An Easy to Build Earth-Sun Simulator for Testing
Reflector Designs
This page covers building a simple mechanical earth/sun simulator
that will allow you to build and test small scale models of reflector
designs and see how they do at various times of the day and year for any
point on the earth. It can be built in a couple hours.
This earth/sun simulator can also be used for modeling shadow
patterns, modeling light on collectors (especially ones of odd shape), modeling
light on home models, shadows of mountains on valleys, ..
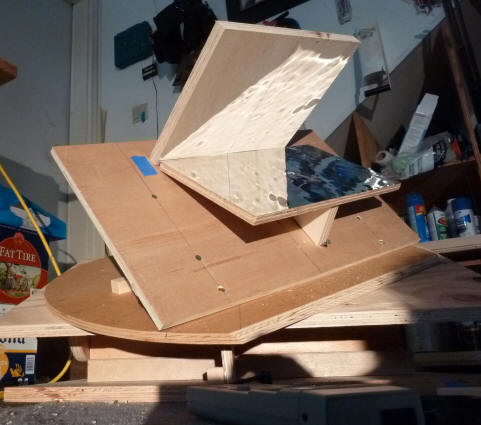
The simulator showing reflector light pattern on a vertical
collector at 3 pm on the
summer solstice.
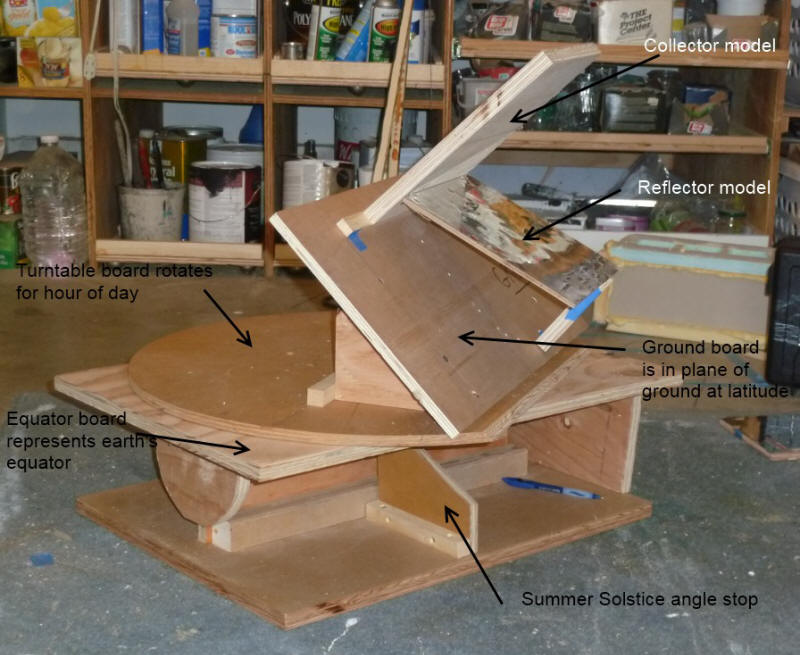
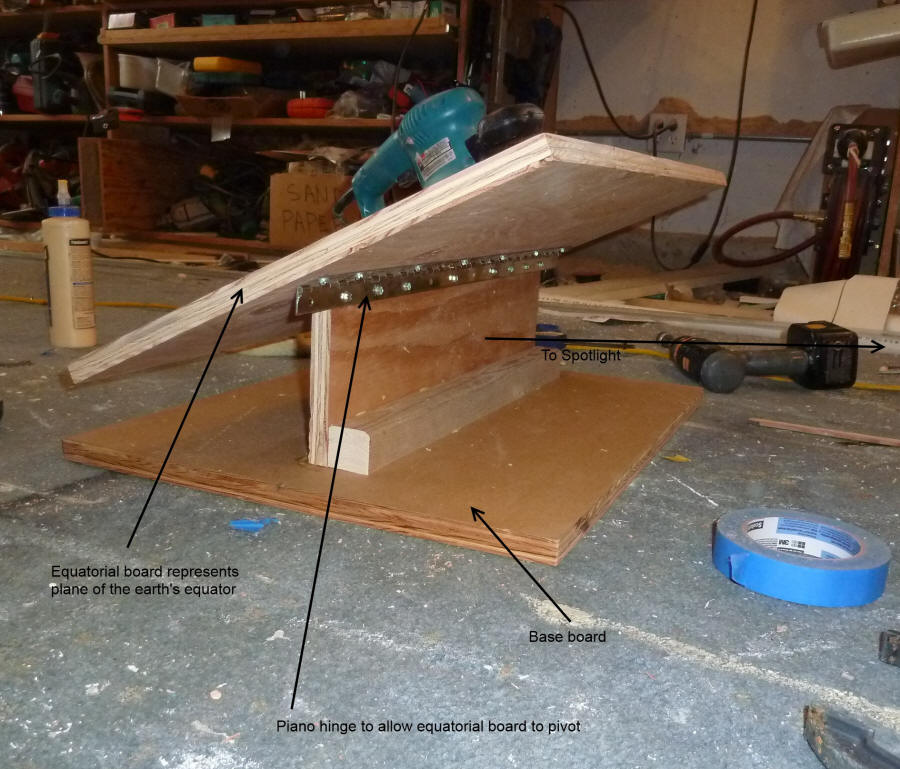
The earth's equatorial plane is represented by the "equator board" (see
picture). The equator board is hinged so that it can tilt through
plus/minus 23.4 degrees to model the tilt of the earth's axis toward or away
from the sun as the earth goes through the seasons (23 degrees toward the sun in
summer, 23 away from sun in winter, and flat at the spring and fall equinox).
The "turntable board" is pinned to the center of the equatorial board and can
be rotated to model the hour of the day. The picture shows the turntable
board at about 2 hours before solar noon.
The "ground board" is mounted to the equatorial board at a tilt of (90 -
latitude) degrees. This board represents the surface of the earth at the
latitude the collector will be located. In the picture, the ground board
is set for a latitude of 45 degrees.
If you are located at latitude 30, then the ground board would be mounted at a
tilt of (90 - 30) = 60 degrees to the equator board.
The sun is represented by a spotlight that remains in a fixed position as the
equator and turntable boards are rotated to model different seasons of the year
and times of the day.
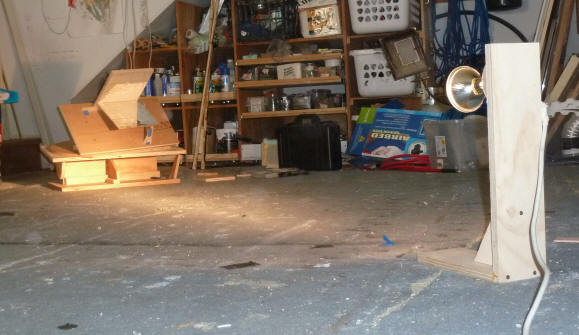
Showing the "sun" spotlight and the simulator.
Normally sun is mounted further away to reduce light angle errors.
I use a 75 watt halogen "spot" light.
The height of the sun should be the same as the height of the middle of the
collector/reflector model. The sun should be aligned with the south or
solar noon axis of the turntable board with the turntable set in the 12 noon
position.
To use the simulator, you mount a scale model of your collector and reflector on ground board.
You then darken the room, and turn on the spot light that acts as the sun. You can easily see
how well your reflector design actually reflects light onto the collector by
varying the tilt of the equator board to represent the different seasons, and by
rotating the turntable board to model the time of day.
Some more pictures of the simulator in use:
In the winter solstice position.
In the equinox position.
From the back toward the sun.
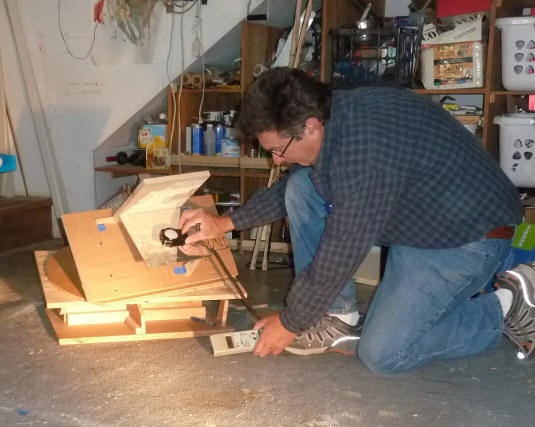
Measuring light levels on reflector,
collector, and ground using
a photographic light meter.
The simulator is very fast and easy to use -- you can go from 2 pm on the summer
solstice to 2pm on the equinox or winter solstice with just one quick hand
movement -- you can easy flip back and forth between different times of day and
times of year in seconds and see how the pattern of light reflected onto the
collector changes. By building the reflector out of aluminized Mylar
cemented onto cardboard, you can try different reflector shapes, orientations
and curves very easily.
Note that this earth/sun simulator could also be used for modeling shadow
patterns, modeling light on collectors (especially ones of odd shape), modeling
light on home models, shadows of mountains on valleys, ...
Light meter readings can be taken on the various surfaces of the model
collector and reflector, and I see no reason why the relative values of these
light light levels would not be in the same ratios of the actual sun light
levels on the corresponding real objects. If these light meter readings
are taken on different test runs, then the exact distance of sun to model must
be duplicated, and things like aging or the sun spotlight and line voltage
variations should be considered.
Building the Simulator
There are no doubt many good ways to build this kind of simulator, but here is what I did.
If you have any improvement suggestions, please send them in.
Make the base and equatorial board
See picture just below.
The equatorial board support should be high enough to allow the
equatorial board to tilt 23 degrees down toward the front and also toward the
back. When the equatorial board is parallel to the base board it is in the
equinox position, when it is tilted 23 degrees down toward the spotlight it is
in the summer solstice position, and when tilted 23 degrees down toward the
back, it is in the winter solstice position.
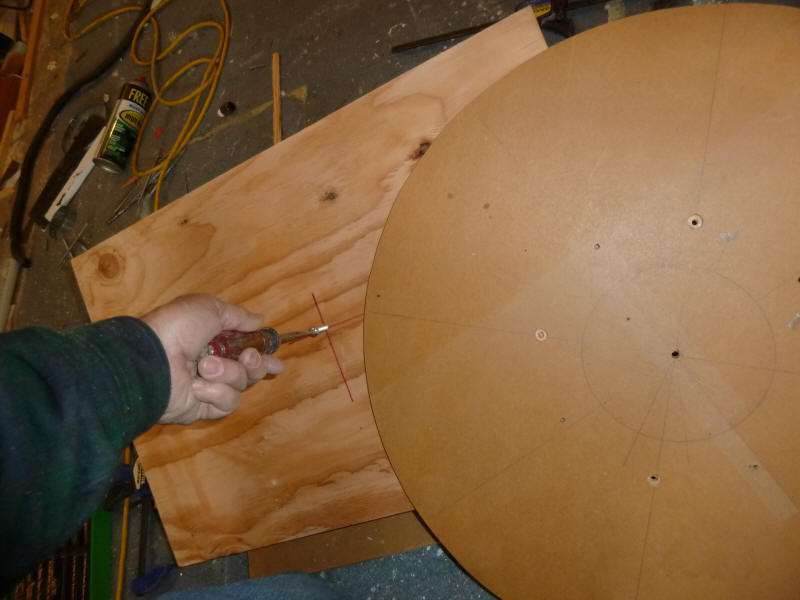
Make the turntable
See the picture just below.
Turntable board is the circular board to right.
It pivots about a bolt that is just threaded into the equator board.
Turntable board mounted in position.
The edge of the turntable board that faces the spotlight is
trimmed off to keep it from shadowing the model when
in the winter solstice position.
Note the 15 degree hour lines on the turntable board -- turning the
turntable board one of these 15 degree increments is one hour.
If you sand and wax the equator board before
installing the turntable board on it, the turntable board
will rotate through the hours more easily.
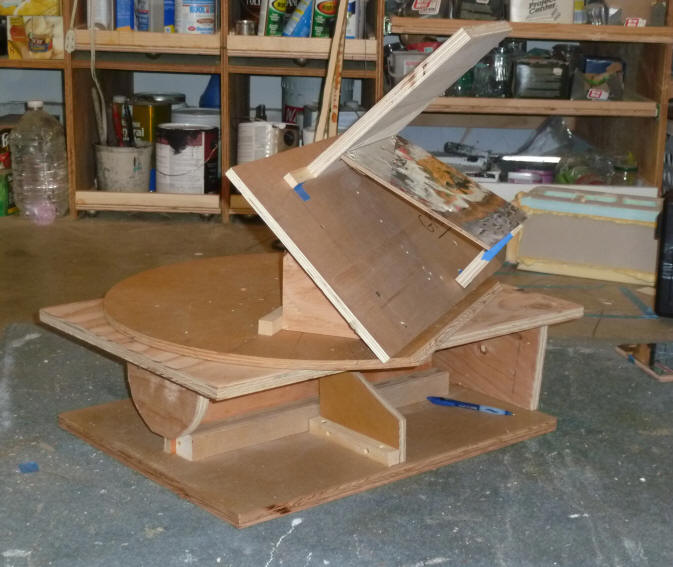
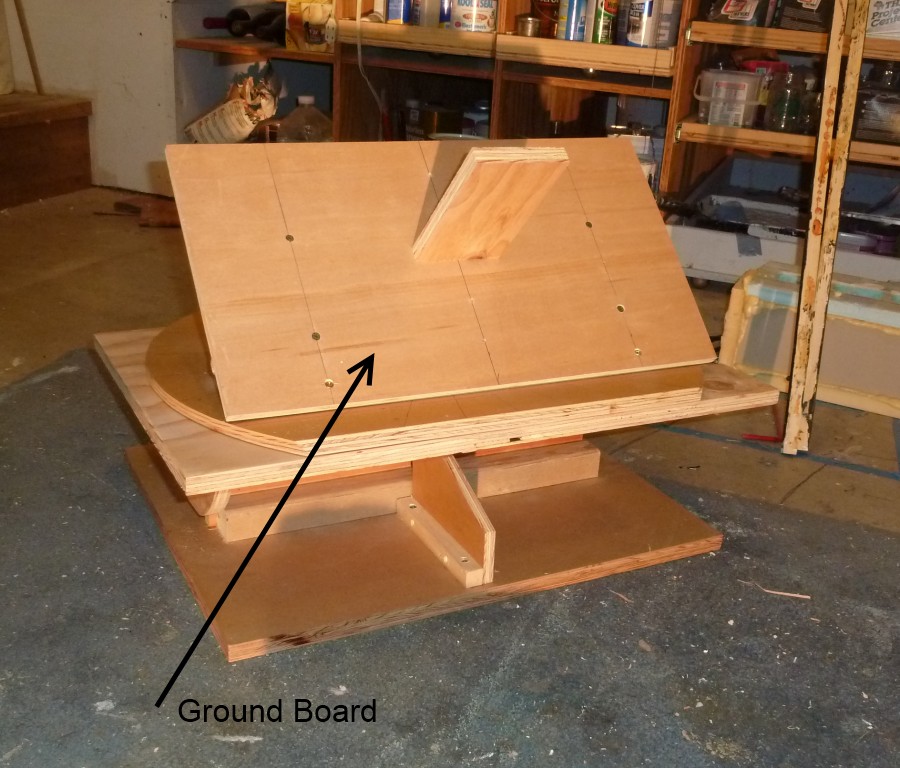
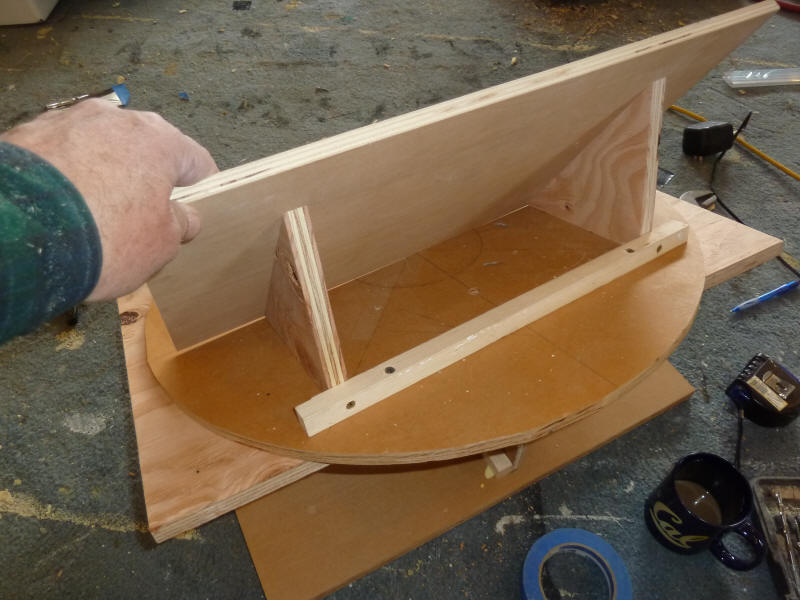
Make the ground board
See the picture just below.
Ground board mounted to the turntable.
The ground board is held at the correct angle by the two
triangular pieces that are cut to an angle of 90 - latitude.
The 1 by 1 along the back just provides a handy way to
screw the ground board to the turntable.
Make the ground board so that it tilts up at an angle of (90 - latitude)
degrees to the turntable. This board will then accurately represent the
ground surface at your latitude. For example, if you live at 40 degrees
latitude, the ground board should be tilted up at 90-40 = 50 degrees from the
ground board. Think about the angle your front yard makes with the
equatorial plane of the earth -- that's the angle you want (assuming your front
yard is not a hill).
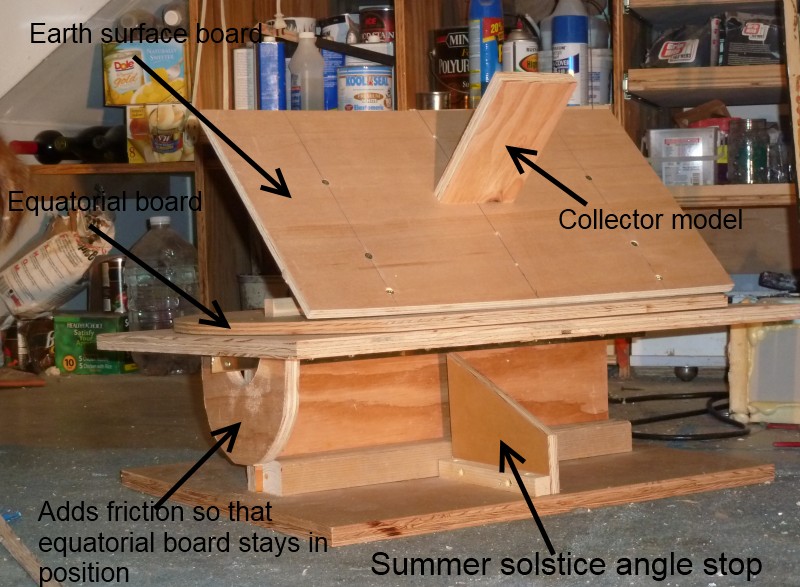
Add the angle stops so that the equatorial board is at the summer solstice
position when against the front angle stop and at the winter solstice when
against the back angle stop. For the equinoxes, I just us wedge piece of
plywood of the right height between the equatorial board and the base.
Assuming you live on earth, the stops will be cut at an angle of 23.4 degrees.
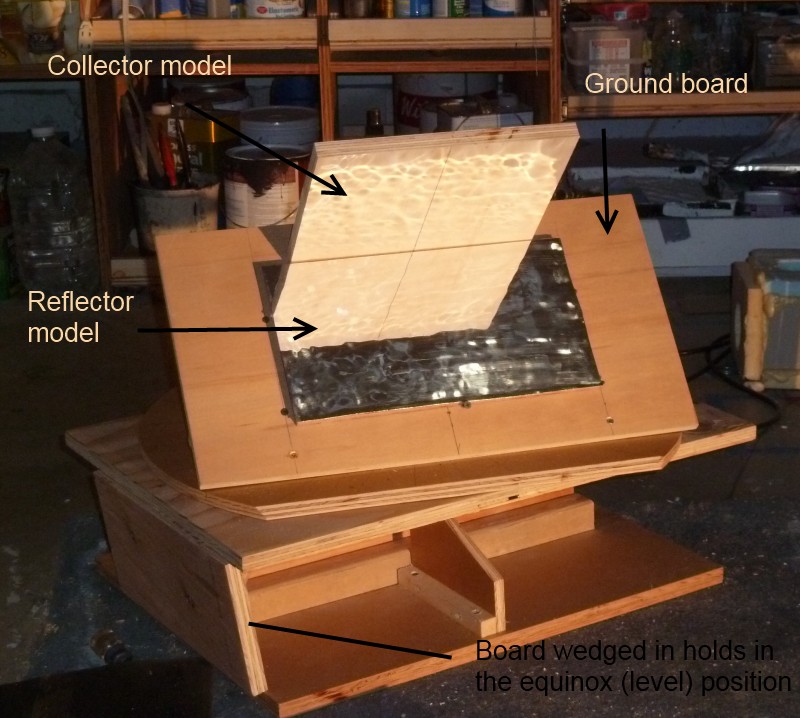
Board wedged in between equator board and base
holds precisely in equinox position.
Setup the spotlight so that it is a good ways away from the model.
Sizes of stuff
You can set up the size of the simulator and the model to about anything you
want or have a large enough shop for. On mine, the diameter of the
turntable is 24 inches. This allows me to have models of collectors and
reflectors that are in the 10 inches tall or wide area. This model size allows
me to work in a scale of about 1 inch per foot compared to the
actual collector and reflector. This seems like a good size to work
with to me in that the models of this size are quick and easy to make out of
plywood or cardboard, but are large enough that you don't have to be overly
fussy to get good accuracy.
Since the spotlight is a lot closer that the 90 million miles our sun sits
away from us, there will be some error in the angle that the light comes from on
some parts of the model. The part of the model that the spot is centered
on will have no error. But, if the spot light is 20 ft away, then a model with
a radius of (say) 5 inches will have a maximum error in the angle of light of
arctan(5/240) = 1 degree -- for most things this is not really a problem.
Some Examples
I will add more examples of using the simulator here as time goes on -- if
you build one, please send pictures of it and how you use it.
The collector modeled in the picture just below is designed to reflect more
light towards the center of the collector. In this way, the full reflected
pattern stays on the collector for a long period of time -- in the case of the
configuration shown below, the full reflected light pattern is on the collector
from 10 am to 2pm solar time. A reflector without the side to side tilt up
would have half of the reflected pattern off the collector by 2 pm.