
Search
The Renewable Energy site for Do-It-Yourselfers
DIY PV System --
Where to Locate The Panels?
|
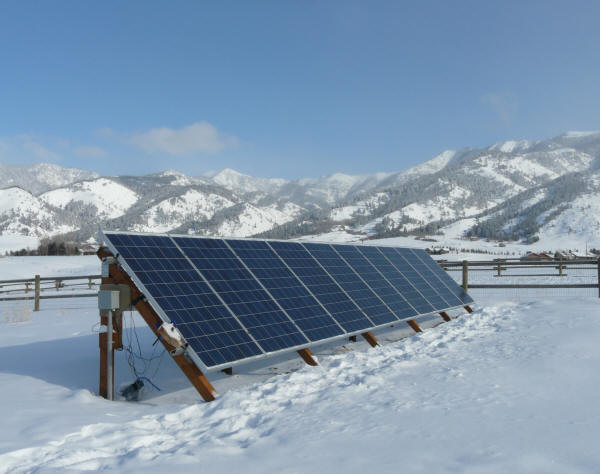
Panels mounted in final position |
|
Back to the PV
System page...
Deciding Where to Put the PV Panels
This section addresses where to
install the PV panels, which direction to aim them, how much to tilt them, and
how determine if they will be shaded by obstacles. Shading by nearby (or
distant) trees, building, mountains, etc. is very important -- PV panels are
very susceptible to shading -- even small amounts of shading can cut
output significantly.
Locating the PV Panels
The first thing to do is to survey
your home/yard for potential locations.
For a PV panels that are fixed in
place (non-tracking), the ideal would be to face them due south, and tilt them
up to an angle equal to the latitude at your location. Ideally the panel
should be located so that it is not shaded from 3 to 4 hours before solar
noon to 3 to4 hours after solar noon. This ideal situation cannot always
be achieved, and some compromises may have to be made -- the idea is to keep the
compromises small.
The most common locations for
residential PV panels are on the roof, or mounted on the ground in the yard.
We had pretty good candidates for
both of these options. The roof location looks like this:
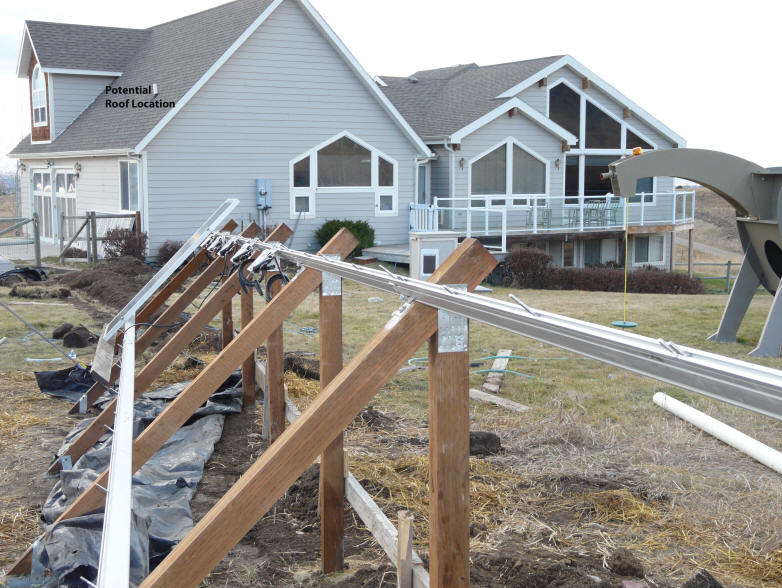
This shows the section of SSE facing roof that we could have used in
relation to the
ground mount location we did use.
This is actually a good roof
location. It is tilted at 45 degrees, which is a very good match to our
latitude of 46 degrees. The roof is pointed about 20 degrees east of due
south, and again this is close enough to south to be fine.
Deviations of a few degrees from ideal tilt or from due south will make very
little difference in yearly system output. For example, here is system
output for our location for various tilt angles.
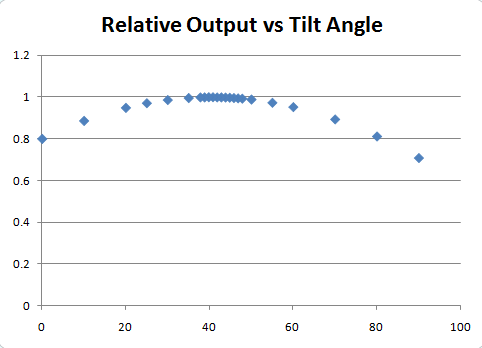
Output changes
only slowly with tilt angle -- you don't
have to be right on the money. Done with PVWatts.
If you are more than a few degrees
off the ideal, then the best way to figure out how much difference it will make
is to run
PVWatts for an ideal orientation and compare the yearly output to your
actual orientation.
Our other location was in the
backyard on the ground.
This is also a good location.
By selecting a good spot in the backyard, we were able to get a due south with
ideal tilt, and very little shading. The only shading we get (see site
survey below) is a little mid winter shading from the mountains to the east
(hard to do anything about that), and a little bit of shading very early in
winter mornings on the first panel from the fence rail.
We ended up selecting the ground
mount in the back yard for the following reasons:
- The roof is 13 years old, and
will require a redo in another 10 to 15 years -- this would require removing
the PV panels, which would be a pain.
- We would like to add a large solar
air heating collector on this part of the roof. While the PV
collectors can be anywhere, its good to have the heating collectors near
what they are heating. The heating collector will supply several times
the energy that the PV system will, so it was important to us to not "use
up" this good location.
- We get a fair amount of snow
during the year, and cleaning snow off the collectors is easier with a
ground mount. This is not a show stopper for roof locations, as you
can just wait for the snow to melt off, or use a long handled "roof rake" to
pull it off. Snow melts off PV panels fairly quickly because the
surface is dark and absorbs heat well.
- Its easier and safer to install
the PV panels on the ground (but not less work -- see below).
- The ground mount provides for
better ventilation of the PV panels, which will make them run cooler.
The cooler they are the more efficient they are.
The ground mount is not perfect --
some of the not so ideal factors for a ground mount:
- You have to build a structure
to mount the panels on. On roof mounts, the rails that the PV panels
mount on can often just be bolted to the existing roof structure.
- Ground mounts usually involve
running the wire underground -- in our case, this involved a 90 ft long 30
inch deep trench.
- Ground mounts use up yard space
you may not have or want to give up.
- While its not an issue here,
ground mounts can be more subject to damage from vandals.
Solar Site Survey
Once you have selected some candidate
locations for the PV panels, It is very important to do a solar site survey before you go ahead
with the system. This is not a step to skip -- it really is VERY
important. Not catching important shading conditions could cripple your
system.
Basically, the site survey will tell
you how much your PV panels will be shaded in the location you have selected.
As mentioned before, PV panels and
arrays are very susceptible to large drops in output with even partial shading.
You can easily do the Site Survey
yourself for free -- I'll go over two good methods below. I used both, and
I think its a good thing to use both. This is not only necessary, but its
fun and you will also learn a lot about those mysterious movements of the sun
all over the sky as the year goes by.
Solar Site Survey Tool
The solar site survey is a simple
process you can go through that will tell you how much your PV panels will be
shaded for any time of the year.
The
Solar Site Survey is explained in
detail here... just follow the directions.
Basically, you download a free
sunchart for your location. The sunchart shows the position of the sun in
the sky for your location for any date and time for the full year -- all on one
8.5 by 11 page! Then you download the free templates to make your
elevation and azimuth measuring tools. Using these tools, you take
sightings around the south horizon, and plot the elevations of the lowest
obstacles on the horizon on the sunchart. Anything below the points
you plot on the sunchart will be times when the panels will be shaded.
This is what the chart looks like for our PV project:
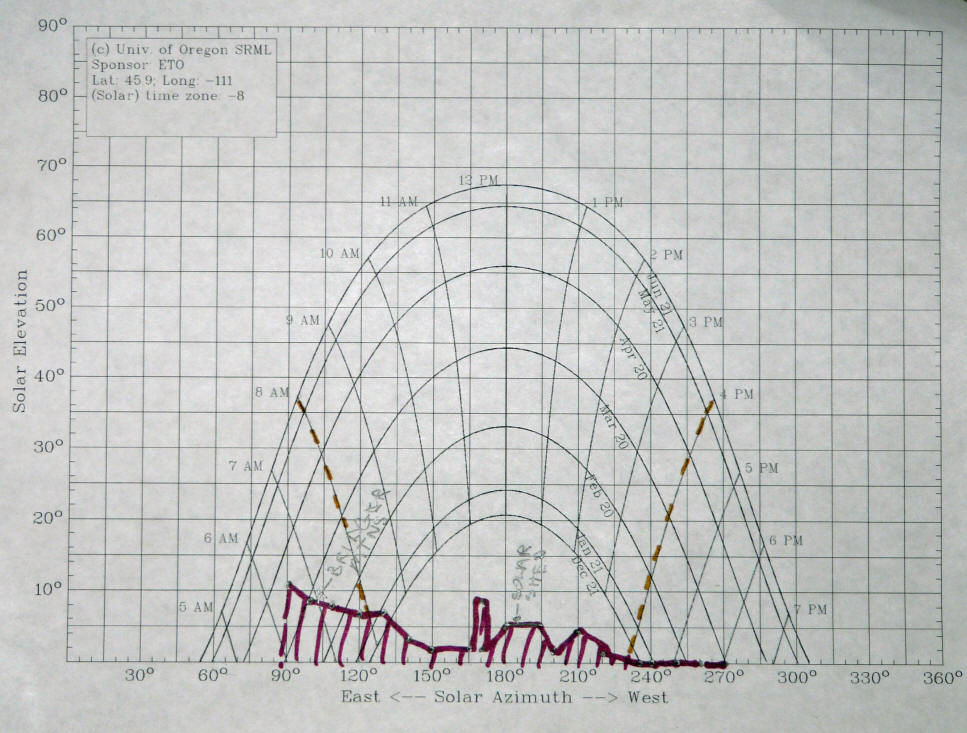
This is the sunchart made from our
site survey. For combinations of solar elevation and azimuth angle below
the violet line, the panels will be in shadow.
The only obstacle that results in any
harmful shade on the panels is the "Bridger Mountains" to the east, and this is
very minor shading.
The spike up to 8 degrees elevation
at azimuth angle 170 is a 15 ft high tree -- while it can grow a fair bit more
without causing problems, I will have to keep and eye on it and trim if
necessary.
Evaluating the chart.
The first thing to look at is the
time period from 3 hours before solar noon to 3 hours after solar noon -- i.e.
from 9am to 3pm solar time.
For our chart, even on Dec 21, the
day of the year when the sun is lowest in the sky, the panels are never in shade
from 9am to 3pm. So, this is good.
The reason that hours earlier than
9am and later 3pm are of of less importance is that the sun makes a larger
incidence angle to the panels, and the greater the incidence angle the less
effective the sun is -- the bulk of your solar energy for panels facing south
will be collected from 9am to 6pm.
In our case, even if the time period
is extended from 8am to 4pm, there is only minor shading for the first few
minutes of the morning in the deep winter. They don't call it Big Sky
country here for nothing :)
If you have a problem with a blockage
early in the morning, you may want to adjust the panels to aim a bit more to the
west of south, so that they will still have a good 6 hours of sun. The
opposite can be done for obstacles in the late afternoon. You should aim
to get 6 hours of good sun exposure without shadowing that is roughly centered
around the middle of the day.
Note that for tracking systems that
move the panels to follow the sun, the shading should be looked at for the full
span of time between sunrise and sunset, since the PV panels will always be
facing the sun.
Note also that the Solar Site Survey
method does not easily catch very nearby obstacles like the fence rails that are
only 4 ft away from the panels. For these obstacles, either the SketchUp
method (below) or a mockup (below) should be used.
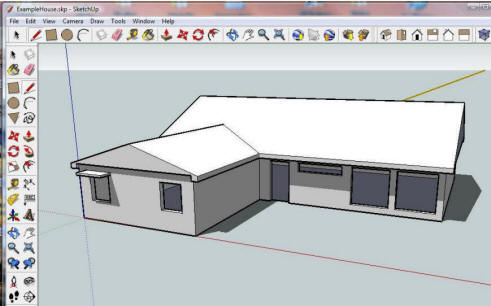
SketchUp Method
SketchUp is a free 3D drawing
and modeling tool that is offered by Google. It allows you to model the PV
panels as well as anything that might shade the panels. Once
you have modeled the geometry, you activate SketchUp's built in sun, and it
allows you to "play" the sun over the model for any date in the year. In
this way, you can directly see when the panels are shaded and by what.
This is
an
example of using SketchUp that I did earlier -- it has the whole "how to" on
using SketchUp and the SketchUp sun....
The SketchUp example showing shadows.
The picture below shows the simple
model I did for our backyard ground mount. It only models the "Solar Shed"
building and the fence, which are the only two nearby obstacles that can shade
the panels.
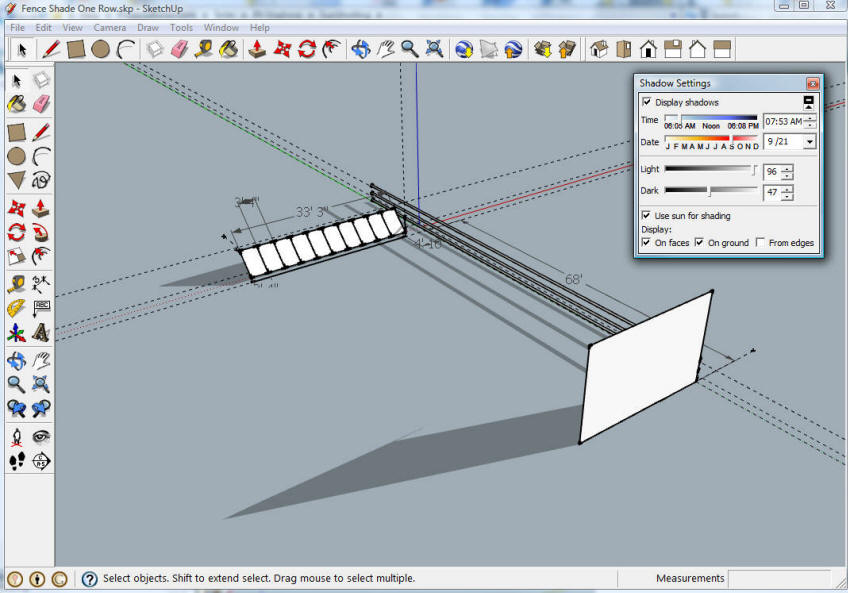
This is the model of the PV panels,
the fence, and a vertical wall representing the Solar Shed. This let me
establish 1) the minimum distance from the shed to the panels so that the shed
would never shade the panels, and 2) that there would be some shading from the
fence rail of the end two panels, but only very early in the morning for part of
the year. The "Shadow Settings" window in SketchUp allows you to play the
sun over the model for any day of the year. Rather than modeling the
entire Solar Shed, I just put in a "wall" that is as high as the roof ridge on
the shed, and as wide as the shed.
Before you start using the sun tool
in SketchUp be sure to select a city near you from the list -- otherwise you will be getting the
sun for Boulder, CO, which is where the SketchUp people live. You can also
just enter the latitude and longitude of your location.
I did not model the mountains to the
east, but this can be done by taking the elevation angles measured in the Solar
Site Survey above, and putting a distant wall type obstacle quite a ways away
and having the same elevation angle.
Since its so critical to get this
right, I would go through both the Solar Site Survey and the SketchUp method and
compare the results.
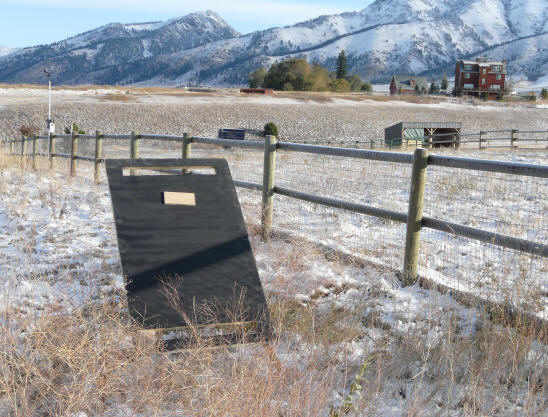
Just because you can't be too careful about this issue of understanding what
is going to shade your panels, I put up a mockup of the end panel to
confirm exactly
how the fence rail was going to shadow it.
The end result for our system is that
shading would have essentially no effect on the output of the system. But,
we live in a very open area -- most areas will not be so lucky, and it may be
necessary to pick the best compromise in the mounting position and aiming of the
panels to get the best window of unshaded sun that you can. In some cases,
the shading may be bad enough that it just does not pay to put in the system.
Even if you have the system installed professionally, this is an issue you
should understand very well, and you should insist that the installer show you
exactly how he/she evaluated the effect of shading. There are lots of
other ways to save electricity, so, it makes no sense to put up a PV system that
will have its output severely cut by shading.
Gary November 20, 2009