
Search
The Renewable Energy site for Do-It-Yourselfers
Bob's Insulated
Horse Tank
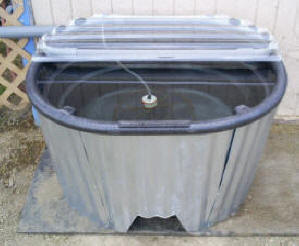
This is an insulated horse watering
tank sent in by Bob. I think it will show a very good reduction in energy
used to keep the tank water unfrozen.
Bob reports that the horses are
drinking out the tank with no problem.
Thanks very much to Bob for sending
this in!
Description from Bob:
I started with a 70 gallon Rubbermaid
dark plastic stock tank, then used corrugated galvanized metal panels
approximately 2 feet wide, cut with shears to form siding for the stock tank.
This was fit into the curled lip of the tank and held off at the bottom of the
tank with sections of 2 inch thick rigid foam insulation glued to the tank with
spray adhesive. (Note that the siding panels are not vertical because the tank
is narrower at the bottom than the top). A cord was used to hold the panels in
place while they are screwed together near what will become the bottom with
sheet metal screws. Then the space between the tank and the metal was filled
with expanding foam of the type available in cans at home supply stores. After
the foam cures, it forms an adhesive bond so no fasteners are required to hold
the metal to the tank (which would be a leak risk). A cutout was provided for
access to the tank drain, and its edges were turned over for safety of horses
and people.
Finally a half-cover was made using 1 inch grey non-metallic (PVC) electrical
conduit as a frame with a piece of clear polycarbonate corrugated sheet screwed
to it. The conduit was chosen over PVC plumbing pipe because of its UV
resistance. It was formed to the required shape by bending after heating with a
paint stripper hot air gun. (Metal conduit could be used if you are skilled at
bending it.) A simple hinge was made with heavy gauge galvanized wire and hold
downs were added with small lengths of light chain, 1/4"-20 bolts and threaded
inserts in the lip of the tank. This prevents the wind or the horses from
lifting the cover. Caulk and foam was used to make a fair seal of the
polycarbonate to the frame and to the tank.
|
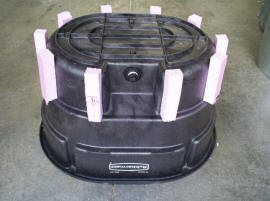
Insulated standoffs on Rubbermaid
container. |
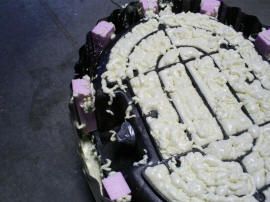
After first layer of foam. |
|
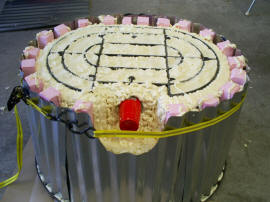
After 2nd layer of foam
|
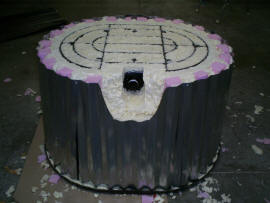
After final layer of foam. |
With the cover down, the horses can still access the water in the open half, but
sunlight can warm the dark tank through the clear cover. It also reduces wind
heat loss, evaporative heat loss, and perhaps some radiated loss at night. The
covered half was placed toward the north. An electric heater was also provided,
and the cover helps to discourage the horses from playing with it. In our
location we were also able to place the tank against a south wall of the barn,
further reducing wind loss and taking advantage of a warmer microclimate.
|
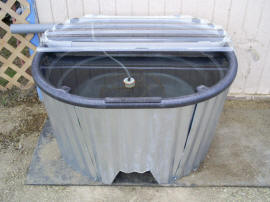
Finished tank with insulation
and partial lid that still
allows horses to drink. |
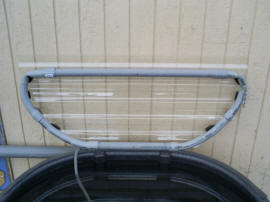
Detail of the hinged lid. |
Lessons Learned:
-
The foam was tedious and messy to
install, requiring about 8 cans of the maximum expansion type and allowing
overnight curing between each can to avoid too much pressure distorting the
tank. In order to reach the remote areas, extra 1/2" vinyl tubing was used
to extend the nozzle, with a piece of wire taped to it as a stiffener. At
one point the tubing blew off and I got foam all over my clothing and arms.
So safety goggles, gloves and old clothing are a must.
-
Next time I would consider using
foam only at the top and bottom, and substituting packing peanuts or broken
up pieces of rigid foam for the bulk of the insulation.
-
I would install the corrugated
metal panels in such a way as to maintain the alignment of the corrugations
between panels to avoid exposed edges. This requires making curved cuts of
the panels at the top and bottom, because the panels are not vertical unless
one allows excessive space between the panels and the bottom of the tank.
-
The clear half-cover gets covered
with dust and bits of feed from the horses. We spray it off each time we
fill the tank.
We will see how far into winter we can go without using the heater at all.
Even after we need to use it I'm sure the energy usage will be greatly
reduced. Unfortunately I won't be able to quantify it since I don't have a
way to monitor it at this exposed location.
Regards,
Bob
October 21, 2008


