Search
The Renewable Energy site for Do-It-Yourselfers
Paul's
House Heating -- Solar Shed
Paul M. in Nova Scotia, Canada is building
the solar heating system shown below. In Paul's system, the collectors are
mounted on a new storage shed that he is building, and the water heated by the
collectors is piped to a thermal storage tank inside the nearby house, where it
is then used for heating domestic water, and potentially for space heating soon.
Paul's system is similar to the one I
am building for my house, and we have been exchanging ideas for several months
on doing various parts of the job. I'd like to really thank Paul for
taking the time to provide the detailed photos and descriptions below!
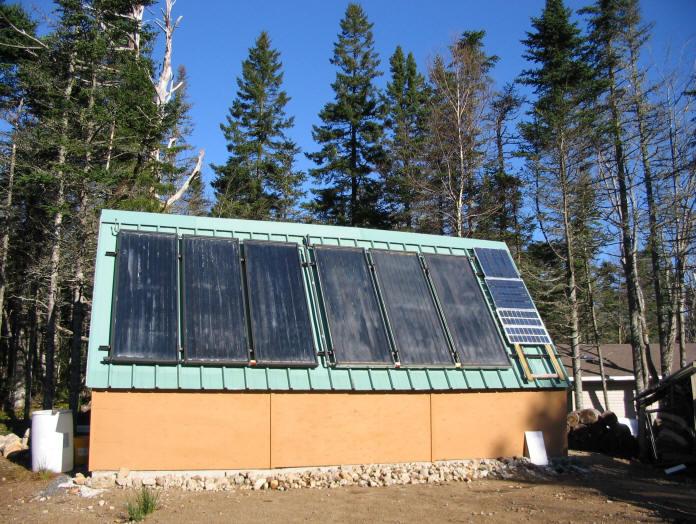
The finished Solar
Shed
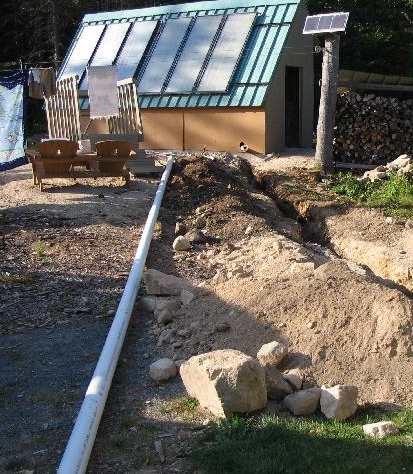
While under
construction -- showing pipe line from shed to house
Overview of the new shed with the
solar collectors mounted. The ditch for the pipe that brings the heated
water to the house is also visible. The storage tank, heat exchangers and
pump are located in the house.
This is a closed loop system with
antifreeze to prevent freezing.
One thing to note is that by making
some good decisions and looking around for bargains, Paul managed to build a
complete system with substantial heating capability for hundreds of dollars
rather than thousands of dollars.
Directory:
The Solar Shed
Paul decided to mount his solar
collectors on the new storage shed he was building. The collectors are
then connected to the house via a pipe line to transfer the hot water to the
house for water or space heating. This method has
some
advantages over trying to find a space on your home for the collectors.
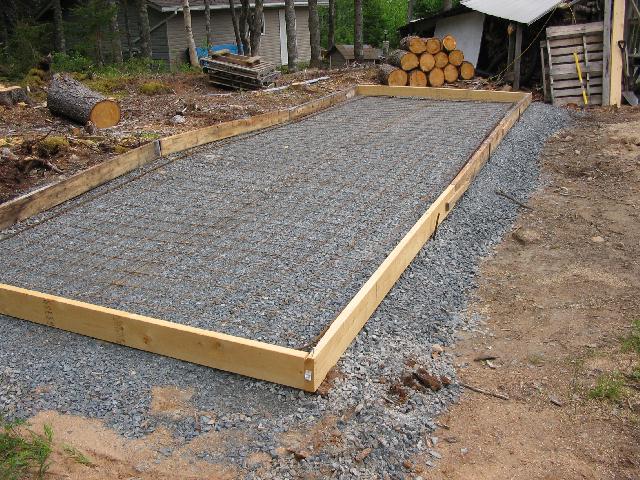
Gravel base:
The gravel base was the first step after the ground was leveled as well as an
excavator could scratch the bed rock which came up to the surface. Originally I
thought I would get away with deck blocks or cement columns in the ground but a
shed of this size requires a good solid base so I went with $60 for the
excavator and $150 for gravel then $200 for concrete. It also involved another
$80 for wire mesh and rebar before pouring the concrete. (24 X 8 feet)
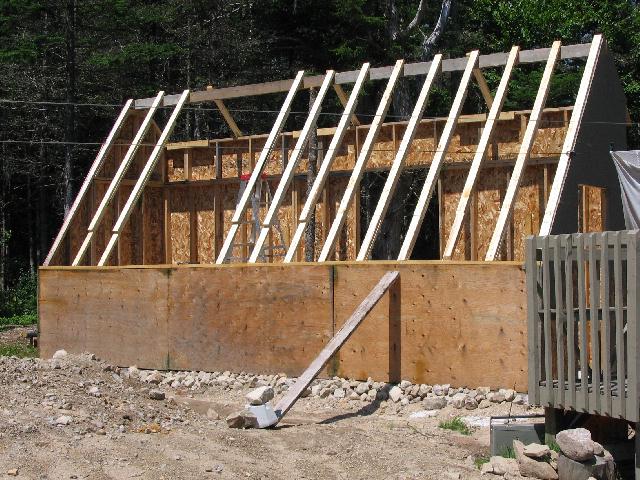
Framing:
Another picture of the roof without the strapping
on.
Framing;
The framing took a lot of 2x4s. There is a beam
along the peak made of two 2x6s supported by a post and the rafters on the
long roof side are made of doubled 10 foot 2x4s. Each 3x8 foot panels weights
about 100 pounds when filled with water. The horizontal boards are deck
flooring used as strapping. They are 1x4 inches. The metal roof screwed into
this.
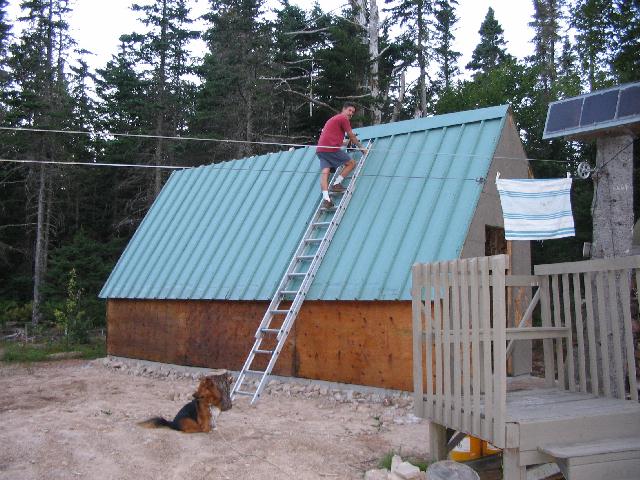
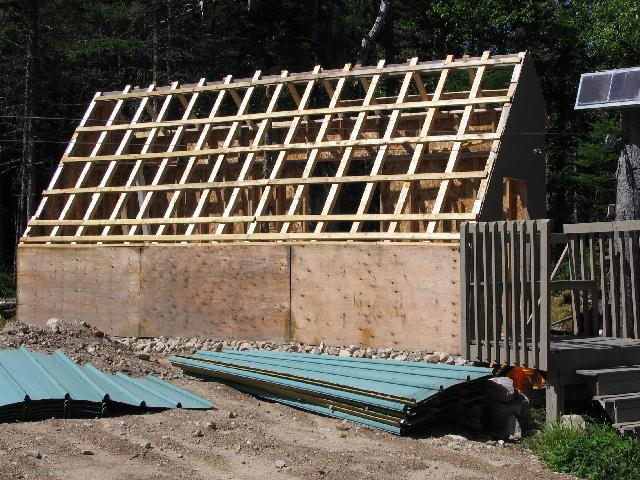
Me on roof:
At this point I was screwing the peak of the metal roof on. This roof was used
and was just taken off a large church. It is 24 gauge steel which is strong
compared to the usual 30 gauge used for common residential roofs. It was heavy
to put on (my wife helped me). It was $250 compared to $500 for new 30 gauge
roofing .
The
Collectors
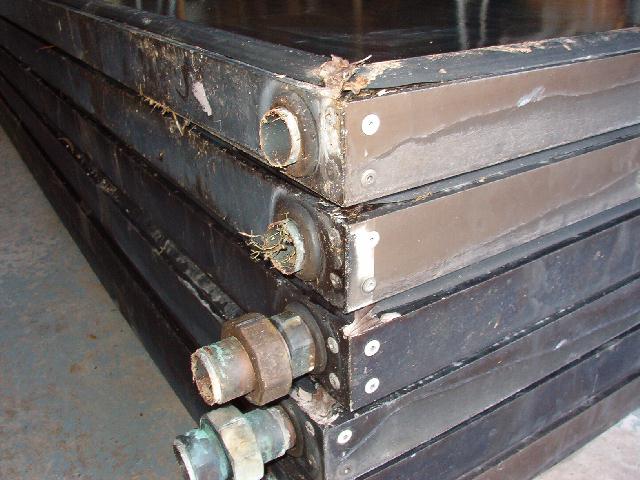
The used Collectors:
The panels were quite used when I got them, about 15 years old but in good
shape. The major problem was the roofers who removed them cut the end of the
manifold pipes off. I did manage to clean them and get enough pipe sticking out
to resolder the threaded unions back on. I bought 12 panels for $65each (my
friend took 6 of them)
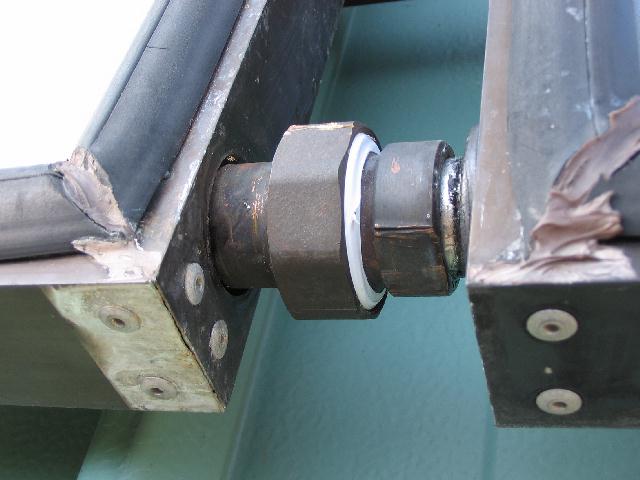
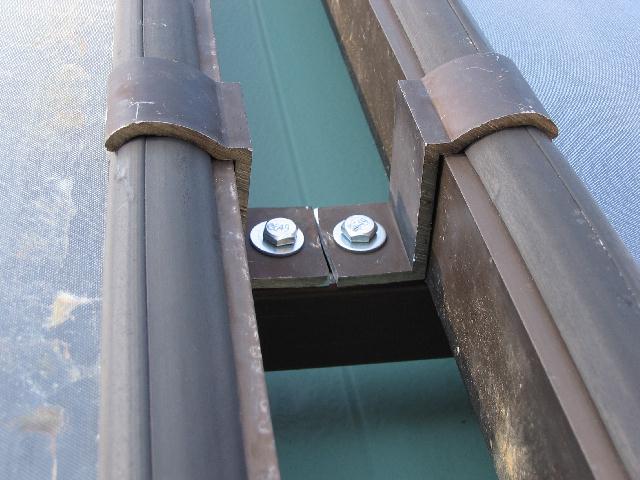
Panel fittings:
The panels were designed with these threaded unions which I don't really prefer.
They are difficult to get water tight unless they are new. I polished these with
sandpaper and still had leaks. I ended up using a lot of Teflon tape and silicon
caulking inside the union. Plumbers say you shouldn't need anything to seal
them. I called the company that makes these panels and they said the only time
there is a problem is if the unions are over tightened with a pipe wrench and
become out of round. I know that did happen to one.
Fittings;
These are the threaded unions between the panels.
A lot of Teflon tape and silicon caulking made them leak proof.

Mounting rails:
The panels need a good solid mounting which can allow for adjusting the position
of each panel. This style of "truss" uses a nut which fits into the slot and can
slide inside the channel. Once it's tightened it doesn't move. This way the
threaded unions can be brought together and tightened or loosened and pulled
apart for maintenance.
Panels clamps;
These are the original clamps that were salvaged
from the roof they were taken from. They are shaped to fit on the rubber
gasket near the glass edge.
Air Vent;
There are two manual air vents at the top of the
panels to allow air collected at the top to escape. It's just like a tire
valve. I will go up about once a month to check for accumulated air.
The Pipe Line
This pipe line circulates water through the collectors, and back to the
house where it is used for water and space heating.
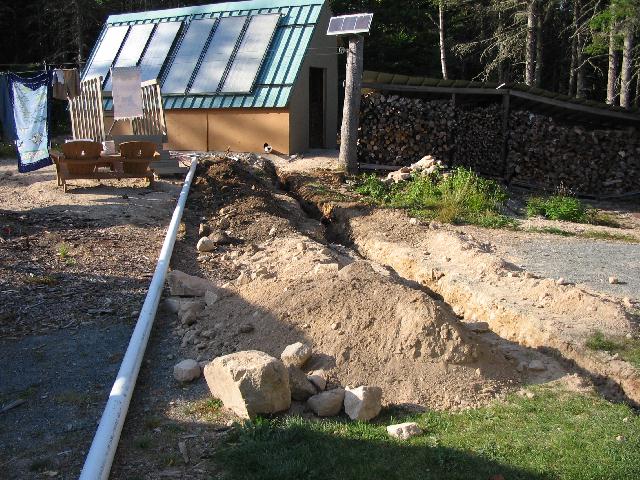
Pipe line;
The pipe line trench is only 15-18 inches deep.
(those rocks must have been fun)
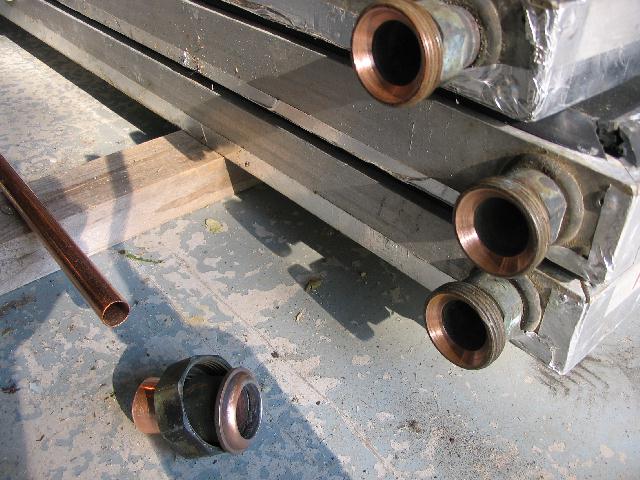
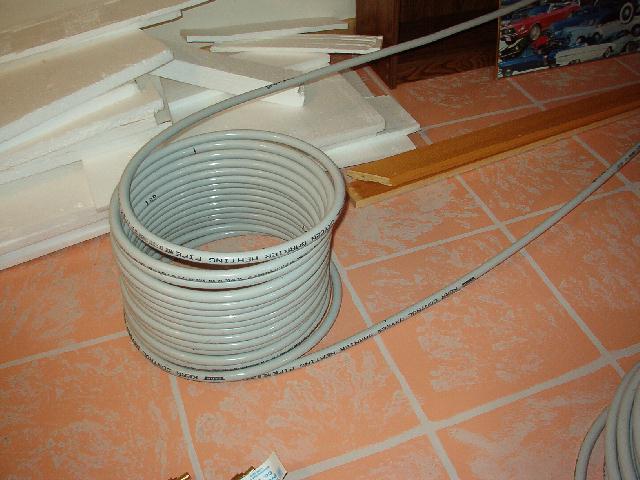
Pipe insulation;
The white or clear pex pipe was given to me so I
used it. It is 5/8 inch. Because pex can't handle the higher temps it is used
for the return line to the panels. It's cooled by the heat exchanger in the
tank and shouldn't exceed 160-180F. The other copper line is half inch. It
will be the hotter line from the panels to the tank. I didn't know if the grey
insulation can handle the possible 200 plus temps so I insulated first with
insulating foil tape then put on the foam.
The ground is hard and sandy, good to support the pipe.
Because I'm using antifreeze the frost and cold in the winter won't be a
concern.
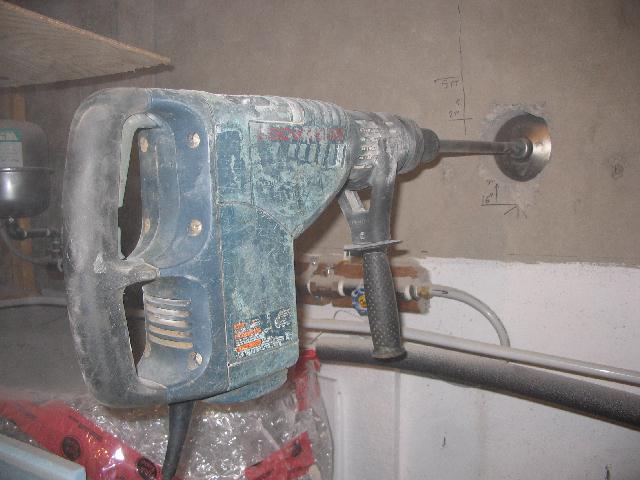
Cement drill;
This huge drill was rented from Home Depot. It
weighs about 15 lbs and the tip is for a 5 inch hole. The pipe is a 4 inch
septic pipe. The extra inch is for inaccuracies in the hole angle. With a 4
inch drill the hole would have to be perfectly straight. It took about
20minutes to drill the hole.
The Tank, Heat
Exchangers and Plumbing
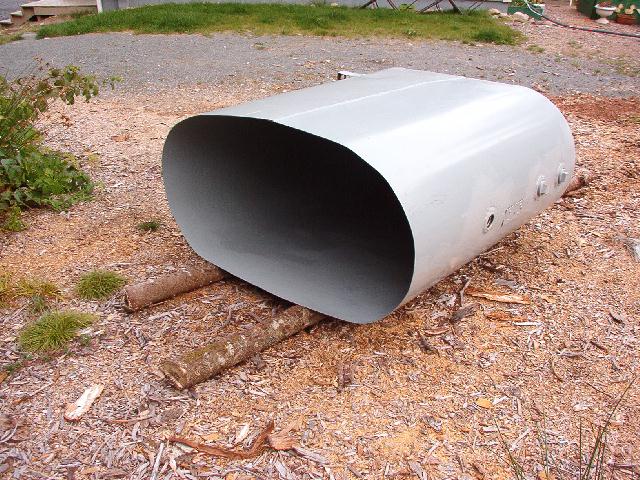
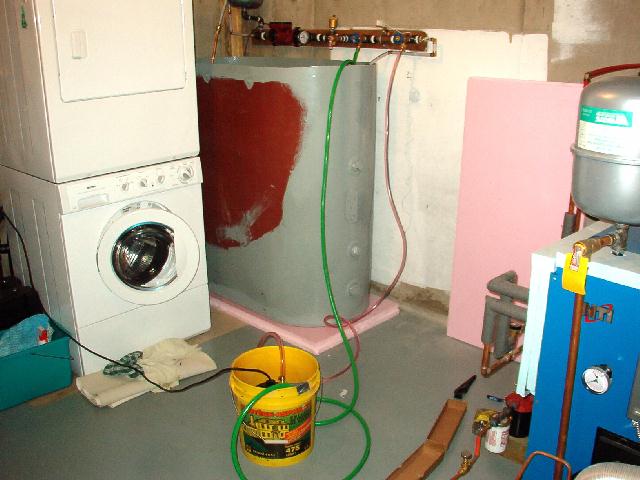
Furnace oil tank:
This tank turned out to be the cheapest (free) and the fastest to have complete
for the project. I used a reciprocating saw, cut one end off, painted it and
carried it down my basement with help from a friend. It holds about 150 gal. It
is a 200gal tank in it's original state. With the top cut off it's easy access
to plumbing like heat exchanger coils dropped down into the water.
Pex coil:
The heat exchanger was first made from 50ft of half inch PEX plastic pipe with
the metal oxygen barrier which makes it keep it's shape when bent. It's a bad
idea. Very poor heat transfer into the water. It didn't heat the water in the
tank or cool the water in the coil of pipe. So, I made a 100ft coil of copper
half inch tubing about one foot in diameter and it is much better.
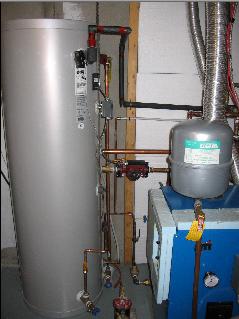
Tank in the corner
Here you can see how well the tank fits in the
corner of the basement. It holds 150 gal. The circulator, pressure
tank, pressure gauge and fill/drain valves are all here.Filling
the System:
For filling the system with antifreeze I used a common 1/6HP submersible sump
pump. The pump sucks the antifreeze from the bucket. Pumps it into the fill
valve through a clear hose (in the picture it's red) As the system fills it
comes out of the drain line which is a green garden hose. While it's filling I
watch for a steady flow with no bubbles coming from the drain line. Once the
steady flow comes I close the valves. At this point it should be full with no
air. The pump will circulate easily now.
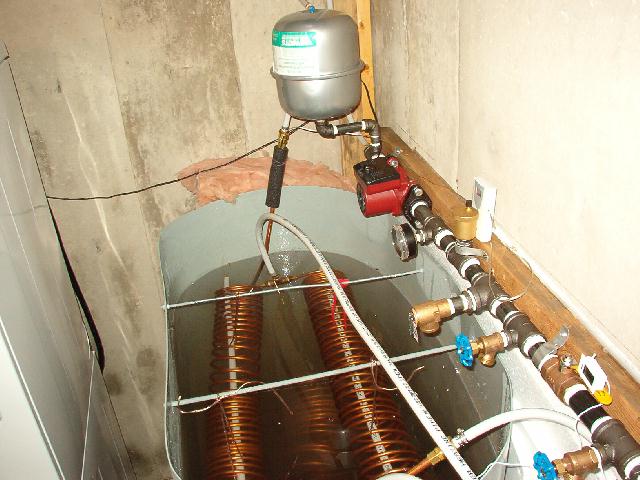
Tank and Heat Exchangers:
This photo shows the top of the tank. The output
coils are visible near the top of the water and the rest of the plumbing. The
circulator pump should be mounted in a vertical pipe not in a horizontal one
as this because the air bubbles can get stuck in the pipe and the pump may
loose it's prime and stop pumping.The top two 3/8 inch coils are
50ft each connected together to give the equivalent of 100 ft. At the time I
couldn't get it in 100ft lengths. These are output to domestic water. The
larger coil (harder to see in the bottom) is 100ft of half inch tubing is the
heat supply from the panels. This is at the bottom because the hot water will
rise to the top where the output coils are. Domestic hot water is
pre-heated heated in a single pass through the 100 ft coil before it goes on
to the regular hot water tank. See diagram below.
Some space heating is also provided via radiation from the bare metal
storage tank into the room. Paul will probably work out a way to
hook the solar heating system into his existing radiant floor heating
system for the next heating season.

System diagram
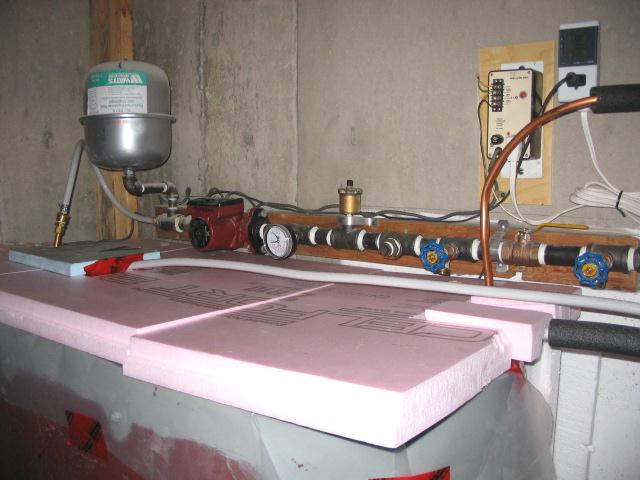
Tank with insulating cover.
Plumbing system and control electronics on the wall.
The pump is a 3 speed Gundfos 15-58U.
Controls and Instrumentation

Controls for the system.
The HI unit is a differential
controller that turn the collector circulation pump on when the collector
temperature exceeds the storage tank temperature by a set margin.
The EM100 measures power consumption,
and also records the pump on time, which accumulates the total time the
collectors were collecting useful heat. The cost was only $25
Canadian.
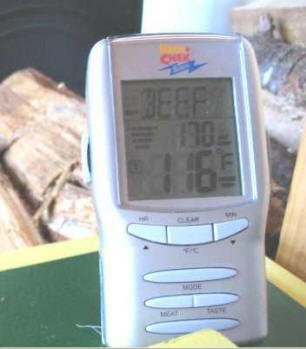
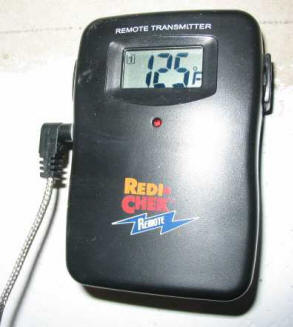
As another bit of instrumentation,
Paul uses this remote sensing cooking thermometer to monitor the storage tank
temperature. Using this, you can monitor the tank temperature from up to
100 ft away. The cooking thermometers are good for this, in that they
register up to 400F -- much more than the usual thermometers.
About $50.
Additional Notes
Space Heating:
Right now the system provides water
heating, and some space just via radiation from the metal storage tank.
Paul is thinking about tying this into his radiant floor heating system for next
year. The system would appear to have enough collector area to make this
worthwhile.
Results to Date:
As for results, After a full sun day
the water goes from about 100F in the morning to 160F by 5pm. This is about six
and a half hours of sun. We washed dishes in the kitchen and filled our
whirlpool tub half way with HOT water. There was still lots more. The tank still
showed 125F.
Without insulation on one side of the tank I loose about 10F over night and
another 10F through the day without using water. Which isn't bad because another
partly sunny day brings it back up another 30-40F.
Note: the 20F total loss from the
150 gal (1245 lb) tank would indicate that the tank is providing space heating
to the tune of about: (1245 lb)(20F) (1.0 BTU/lb-F) = 25000 BTU per day
just from the tank losses to the room.
---
Paul and Gary 10/15/06