Search
The Renewable Energy site for Do-It-Yourselfers
Heated Water Trough
for Livestock -- Using the Sun
Here's an interesting project that I took on this month. With winter coming, and
water troughs needing heat to stay thawed, I've put up with exposed steel
troughs long enough. Why these things don't just come from the manufacturer with
insulation wraps is a mystery to me. Three years ago, I built an insulated box
for a water trough, and it is still effective. Now that we have more horses, we
need more water troughs. Into the old water trough, I never built into it
provisions for putting in insulation. I decided that the second cover would be
better and have insulation.
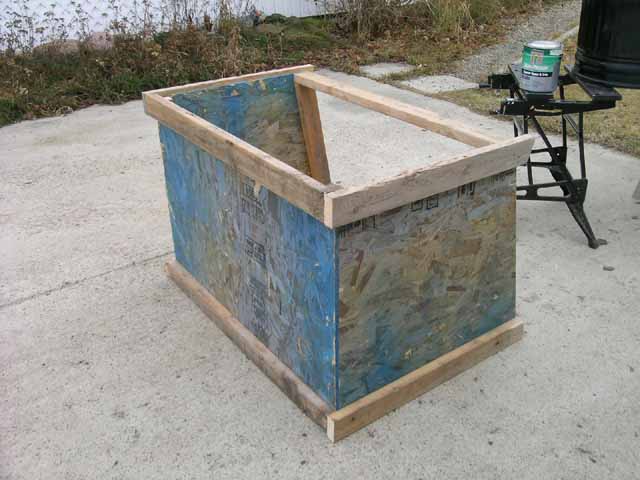
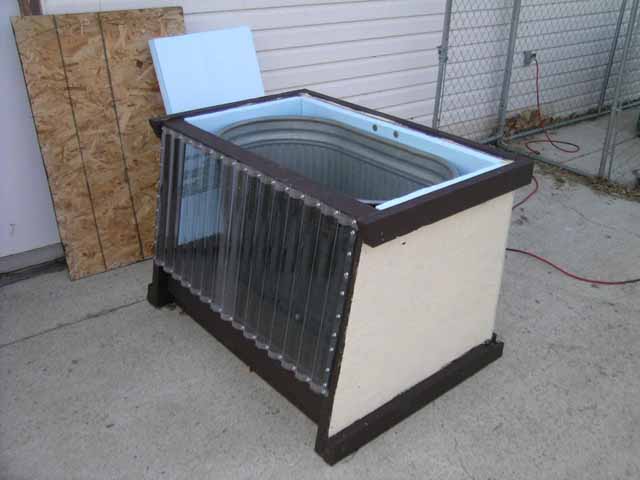
To insulate mine, I had plenty of particle-board and 2x4's lying around, so
building a box to cover the trough was easy. I built this carefully, however, to
ensure room for the insulation and not much wasted space around the trough
walls.
To capture some heat from the sun, I found a great idea from Build-It-Solar, and
added a solar collector to one side. In that design, the water was held in by
walls of plywood, lined with plastic pool-wrap. It is very efficient from the
point of view of insulation, but it wouldn't survive the rigors of Alberta's
winters. I needed a different way to build this water trough. Ruggedness is
essential, because horses are like little bulldozers with teeth. Leaving a solar
collector within reach of their hooves invites disaster. And if it isn't
possible to throw in a floating water heater on seriously cold days, then
there's no point in doing this project. A solar collector will not melt water
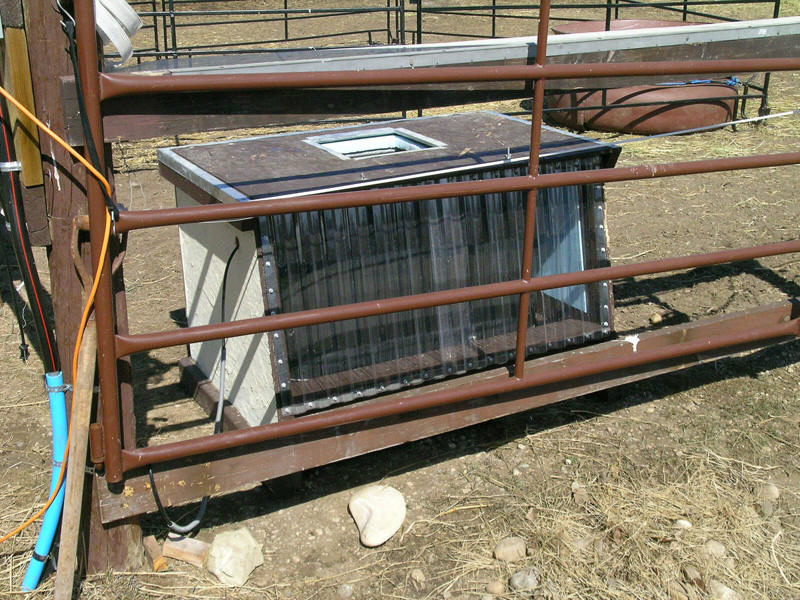
when it's -30 overnight! Using a metal trough to hold the water was essential.
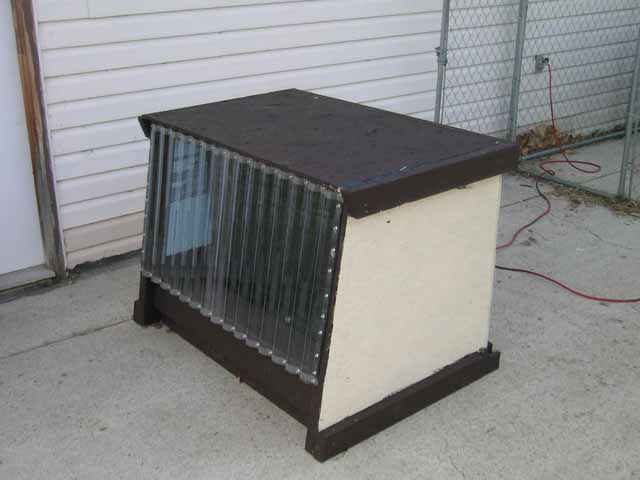
Here is the steel tank, a pretty typical 4' foot long oval trough.
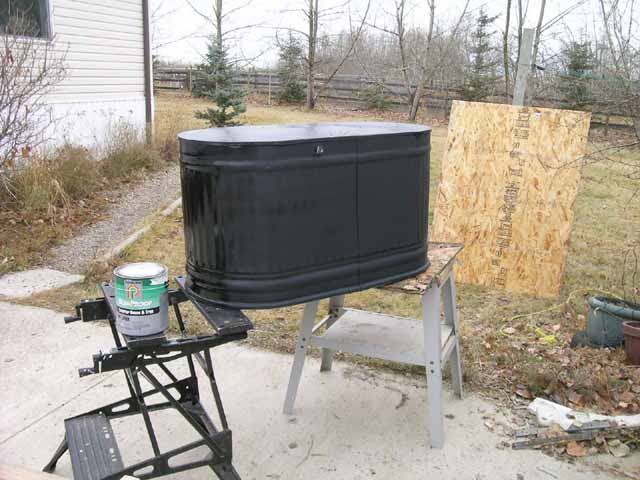
For the solar collector to heat the water, the sunlight must be absorbed
efficiently. I painted the water trough black. It turned out that the black
paint was glossy, but I had a bit of matte left in a spray can, so I lightly
sprayed that on the side that would be in the sun. Sun entering the clear panel
hits the black metal water tank and passively warms the water. At the time, I
had no idea how strong the effect would be. Now that it's complete, I can feel
the effect when putting my hand under the lid.
So far, I used only left-over materials from other projects (building a new
barn, tearing down an old one, etc.). When it came to covering the solar
collector, I had some translucent panel materials, which also happened to fit
perfectly. Looking at them realistically, though, I realized that the fiberglass
panels would not let much light through directly to the trough. A lot of energy
would be absorbed into the fiberglass sheets themselves, defeating the purpose.
I went to the hardware store and picked up a clear corrugated polycarbonate
sheet (called "Suntuf"). It was easy to work with, and is very transparent.
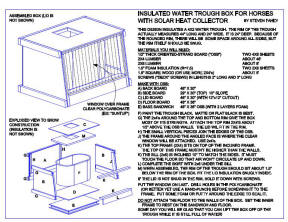
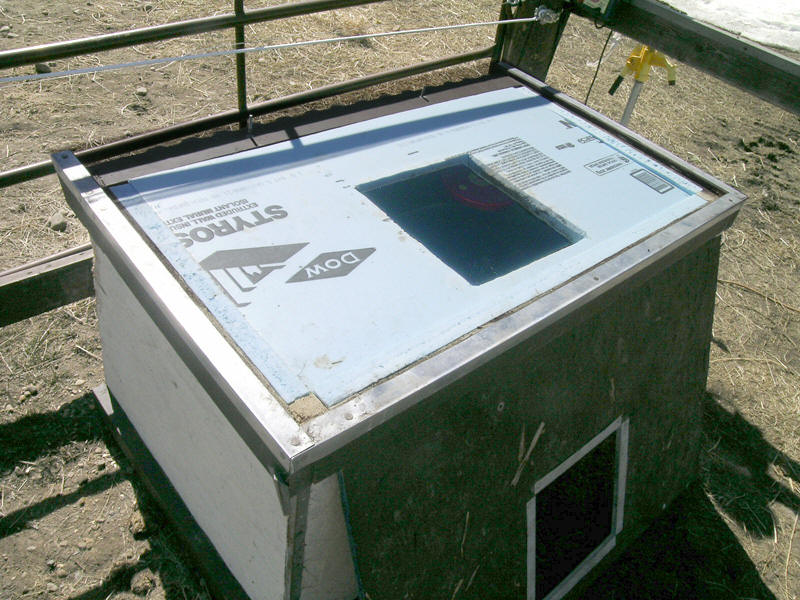
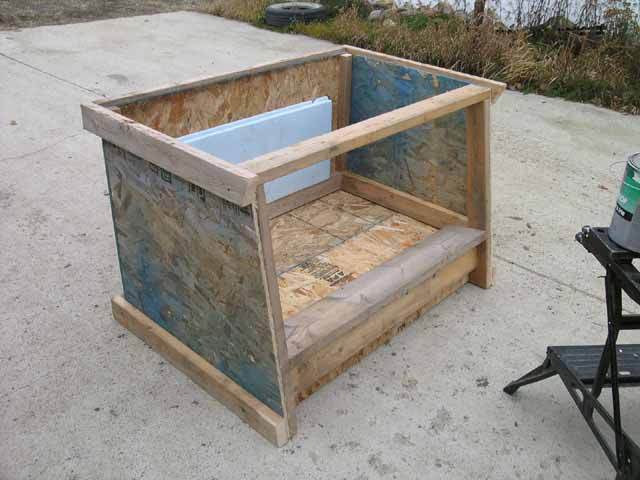
I packed foam insulation into the walls, including making an insulated base with
a sandwich of plywood and foam insulation. The insulation in the walls is R=7.5,
and the double thickness in the bottom would be about R=15. Insulation on top of
the trough does two things. First, obviously, insulates the water from radiating
heat from the top surface. Second, the top sheet of insulation blocks air
circulation between the sun collector area and the air above the water. Why does
this matter?
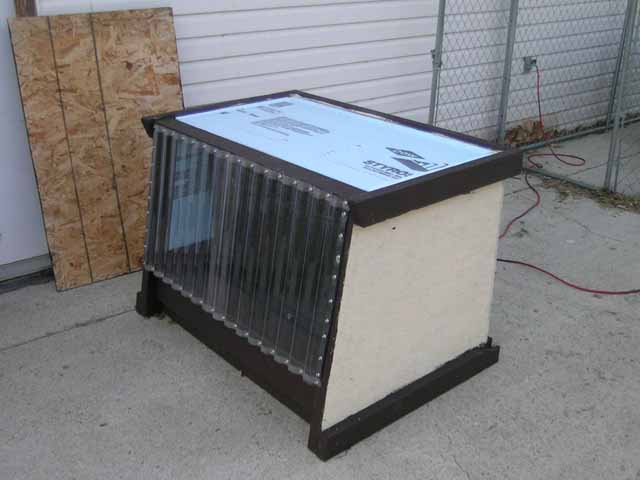
Because you have to cut a hole in the
lid! The horses are getting thirsty! With a hole cut out, the air above the
water will almost always be cold. Wind makes that air circulate in and out of
the hole. If the air circulation also cools the air in the solar collector, then
the solar effect is diminished. There must be a seal between the two chambers.
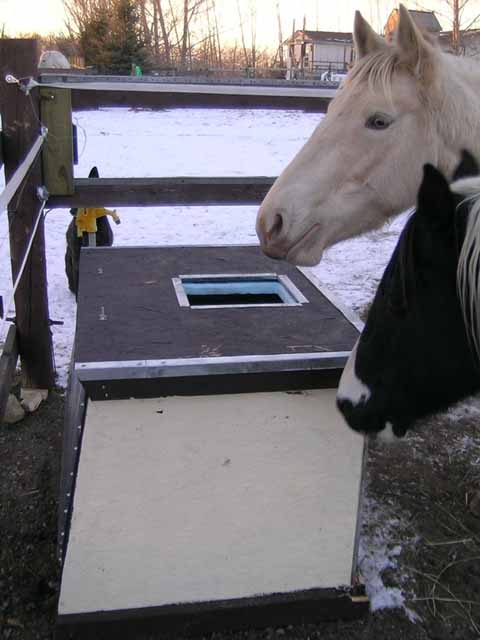
Here it finally is, facing south (it
was sunset when I took the picture, so no more sunshine into the collector). The
cut-out in the top is 12"x12"; just enough for the horses to poke their noses
through. They took only a few days to get used to it. Some deliberate splashing
of water on their noses was all it took to make them understand that the water
was inside. Pieces of metal trim around the edges of plywood prevent chewing
(did I say they are like bulldozers with teeth? I meant beavers!)
Steven will answer email questions
at: sparweb AT hotmail DOT com (replace AT with @ and DOT with
a period).
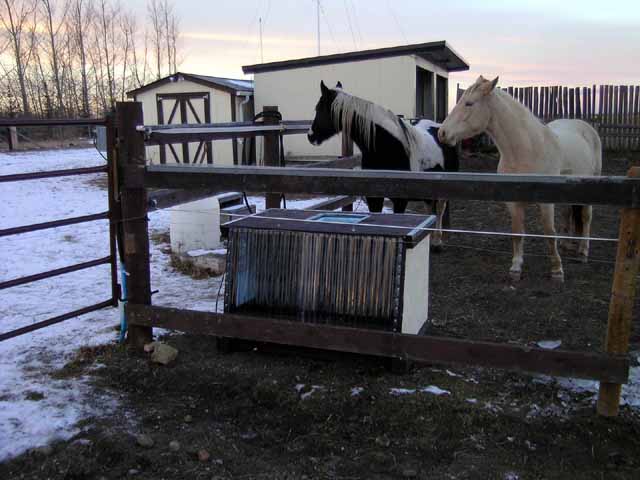
Update: December 23, 2008
We've had two weeks deep cold without
a break. Daytime temperatures have not gone above -10C, and most overnights have
been -30C or worse. Winds come and go, and only 1/2 of the days have been sunny.
The insulated water trough is doing very well. It requires 1/2 of the
electricity to keep it thawed compared to an open trough. The floating electric
heater is controlled by an appliance timer, so it only turns on for 3 hours at a
time, 2 times a day. This is enough to keep it thawed even on the coldest days.
Several hours after the heater has shut off, a thin (1/4") layer of ice is the
most I've seen built up, and the heating cycle thaws that before the 3 hours are
up. The other steel trough that I have is identical, but it is only covered with
an uninsulated plywood box. This tank is in trouble at -30C, and requires
frequent ice-bashing. The electric heater in this trough uses almost twice as
much electricity, and it still doesn't keep up. I'm glad now that I insulated
the new water trough, and maybe before winter's through I'll have the old trough
insulated, too.
Steven Fahey in SW Alberta
Update:
April 15, 2009
This is the latest on Steven's solar
horse watering tank -- some very helpful information and results -- thanks
Steven!
Here are some pictures. The trough box shows hardly any wear-and-tear.
The Solar Tank after a full winter --
click on images for full size
| |
 |
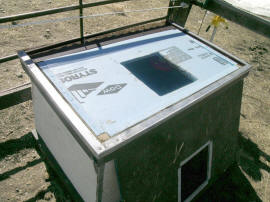 |
|
Now that winter is over, it was time to decide if I would take it apart or just
leave it. I took them apart the other day and here are some conclusions:
The electric heat hasn't been necessary for a few weeks, with temperatures
hovering just above freezing overnight. As you may recall, the other water
trough was covered but not insulated, and in the mornings where the temperature
had dipped below zero we would find ice, but not on the insulated one. The
uninsulated trough needed an hour or two of "on" time overnight to stay clear of
ice, when the insulated trough didn't need any.
I took the top off the insulated box and I saw no damage, no rot (rotting is
impossible in winter, of course), nothing split or moved by ice. The window was
intact, too. Facing the fence, it was never exposed to much risk of damage. In
the picture you can see that the sun angle is now so high that there is very
little light collected. The solar collector has an angle of 10 degrees, which is
only ideal for December and January.
On some winter mornings I discovered that condensation had frozen on the inside
of the window. The ice could be broken by tapping the window (Suntuf is
flexible) but if I wasn't there to do so, the ice inhibited the collection of
energy until it melted away.
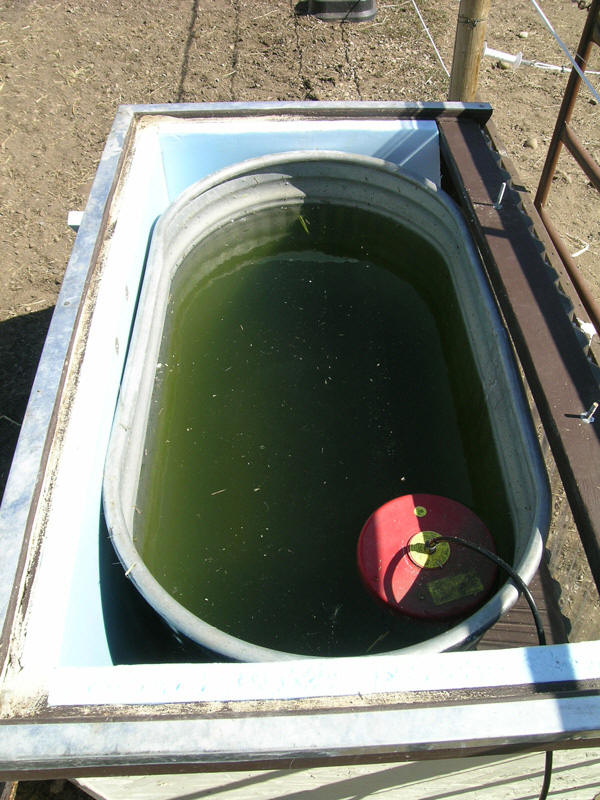
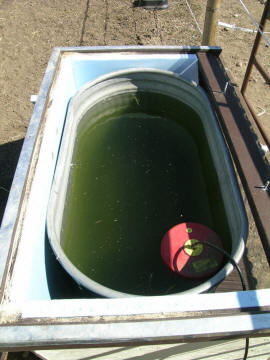
Once the warm weather had come, the water in the trough rapidly turned green
with algae. The un-insulated trough did not have algae coloring in the water.
The insulated box makes for a much cozier environment! I cleaned both out,
finding only a little bit of algae on the walls of the tank in the un-insulated
box, but the algae had grown throughout the other tank. The insulation must be
removed when winter is over!
| |
 |
|
Both troughs have had their respective boxes removed, and the covers have been
set aside. I think that next winter's water trough system will, of course,
re-use the solar trough, and the other trough will also be given a new cover.
That cover will have no solar heating window. The trough's location and
orientation precludes much direct sunlight for most of the day. In addition, I
have plans to create an adjustable temperature monitor using a PICAxe controller
to improve on the simple "on/off" timer system.
During this winter there was never more than 1/8" of ice to punch through on the
insulated trough - and then only on very cold mornings (-30C), after the timers
had kept the electric heat off for 4+ hours. The un-insulated box could develop
twice as much ice in the same conditions. No frozen-in water heaters, no broken
cables. Tripping of the GFI early in December turned out to be caused by a
defective heater. Returned to store and substituted a different model that
didn't trip the GFI. On two occasions, errors in programming the timers caused
two 1500W heaters to come on in the same circuit, causing the breaker to trip.
One of those instances was due to setting daylight savings time on one, and not
on the other. Duh!
Years before, keeping two troughs of water meant regularly bashing through
nearly solid ice, despite the heaters on 100%. Several times, repeated trips
back and forth to the house with buckets of hot water to thaw things out were
needed. There were also the frozen-in electric heaters and the broken electrical
cables immersed in water. All things of the past! Good thing I have all these
circuits GFI protected.
My total electricity consumption this winter between 1 December and 28 February
is roughly 10% less than it was last year. Considering my house's base load is
half of the total energy I used, and unaffected by this experiment, then the
"outside" power consumption was reduced by about 20%. A saving of about 200 kWh,
or 67 hours less time using two 1500W electric heaters. Just rough numbers,
here, but in the ballpark. By insulating the other trough, an additional saving
can be made next winter. If I can create a working temperature control, I can
improve those saving even more. Beyond that, I may be getting into diminishing
returns.
At 10 cents/kWh, my savings is about 20$, which pays for one of the timers. Next
year's savings will pay for the other one. Not a long pay-back time, even if you
were to take into account the wood and insulation materials, which stretches it
out to 5 years.
A couple more observations that
Steven passed along:
The ground under the tanks was
still frozen, so when removing the covers and troughs, I couldn't actually
move the insulated panels under the troughs until a week later. If the
ground can stay frozen for a week when temps rise from freezing to 20C, then
the opposite can be true, and the ground under the trough retains some heat
for a week when the temperature drops from 0 to -20C.
I foolishly forgot to plug the hole for the electrical cord, which went
through the solar chamber. This is probably what caused the condensation
inside the window.
The horses basically didn't take up any habit of chewing on the edges of the
box, because I put metal angles on all the edges and corners before putting
it in the paddock. Some horses chew, some don't. In my experience, horses
that don't chew wood will start if they ever see another one do it!
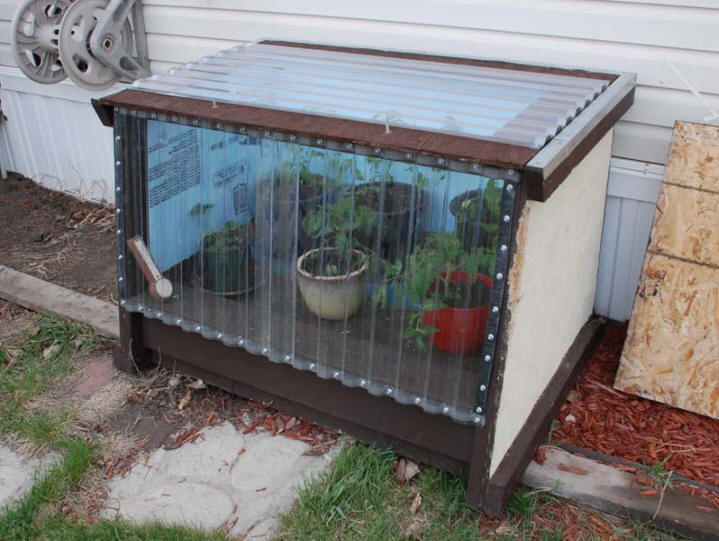
Update May
13, 2009 -- Summer Uses
Steve has found a great use for the
tank enclosure in the summer:
Hoping for actual tomatoes in July....
The lid stays off during the day, goes back on at night.  We're still
getting frost some nights.
December 20, 2008, December 24, 2008,
April 20, 2009