
Search
The Renewable Energy site for Do-It-Yourselfers
Doug's Masonry
Stove
My version of a masonry stove
Living for 10 cold New York winters
solely on wood heat made me want to learn more about wood burning stoves. I
studied and tried out several different designs. Airtight stoves appeared to be
the most efficient, but they are very smoky and inefficient when damped down to
hold a long, low fire for hours without tending.
The big lesson from cutting and splitting my own firewood for over 30 years:
anything I can do to minimize wood burning is a good thing! So, when I moved to
Tennessee, I built a passive solar, earth sheltered home described
here in Countryside Magazine and also
here ...
Because my house design works well, wood heat is now my only backup heat source,
and we burn only a small amount of wood yearly.
But during those cold times, extra heat is needed. I designed and built my own
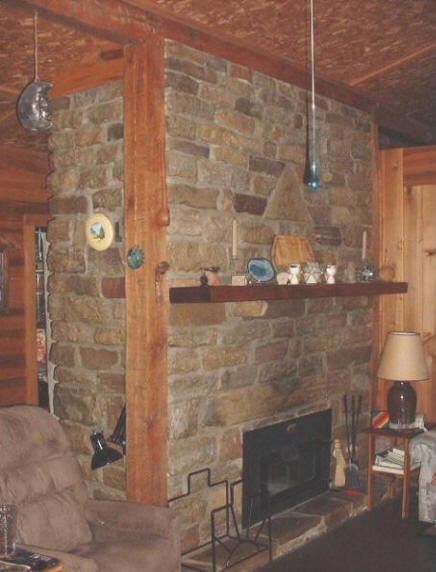
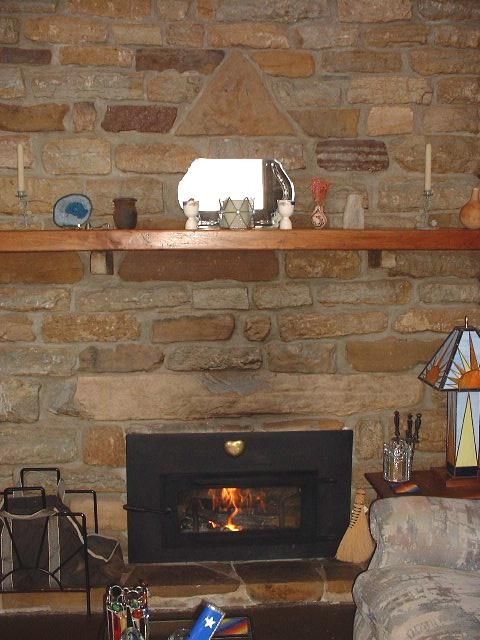
version of a masonry heater (also called Russian masonry stoves, Finnish masonry
stoves, kachelofen in Germany), which was developed in cold northern climates.
These stoves are typically built with 20-30 tons of stone mass, thus holding
their heat for days.
Here in central Tennessee, where it¹s rare to have extended cold, cloudy
periods, I want heat quickly, but not four days after I fire it. By designing an
air space between the firebox and stonework, along with room air vent openings
high and low in the stone surround, I get much faster warm-up than the
traditional masonry stove. Still I get the moderating and heat saving features
from the mass of the stone surround.
My stove also heats domestic water for my 85-gallon solar water tank in the
attic, which adds to the thermal mass for solar heat storage.
To improve the draft of the stove I
insulated the exterior of the masonry chimney. If you online search "masonry
stove," you find many expensive kits and plans explaining the basic theory of
masonry stoves. I used local, free stone that I gathered for the 3' deep x 9'
wide x 9' tall surround, which averages about 10" thick. That¹s about 10-12 tons
of stone. It¹s on a 6" thick slab, poured separately from the house slab.
I welded up a firebox from scrap 1/4" and 3/8" steel, making an airtight door
with a tempered glass window in it. I ran 4" galvanized vent pipe from the attic
down through the surround, to the back of the firebox, and made a channel in the
concrete slab for the incoming air to flow under the fire to the front glass,
washing across the glass to keep it clean. Using air from the outside also
prevents the air needed for combustion from pulling replacement cold air in
around our home¹s weather-stripping on doors and windows.
I used 4 feet of 6" stainless steel exhaust stack from the firebox, which then
goes 2' over into a block-and-tile chimney. I coiled 30' of 3/4" copper tubing
around the vertical section of stack to heat water; it flows by gravity to my
solar tank located in the attic directly above it. The tank is supported by the
stone fireplace.
There is no damper, nor a thermostat to regulate the fire, so it burns hot and
cleanly. In 20+ years of use, I've not needed to clean the chimney yet.
The heat is soaked up into the stone and concrete. It takes about an hour for a
pulse of heat to travel an inch through stone, so we get a nice warming in back
of the fireplace after the fire itself is cooled to ashes.
With the solar house, we burn little wood, but I'm still glad I went for the
masonry stove. It is efficient, esthetically pleasing, and ends the typical
problem of either being too warm or too cold, as with a regular stove.
Doug
Jan 4, 2008
You can reach Doug at:
dougkalmer AT gmail DOT com (replace AT with @, and DOT with a period)
Doug's Other Projects
Doug has contributed a number of
projects to Build-It-Solar covering a wide range of solar and
renewable energy areas --
see them all...
Thanks very much to Doug for
providing this material!