
Search
The Renewable Energy site for Do-It-Yourselfers
Mooney Wall -- A
retrofitable wall with high R value and low thermal bridging
|
This description of the Mooney wall
appeared in the Breaktime discussion group of the Taunton Publishing discussion
forums (Taunton publishes Fine Homebuilding magazine) -- a good place to get all
sorts of construction advice.
The Mooney wall provides high R value,
low thermal bridging, and good resistance to infiltration. All this
at a low cost (especially if you are providing the labor). Thermal
bridging refers to the transfer of heat directly through the relatively low R
value studs -- this can reduce the R value of the wall substantially from the R
value of the insulation placed between the studs. For example a 2X6 stud
wall with "R19" insulation only has an R value of 13.5 when the thermal bridging
of the wall structure is taken into account (see
http://www.ornl.gov whole wall calculator).
The Mooney wall can be used for
either new construction or as a retrofit to increase the R value of an existing
wall.
Another
example of using the Mooney wall here ...
From the BreakTime Post:
The "Mooney wall" is the The brainchild of
Mike Smith and Tim Mooney.
The primary purpose of the MW is to upgrade the insulation of a standard 2x4 (on
16" centers) wall. The MW is well suited to renovation work with superior
insulating characteristics to standard 2x4, 2x6, and many variations. In one
thread I see Mike estimating the wall at a true R-18 (unlike the artificial
R-19 of a 2x6 fiberglass wall, which doesn't take into account the thermal
bridging of the wood).
The Mooney Wall's thermal bridge is restricted to the points where the 2x2's
(really 1.5"x1.5") contact the 2x4 wall studs. This is a vast improvement over
the nearly 30% thermal bridge of a typical 2x4/2x6 wall.
|
|

after the
stud walls are built, install the 2x2 at 16" oc horizontal,

the
electrician roughs in , the boxes can be mounted on 2x2 blocking...
the insul-mesh is stapled and pulled tight..
White glue is rolled onto the mesh and saturates
the mesh / stud interface to prevent cellulose dens-pak from getting under
the mesh and causing bubbles over the framing
the next day , the glue is dry and the walls are
ready to be blown ,

you blow it right thru the mesh in a hole you make
with a utility knife, you can see everything as you progress..
Overview:
1. The existing 2x4 wall cavity
2. Horizontal 2x2 (a 2x4 ripped down the middle) @16"
3. Electric rough-ins installed
4. Insul mesh glued to the face of the 2x2 strapping
5. Dense-pack cellulose insulation blown into the cavity created by the
2x4/2x2/mesh
6. Drywall/plaster
-----------------------------------------------------------------------------------------------
the Mooney wall facilitates installation of electric
devices and blocking for accessories ( like curtain rods, grab bars, etc )..
-----------------------------------------------------------------------------------------------
we use insul mesh , stapled and glued, next day we
blow the wall thru the mesh .. just make a small cut every 16" or so..
you can see exactly what you're doing...
first couple of times I special ordered it from
Regal Industries ( make sure you get insulmesh... you don't want the 1/4" open
mesh ) now we get it from our insulation supplier .. and we use Elmers White
Glue , which we find superior to what we were buying before.
More on the Mooney Wall -- 7/7/06
These are some additional pictures and notes published by Mike S. on a Taunton
BreakTime forum.
Comments below are from Mike.
Here's two sequence shows from our latest:
this is after the mesh has been stapled to the Mooney and glued with Elmer's
white glue... one day drying time ( overnight minimum )
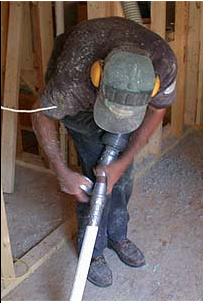
Chuck loading the hopper of our 1980 US Fiber machine with a 2005 Hurricane
blower

Here's what our nozzle looks like... it's a 1" copper 1/8 bend taped to the
end so it reduces the size which increases the impact speed of the cells.. we
also increase the air flow to mix more air with less cells to get the density we
want.

We use one hole every 16" ...and work one stud bay at a time.. going from
filled to empty
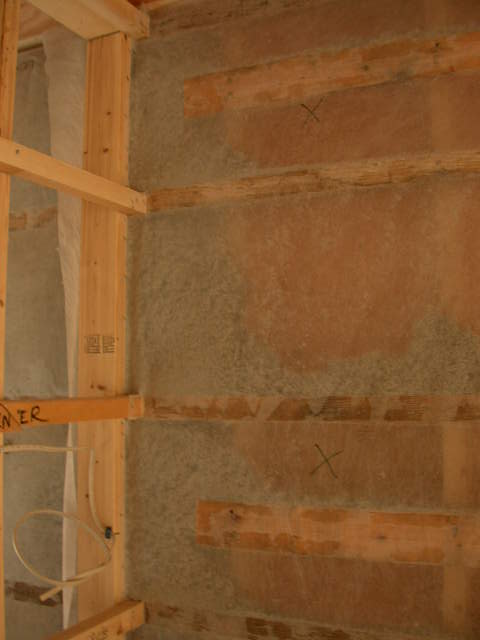
We find it helps to mark the hole locations so you can find them when the
dust starts blowing.... then we cut each hole with an X.

Here's one stud bay sequence:
bottom

Next ... working up

Next
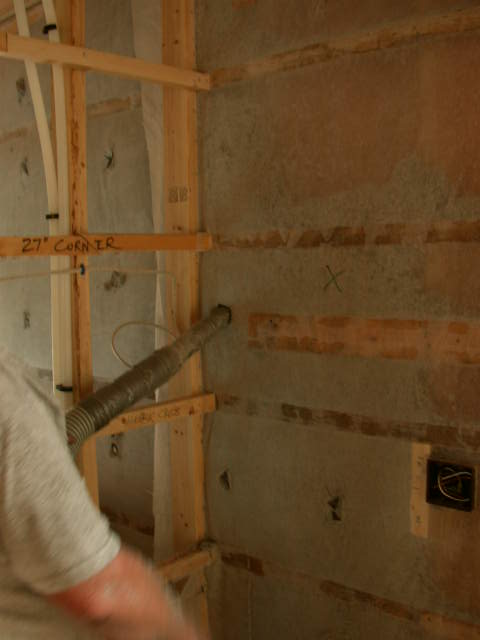
Getting to the middle

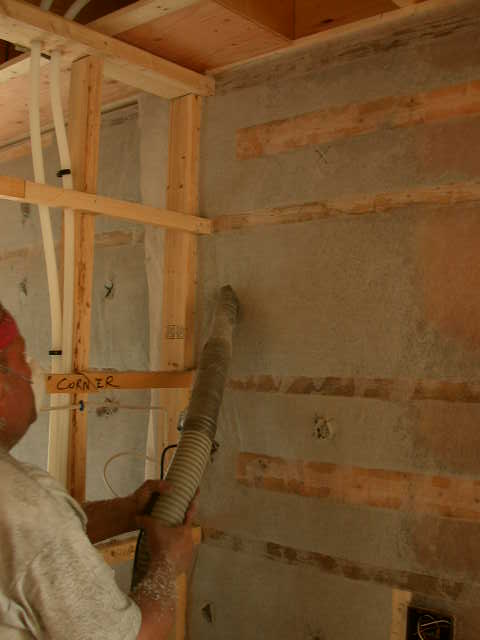
and topping out...

It took 5 times longer to post this than it took Roy to actually blow that
bay..
Chuck & Roy blew the perimeter of the house & breezeway in one day...
Mike Smith Rhode Island :
Design / Build / Repair / Restore
Some additional notes from Mike:
Noise Transmission:
"The combination of the Mooney providing a thermal break also means it provides
a sound-transmission break,, decoupling the path of sound thru the studs.. the
cellulose also has a great dampening effect , so short answer.."
"Mooney wall makes a good sound transmission barrier wall... far superior to
the old regular stud wall with fiberglass insulation we all have used at one
time or another"
Blowing Insulation After Dry Wall Install:
"As far as blowing after the drywall is hung... yes that saves an enormous
amount of the labor.. but you do lose one benefit.. you can absolutely see any
pockets that don't get enough insulation with the mesh.. with the drywall it's
more of an experience /confidence factor."
DIY Install:
"can DIY'ers do this.. sure, it's labor intensive but material cheap. and the
technique of blowing dens-pak is pretty self -evident.. you need a good blowing
machine with an adjustable air vent.. most blowing machines that I know of are
capable"
"you will probably get a better insulation job with blowing your own dens-pak
than you would hiring an insulation sub..mostly because you will take more
care.. it's your house."
Installing Dry Wall Over the Mooney Wall:
"The drywall install is easier with Mooney , not harder.. just make sure you
have mooney where your joints will fall out."
Cost of an Example Mooney Wall:
we had 2080 sf of Mooney wall
materials cost $1071 ( $0.52 /sf )
& labor was $1596 ( $0.77 / sf ) based on rate plus burden = $28 / man
hour
materials were culled 2x matl from our lumber yard ( $120)
glue.................................................$25
Insulweb..............................$83
cellulose ( 94 bales ) ..............$843
labor was :
rip culled matl to 2x2................. 4 hrs
cut & nail mooney ( 2x2 )......21 hrs
install & glue mesh...............16 hrs
blow walls...................... 16 hrs
______________________________
total labor .................57 man hours or 36 sf / man hour
blowing the attic is separate ( 2 guys one day ) 24" deep ... say 20"
settled
settled density of 1.7 lb/ cf = 20/12 x 1.7 = apx 2.8 lb/ sf
cells cost about $9/ bale (25 lb ) delivered including tax
Mike Smith Rhode Island :
Design / Build / Repair / Restore
Note that for new construction, the Mooney wall could be used in conjunction
with the efficient wall framing described here:
http://www.builditsolar.com/Projects/Conservation/Insulation/WallFraming26449.pdf
This includes such techniques as insulated headers, efficient arrangement of
studs at the corners, and in general reducing the thermal bridging areas in the
framing.
It seems like using 24 inch stud spacing would provide less thermal bridging,
and reduce the work level to some degree. Two by six studs on 24
inch centers with the Mooney 2 by horizontal members would give a full 7 inches
of Cellulose -- about R 27. See also the "Gimme
Shelter" wall construction notes.
Gary 04/26/06,
updated 7/7/06