Caveats:
I'm not trying to push any particular product or practice, this
is just an FYI.
My
Dad WAS a distributor for Thermasteel which was the main reason
for building this house in the first place.
The house up to this point has only been lived in part time.
My Dad has pretty much always lived a low impact lifestyle.
BACKGROUND
My brother and I built this house for our Dad in Pueblo West,
Colorado, a city west of (imagine that!) Pueblo, Colorado. We
started it in September 2003 and finished it up with the help of
a brother-in-law and various sub-contractors in August 2004.
The exterior walls of the house are built entirely of
Thermasteel SIP's(Structural Insulated Panel). The foundation
was fabricated using Polysteel ICF's(Insulating Concrete Forms).
The roof is composed of Actech panels, another form of SIP's,
from Alternative Construction Technologies Inc. The HVAC system
is a ground source heat pump from Water Furnace which also
provides the hot water. Three wells were to be dug near the
house at 100' each but they hit something hard on the third hole
at 50' so drilled another 50' one.
Dad is a Mining Engineer and worked many mines and tunnels in
Colorado but moved out of the mountains to Denver and became a
General Contractor when mining jobs dried up in the late 50's.
My brother and I grew up in the construction industry but never
had much experience with anything from the ground up. Along
with the General Contractor job, Dad had a quite competent
framing/finish crew which allowed him to keep tight control over
the job from start to finish. Hence, mine and my brother's
experience was mostly with wood framing and interior/exterior
finish. Although we had done a little of everything required in
the building of this house, this was our first "from the ground
up" endeavor. Bottom line... I would think if you have a
modicum of building experience, SIP's and/or ICF's should be
easily doable for a self-build.
Enough background, here's the house.

We decided, after watching the ICF distributor build a house
nearby, that pouring the basement floor before assembling the
block for our foundation was the better way to go. It offered
better support for the 1st floor framing which was basically
poured in place while we poured the foundation.

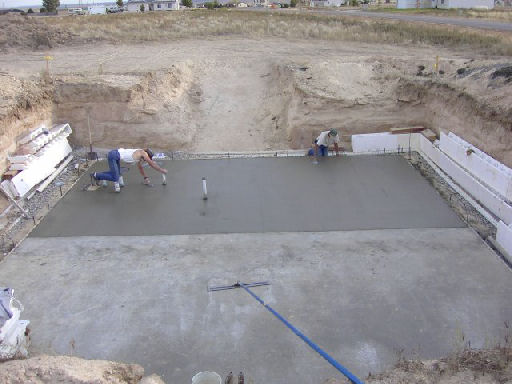
Here the basement slab is poured and the first row of ICF's are
in place with rebar installed. If you get the first row spot
on... the rest is pretty easy. The ICF's we used required
either construction glue or foam for assembly. The distributor
we bought from builds up panels in his shop for many of his
projects and then trucks the panels to the job site, making for
an even speedier build. Note the vertical 2x's in the corners
which help to keep things true. The foundation ended up 1/4"
out of square and 3/4" out of elevation... not bad for a first
foundation AND we did not have one single blow out.

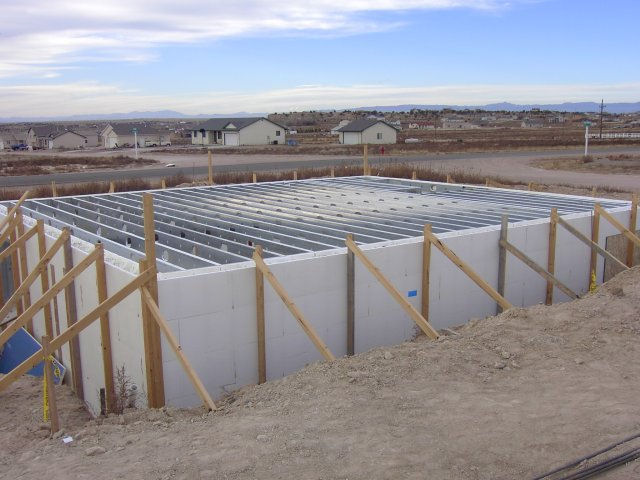
The floor joist are Dietrich TradeReadyŽ joist and I was very
impressed with the system. The only problem was that the
distributor was new to the system and ordered and shipped almost
every joist the wrong length. They weren't too tough to cut
with the sawzall and the package was cheaper than using wood.
You can't see it from this picture but foundation bolts were
placed through the rim joist and block every 2' before pouring
concrete and in this picture the whole floor is resting on 2x4's
running down to the basement slab about every 3 feet around the
inside perimeter. After installing the subfloor, this gave us a
nice platform from which to pump the foundation full.

The walls arrive from Virginia and erection begins. The walls
come as a complete package with every piece marked and drawings
to show where each one goes. This house is 1500 sq. feet and
the whole package fit in about 1/3 of a semi trailer. The
panels weigh next to nothing, I think a 4'x8' panel weighs
around 42 lbs. which is less than one sheet of 1/2" OSB. We
lost part of the front wall to high winds when we left it over
one weekend... not enough bracing. One panel had flown maybe
40' but only one of the panels was damaged and it only required
a little foam-in-a-can to repair it. All in all these panels
proved to be quite strong.

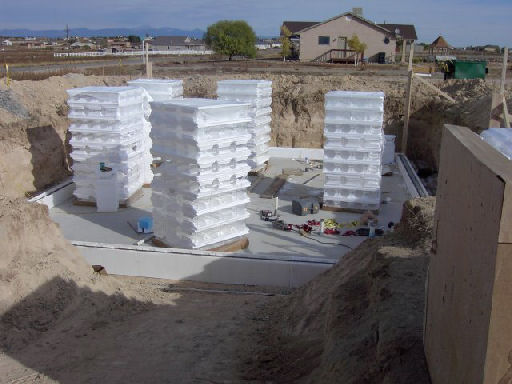
Here's a good shot showing how the wall panels interlock and
stack. The Thermasteel panels incorporate a shiplap overlap
producing a very strong and air tight structure. Some of the
more complicated panels come preassembled.

Here's the 2nd floor framing. Except for the main support wall
you see here, OSB flooring, and the roof beams, everything is
foam and metal. If I would have been on top of everything, even
this wall, would have been metal and just the few studs that
went into this wall required culling and even some cutting and
straightening before the drywall was hung. Vendors should
really be ashamed of what they try to pass off as lumber these
days.

We rented a man lift to assemble the upper parts of the exterior
walls so I decided to get a good aerial shot of the whole house.
We also used the lift in place of a crane to install the beams
and roof panels. It worked out well as nothing in this house
weighs much.

A picture with the roof panels in place and some more of the
upstairs framing. The "attic" to the upper left of the picture
was to be part of the HVAC system but ended up with nothing in
it and will be a small storage area.

Here you can see the roof panels where they have been stitched
together and down onto one of the roof beams with 10 inch
screws. The hat track on top of the panels was added because
the city wouldn't let us install a membrane roof. OSB was
screwed onto the hat track and then roofed as any typical roof.
This added cost/time to the construction but also added an air
space which most likely added a bit of R value and keeps the
roofing a little cooler.

The finished house.
The house is all electric. Even now it is still a part time
residence, Dad spends 1 or 2 days up north getting the old house
ready to sell. That started in June '05 and before that he
spent maybe 3 days a week here.
Here are 1 years worth of electric bills AND MORE CAVEATS. Dad
still does laundry at the old house and there's not even a
cloths washer or dryer installed here yet. Dad doesn't use the
stove much and cooks most of his meals using the microwave and
toaster oven.
The community has underground utilities and this lot is big so
we had to have another transformer intalled closer to the house
because the original run was too long. The cost of this
installation was pro-rated on his electric bill over 4 or 5
years, therefore, his electric bill is a minimum of $68.50 until
the installation is paid for, BUT he doesn't pay more for
electricity till he uses more than $68.50 worth of electricity.
In other words, he gets $68.50 worth of electricity free till
the installation is paid for.
(The billing dates run from the middle of the month, I'll use
just the month for simplicity)
Each bill includes a KWH charge, access charge of $6.00, and a
minimum billing which I'm not sure of and varies. The Water
Furnace heat pump required 2 electric water heaters, one used
only as storage, and this qualified for about $800 in rebates
and there may be other rebates for all electric.
DATE USAGE-KWH AMOUNT TOTAL
July 04 191 $18.27
$68.50(every bill so far)
Aug 218 20.86
Sept 161 14.74
Oct 217 19.87
Nov 465 42.58
Dec 667 61.08
Jan 05 513 53.94
Feb 386 40.58
Mar 413 43.42
Apr 253 26.60
May 333 36.38
June 409 44.68
Late fall was cold and this shows up in the bills. AC should
almost always be cheaper than heating this house. Even though
100° temps are common in the Pueblo area, the ground temperature
here is around 57° F. This house is a good candidate for some
type of RE. I tried to get my Dad to install solar shingles on
the south side of the garage but he didn't like the fact that it
would "never" pay for itself. The wind does blow here a fair
amount and maybe some type of genny is in the future.
GENERAL IMPRESSIONS
The SIP's and ICF's we used were of very good quality but when
you start looking at different systems you'll probably find that
most offer roughly the same R value. Usually you get what you
pay for in "fit & finish". Some of the Thermasteel panels were
the wrong size on window and door openings but each required
easy cuts using a sawzall (stryofoam and 20 ga. steel studs) and
took, at most, 15 minutes each to correct. The foundation took
about 30 man hours to complete and was 32'x25'x9'. I don't
recall how long the wall panels took to erect because of
interior framing that also had to be completed as the structure
rose but except for the hight, it was easy to build. The roof
panels took 10 to 15 man hours to install.
The ground source heat pump is very efficient. Many people
refer to them as over-unity machines because they "put out more
than you put in". I was, and still am a bit, skeptical about
installing it in this house because the house is already so
efficent. I believe it was 3.5 times the cost of a propane
furnace and evaporative cooler and it will take at least a years
worth of full time living to see how long the pay off will be.
If I were to build another house I'd really have to look at
using ICF's for the whole house. These make for an incredibly
strong and mostly fire-proof structure. The distributor we got
the ICF's from said we were his first customers ever to use them
only for a foundation. Another method I'd be very interested
in is tilt-up on site precast concrete. This method produces a
structure very similar to ICF's but the end product has all the
thermal mass on the inside of the structure. Naturally there
are pluses and minuses for SIP's, ICF's, and tilt-ups but it's a
bit sad more of these types of structures aren't being built.
THE COST
I know that's probably the biggest question on everyone's mind.
I've seen quotes anywhere from 1% to 5% more than a stick
framed structure. The only real way to compare the cost would
be to build the exact same house on the exact same lot at the
exact same time. Even this would be hard to compare because a
SIP structure can be erected so quickly, couple that with
weather delays, and you can see how even a modest storm could
cause significant time differences between the 2 houses.
Our walls would have cost a consumer roughly $12,000 shipped.
We paid $7,300 for the roof panels which included a bit of a
price break on shipping because our panels came from the factory
with another load that was dropped off in Texas. The block for
the foundation was about $5,000 and there was block left over
that we used for the garage foundation instead of just doing a
monolithic slab. These prices are from mid 2003. Steel prices
soared around spring/summer 2004 and I have no idea where prices
stand today.
You're going to save labor cost building a SIP structure and
also on jobsite clean up. We had a 5 yard container, which you
can see in the 2nd picture, that didn't see much use till
drywall was started.
I
hope this post gives some insight and ideas for your next
building project.
Gary Freeman
Gary will answer email questions: bell47g5a at
comcast dot net
|


