
Search
The Renewable Energy site for Do-It-Yourselfers
Changes to the
Solar Shed Thermal Storage Tank (Made for the winter of 07-08)
I made some changes to the tank for the
07-08 winter. This included adding more insulation inside the tank,
and a new arrangement for the lid and for the way the plumbing and sensors
are brought into the tank. These are kind of incremental improvements
to the design -- the old design was/is fine, the new one is just a bit
better.
If you are wondering what in the world a "Solar Shed" is, go here ...
More Insulation
I removed the EPDM tank lining, and added 2
inches of Atlas R-Board rigid insulation to the inside of the plywood tank.
I wanted to reduce the heat loss at night a bit more.
Had I thought this trough carefully when I
first built the tank, I would have included a layer of insulation inside the
tank walls, as this is really the best place for insulation. You don't
have to fit insulation around the tank 2X4 frame -- this makes the job
easier, and also increases the effectiveness of the insulation by
eliminating the thermal bridging caused by the framing.
Since I had to take the lining out to do
this, it offered a chance to inspect the plywood tank walls on the inside.
They were beautiful -- just like the day I first built them.
The Atlas R-Board insulation is
polyisocyanurate, which has an R value of 6.5 per inch (very high), and also
has a very high temperature capability. I would not use polystyrene of
any type as the first layer of insulation for a storage tank that may get
above 130F.
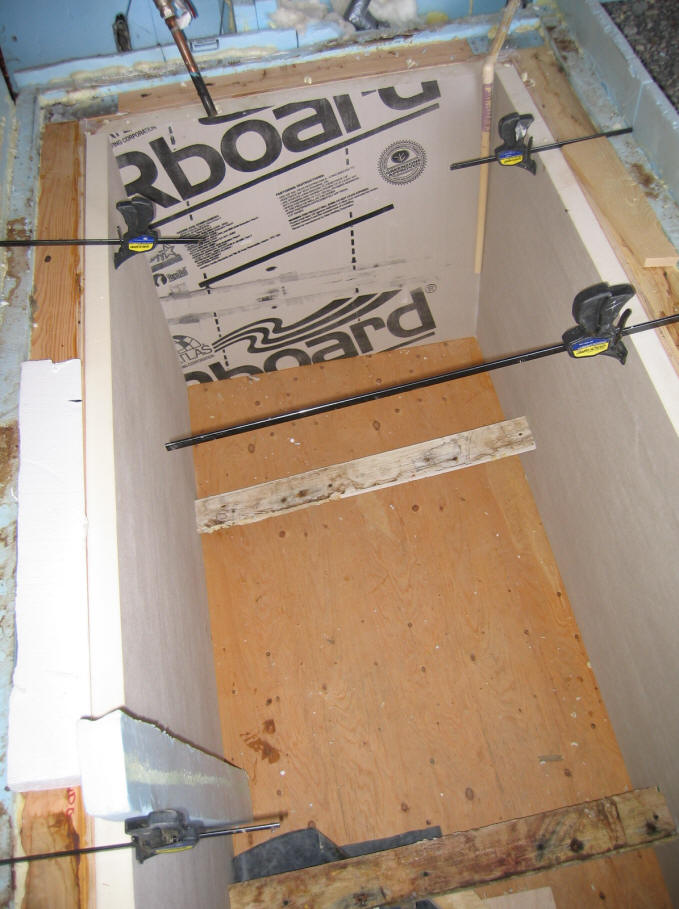
New insulation going in the tank
after removing the lining. The insulation is glued in place using
"Great Stuff" polyurethane foam in a can.
Not much is needed, in that the water pressure will hold it in place.
All the edges and seams are also sealed with Great Stuff.
The new layer of tank floor
insulation has not yet been installed.
New
Lid Arrangement
I also made some changes to the lid
arrangement.
The wood board that ran around the
top edge of the tank to provide a good place for the lid to seal down to was
looking like it would have a limited life in the moist environment. I
replaced this with an edge board made from plastic deck lumber.
I moved all the plumbing and sensor
connections that had been made through the west part of the old lid.
These connections now all go through slots cut in the west edge plastic deck
board. I cut a slot for each connection, then placed the pipe or wire in
the slot, and then silicone caulked the slot full. This way the entire lid
can be removed without disturbing these connections.
The connections are:
The 3/4 inch copper return line
from the collectors
The tank vent pipe (vents tank to
ambient air)
The tank temperature sensor used by the control system inside the house
(enclosed in half inch copper pipe)
The 3/4 inch CPVC supply line to
the house
The 3/4 inch CPVC return line
from the house
My caulking job was a bit
messy (well, maybe a lot messy), but the arrangement works well, and does not
leak any water vapor out of the tank.
The pump still connects
through the tank sidewall near the bottom on the east end of the tank.
The only penetration
through the lid of the tank is a quickly removable tube that contains the tank
temperature sensor used by the differential controller for the collector pump.
This also serves as a place that a dipstick can be inserted to measure the water
level in the tank.
I also took this
opportunity to run the return line coming from the house to the far corner of
the bottom of the tank. So, this separates the supply and return lines
better, and returns the cold water from the house to the bottom of the tank.
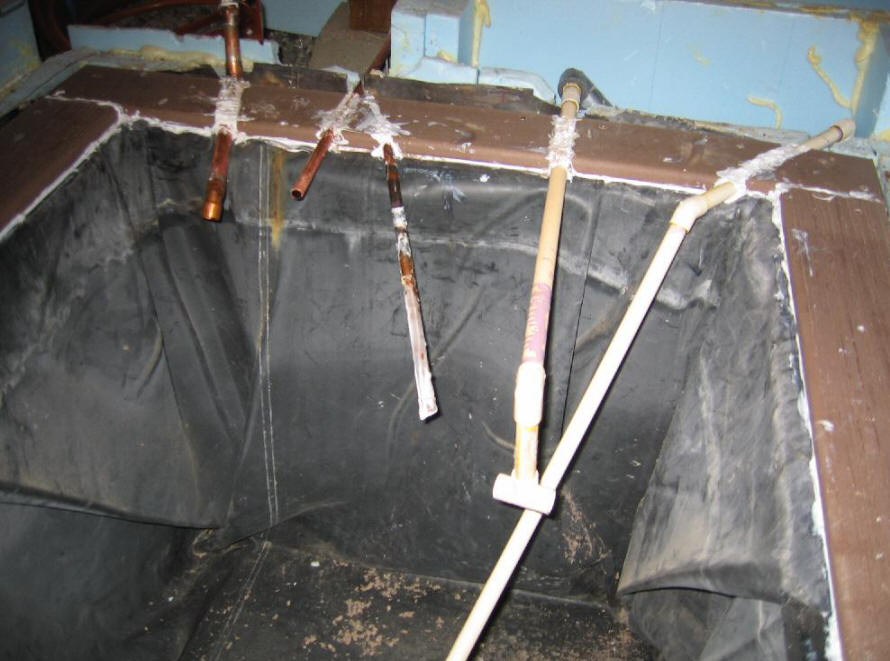
Left to right: 1) return
from collectors, 2) tank vent pipe, 3) tank temperature sensor, 4) hot supply
line to house, 5) cold return from house.
The tank lid itself now looks like
this layer by layer from the bottom up:
EPDM liner for the lid (bottom
layer -- seals against the board running around top edge of tank)
2 inches Atlas R-Board insulation
board
Layer of half inch OSB plywood
2 inches of polystyrene blue
board (XPS)
A number of old insulation bats
piled over the top
The lid is held down by extra long
coated deck screws that screw through the OSB, through the 2 inches of R-Board,
through the plastic deck board that surrounds the top edge of tank, and into the
tank frame. The steel lag bolts that held the old lid down were
showing some signs or rust, so I thought the coated deck screws might be better
(not that the lag screws would have failed within my lifetime).
I also replaced the tension tie strap
that ties the tow long edges of the tank together with a stainless steel strap.
The galvanized strap was corroding with the continual exposure to hot water
vapor. I think that its worth using a non-corroding material here in
that the tension tie is structurally important, and the tank might well fail if
the strap corrodes all the way through.
I had planned to actually measure the
temperature drop of the tank overnight under cold conditions, but other projects
have gotten in the way. This is less straightforward than it seems, as the
tank tends to develop a temperature stratification that changes with time.
Gary Feb 7, 2008