
Search
The Renewable Energy site for Do-It-Yourselfers
ProMaster Camper Van Conversion -- Composting Toilet
|
This section covers our homemade composting toilet for our ProMaster camper van conversion.
The DIY composting toilet is located up front just behind the passenger seat and next to the sliding door. It also provides some map etc storage and an extra place to sit.
The toilet design includes urine separation and includes a small vent fan that runs all the time to keep odors down and maintain an aerobic composting process.
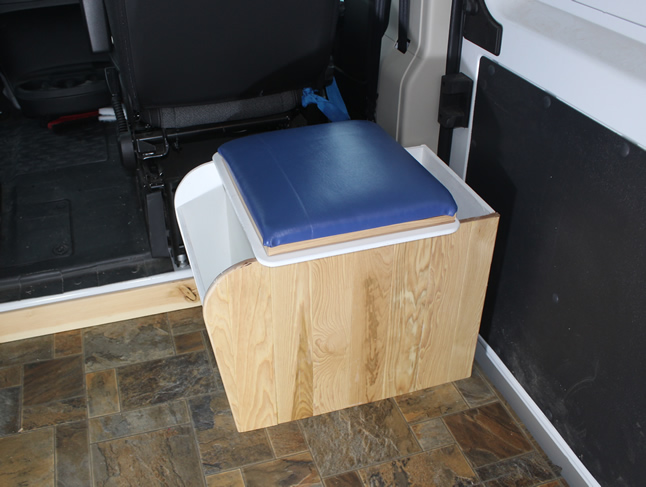
The finished toilet installed behind the van passenger seat. The blue cushion comes off to reveal the toilet seat.
Go back to the main camper van conversion page...
|
|
| |
Important Update
The material on these pages describing our camper van conversion has been moved to our new new site dedicated to efficient RVs and camper vans.
The new site covers all the material here and adds a lot of new material on other camper van conversions, camper van design and build, resources for people converting vans, other efficient camping vehicles, new ideas in efficient RVs and camper van travel hints.
The new site is here...
I'm leaving these pages here as you may have bookmarked them and the Comments section has some good suggestions, but I suggest that you go to the new site -- I won't be updating this material anymore.
Thanks to all the people who read these pages and especially to the people who left comments and suggestions! Feedback on the new site is very much appreciated.
Gary
|
|
How it Works
You start by adding some peat moss to the bucket -- this provides Carbon for composting and provides more air in the mix.
When you use the toilet, the urine is diverted into the pee bottle, and poo drops down into the bucket. After each poo, you add a bit more peat moss to the bucket.
The pee bottle is dumped as necessary throughout the trip. How often will depend on the size of your pee bottle and how often you use it vs other facilities. An adult is said to generate about 1 liter of urine per day.
The mix in the poo bucket will compost some over the course of the trip. When you get back home, you can dig a hole in the yard for it to finish composting in, or you can place it in a plastic bag and put it in the garbage. The volume is said to be much less than you would expect as the composting process reduces volume.
The references listed below go into a lot more detail on how the composting works and how to keep the composting toilet working well.
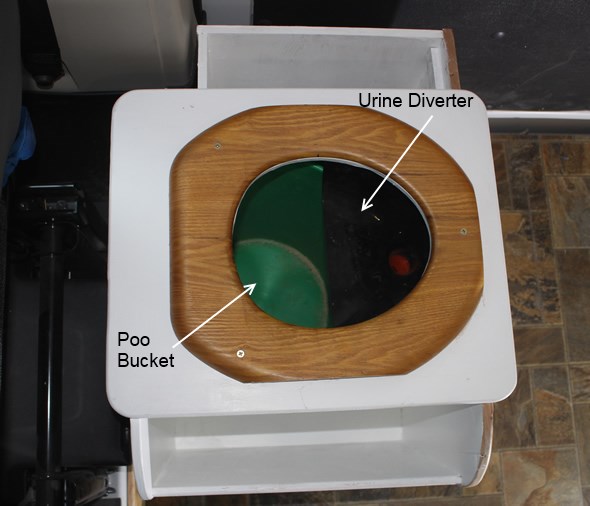
The toilet seat is sealed down to the lid of the toilet.
Pee is diverted by the urine diverter into a pee collection bottle just below the diverter.
Poo drops straight down into the 5 gallon bucket (which has peat moss/sawdust in it).
|
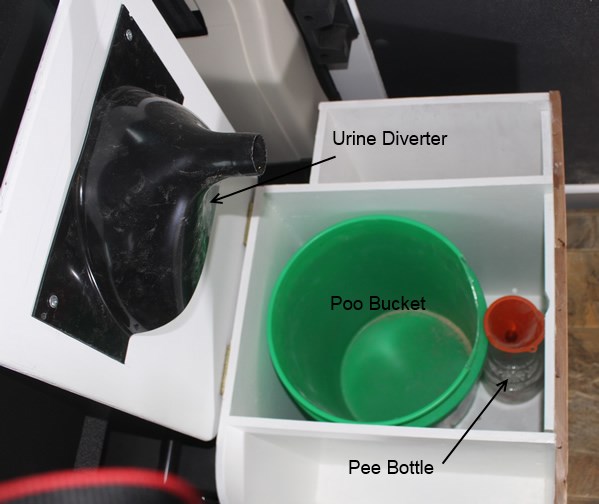
With top open to show urine diverter, poo bucket, and pee bottle and funnel. The outlet from the urine diverter nests into the top of the funnel. |
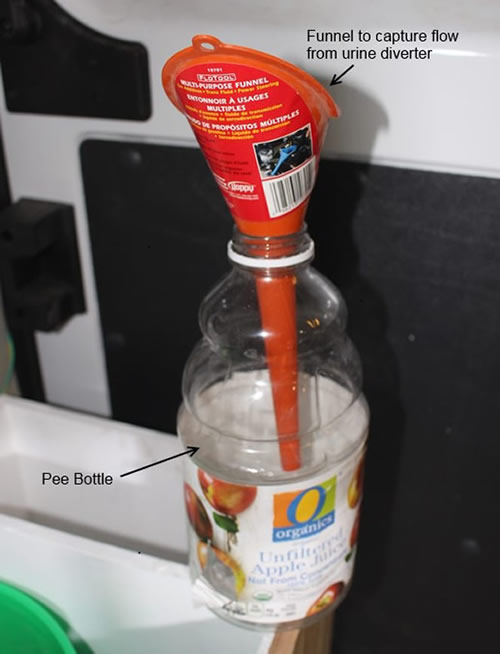
The pee bottle and funnel removed from toilet for better view. There is room to store two of the pee bottles in the box.
|
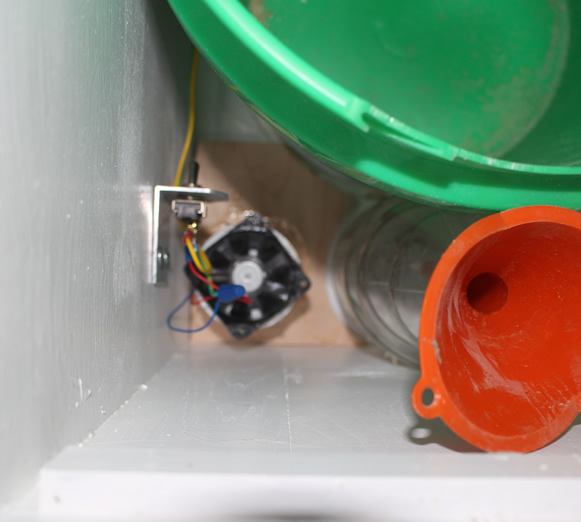
The fan exhausts air from the toilet compartment via a tube that runs down through the
floor.
There is screened air inlet opening in the opposite corner of the toilet compartment
near the top.
|
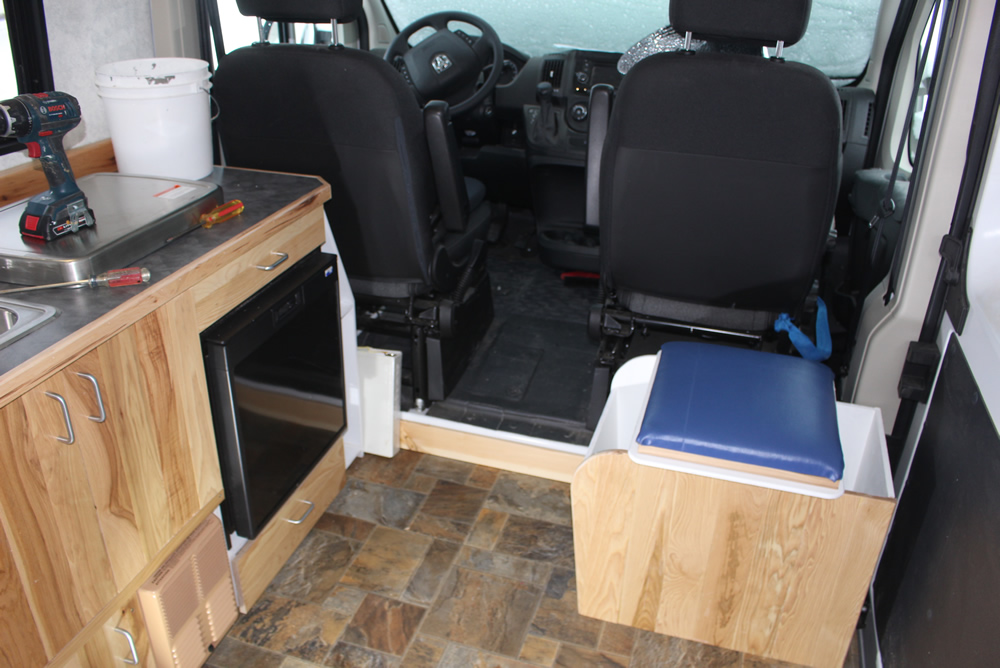
The toilet has a removable seat cushion that seals the top and serves as an extra place to sit.
The compartment on the inboard side provides some storage for maps, books, etc. that is accessible to driver or passenger while driving.
The compartment on outboard side stores toilet paper and peat moss/sawdust.
The urine diverter diverts urine into the pee bottle in the base of the toilet -- this makes for better composting conditions in the poo bucket, slower filling of poo bucket, and less possibility of odor. The diverter works for both males and females as long as everyone sits down to pee.
Composting Toilets for RVs Information
I know near nothing about how composting toilets work, and was skeptical that they would be a good solution for an RV. The references below from people with lots of experience with composting toilets in RVs convinced me that it is a solution worth trying.
They advantages the composting toilet offers over the usual RV approach:
- No odor
- Efficient on space utilization (can be as small as a 17 inch cube).
- No need for black water tank and no need for the fun job of emptying the black water tank or finding a place to empty it.
- Long periods of operation without the need to empty
- No need for toxic toilet chemicals
- More environmentally sensible.
These are some of the references that convinced me to give this a try:
These are from people who are actually successfully using small composting toilets in RV's or very small cabins and have been doing it for a long time. There is lots of good practical information on building and using small composting toilets in these references.
I want to thank Gordon and Sue for submitting all the details on building and using their composting toilet in their RV over the years -- this is what got us off the fence on trying the composting toilet.
Building the Toilet
Mockup
We wanted the toilet to be as compact as possible in that its located in an area with limited space. In order to get the size down as small as possible and to make sure that it would fit in the intended area OK, I built a full size mockup -- this allowed playing with the relative locations of the bucket, pee bottle, toilet seat, and urine diverter to get a compact arrangement. It also allowed actual testing of the urine diverter.
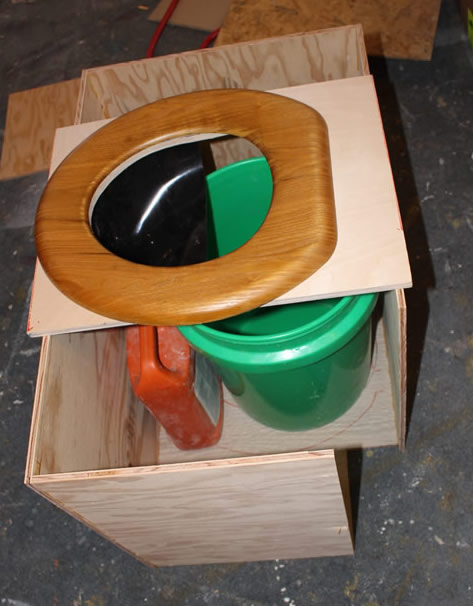
Simple mockup helped to get the geometry right.
Toilet Seat
The toilet seat is a standard one off the Home Depot shelf. They sell ones with round openings and with oval openings -- this one is a round opening which uses less space and seems to fit the urine diverter better.
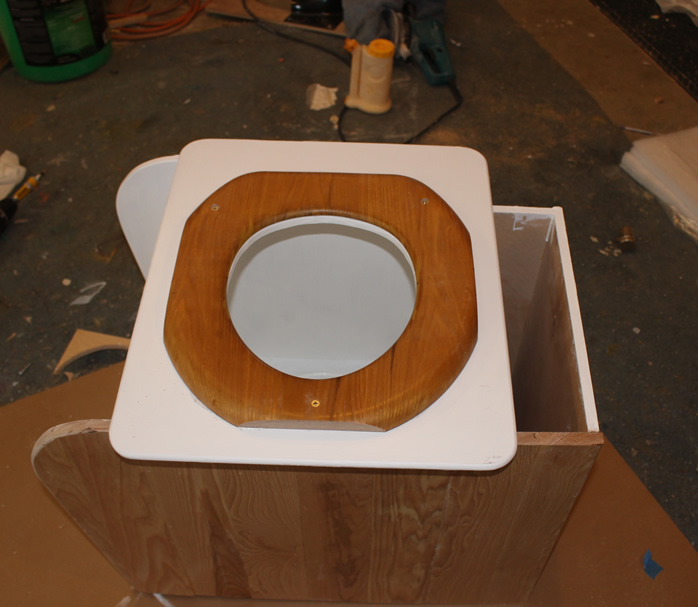
The lid that came with the toilet seat was removed, and the bumpers on the bottom of the seat part are removed so that the toilet seat can be sealed right down to the lid of the toilet box. It is important to not leave any openings for insects to get in.
I trimmed the left, right, and front edges of the toilet seat to create flats that the seat cushion could fit against -- the seat cushion (see below) is just a friction fit against the flats on the toilet seat.
The board the toilet seat is mounted on is hinged at the back to allow access to the poo bucket and pee bottle.
The Box
The box closes in the bucket, bottle and vent fan, provides for storage for peat moss and toilet paper, and provides an enclosure for the airflow created by the vent fan.
The box is 17 inches front to back, 23 inches wide (including storage areas), and 18 inches tall. We tried to make these as small as possible because the space we have is limited. If you have more space, I'd consider allowing for a bigger bucket and particularly a larger urine container.
This is the basic box. The center part holds the poo bucket and pee bottle, the right compartment is storage for peat moss and toilet paper, and the left part is a stowage bin for maps etc that is reachable from the drivers or passenger seat (I suppose it could also be toilet reading material :)
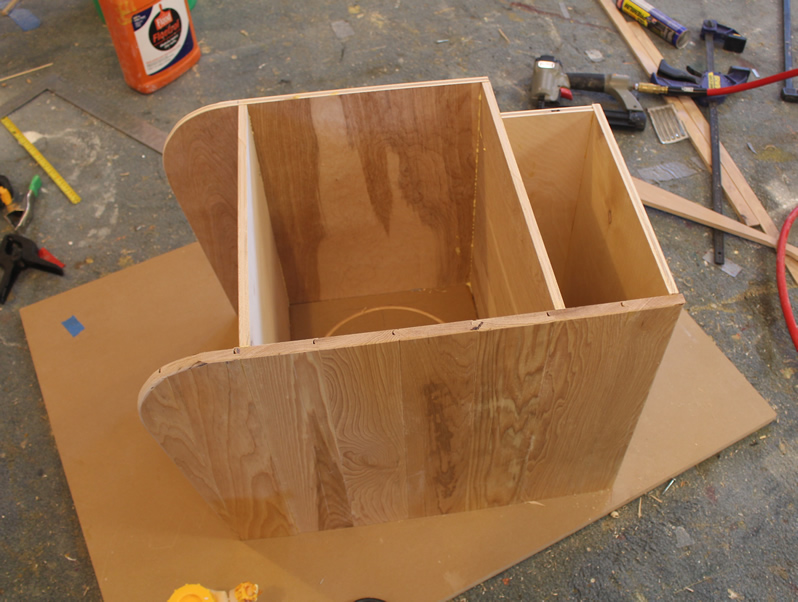
The base of the box is made from some 3/4 inch Medium Density Overlay (MDO) plywood I had left over.
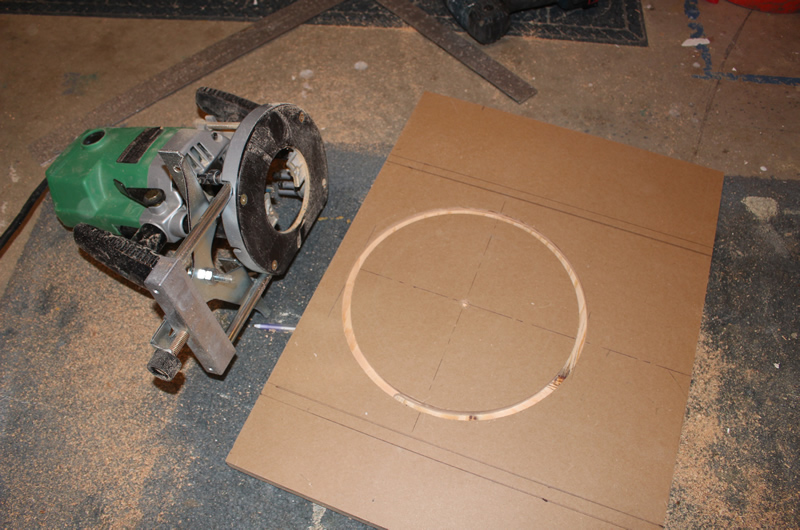
I routed a groove in the base for the bottom of the bucket to fit into.
The back and sides of the box are made from some left over half inch birch plywood.
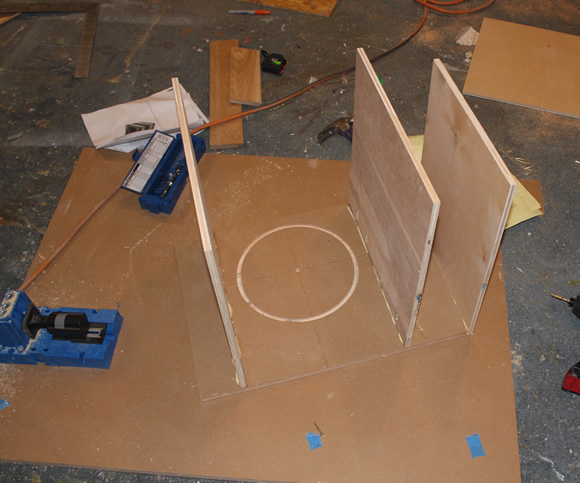
The partially assembled box.
|
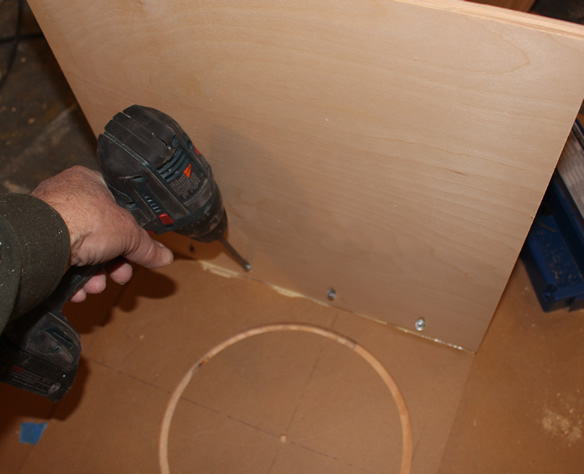
Using Kreg fasteners to attach the box fore and aft internal partitions.
|
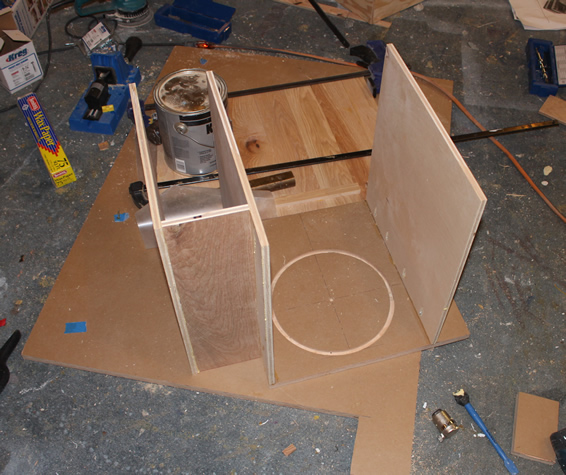
The back, outer sides and front are just nailed and glued to the base board.
|
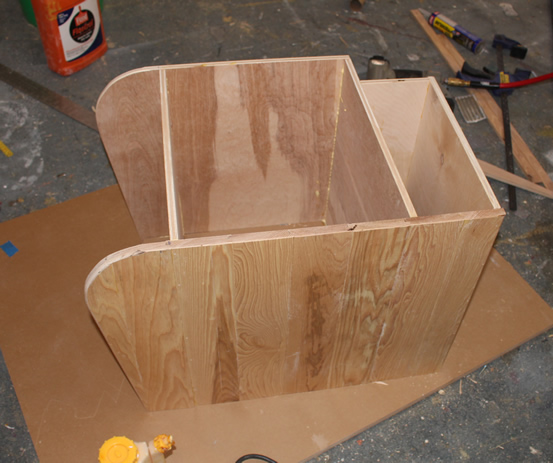
Mostly finished box. |
The front of the toilet box is made from the same Hickory boards that we used for the galley cabinet -- I had some of this left over from the galley cabinet and thought it would be nice to have the two cabinets match.
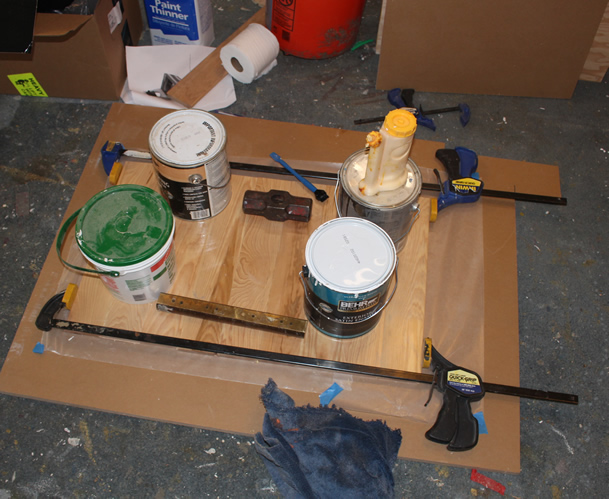
Edge gluing the pieces of Hickory flooring together to make the front face.
The paint buckets are just weights to keep things flat while the glue dries.
They were first surface planned down to about 5/8 ths thick to remove the flooring grooves
|
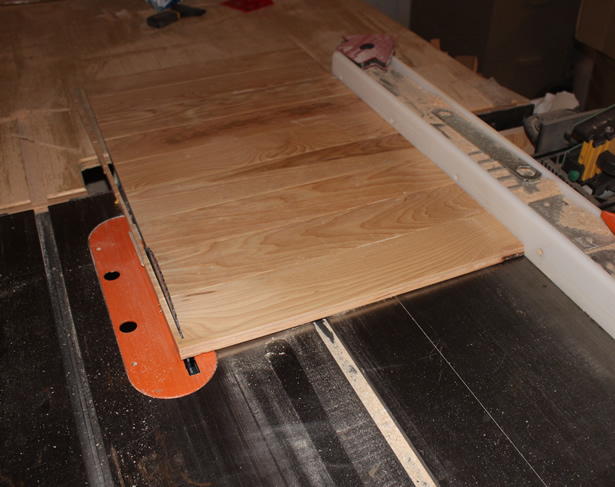
Trimming the front fact to final size.
|
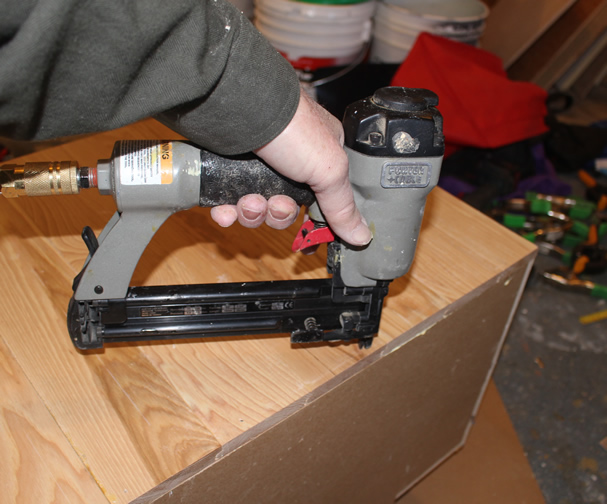
Using 1 1/4 inch finish nails with glue to secure front (same for sides and back).
|
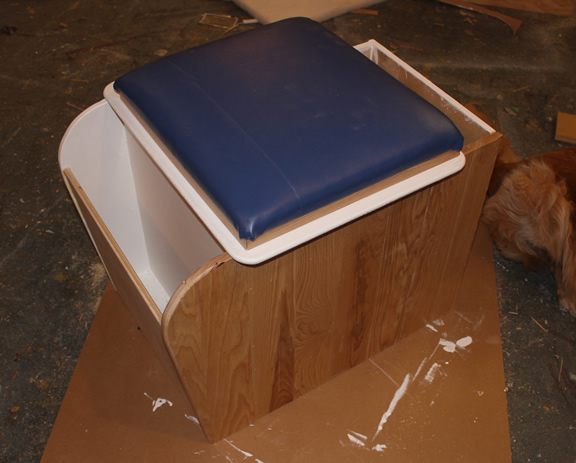
Finished box.
|
The Seat Cushion
The seat cushion fits over the toilet seat -- it provides an extra place to sit and seals the opening of the toilet so insects cannot get in.
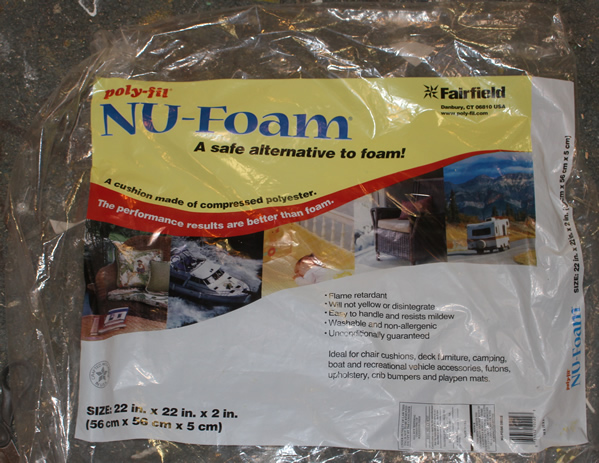
The padding material for the seat cushion from the fabric store.
|
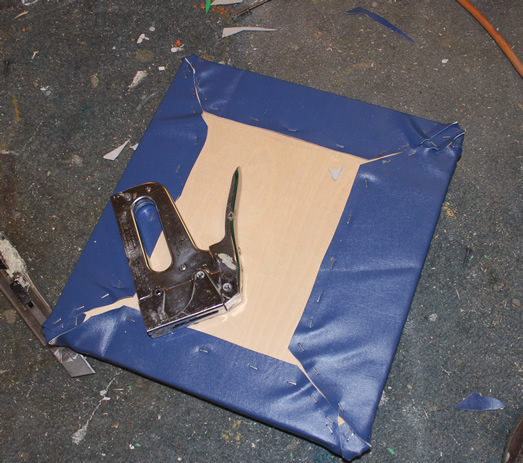
The blue vinyl is also from the fabric store.
The blue fabric is just pulled over the padding, turned over, and stapled to the back,
which is a sheet of half inch plywood.
|
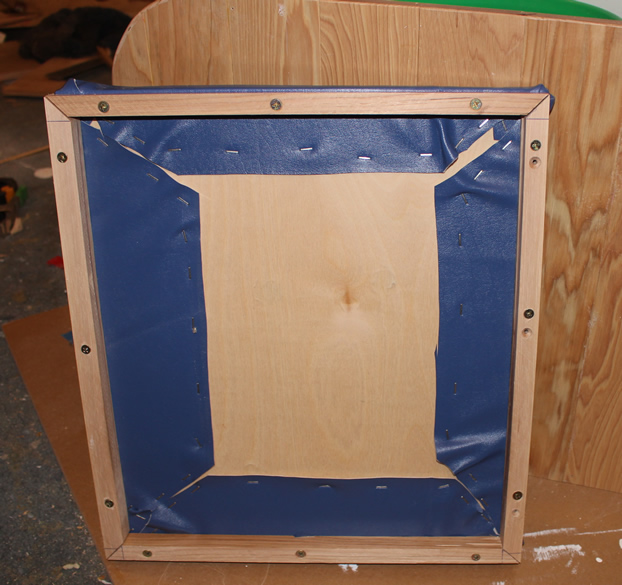
The seat cushion is framed on the bottom with some scrap Hickory -- this spaces the seat
cushion up the height of the toilet seat, and allows the seat cushion to fit snuggly against
the flats on the toilet seat.
|
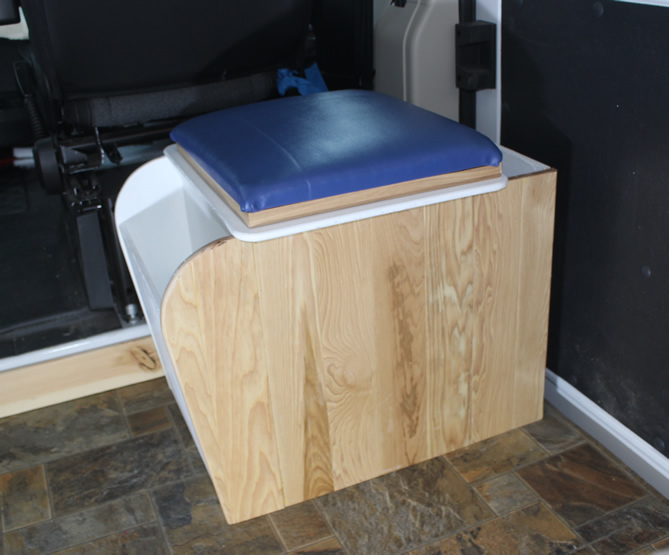
Seat cushion in place. Its just a friction fit for now.
|
Bucket
Some pictures showing how the poo bucket and pee bottle fit in the box.
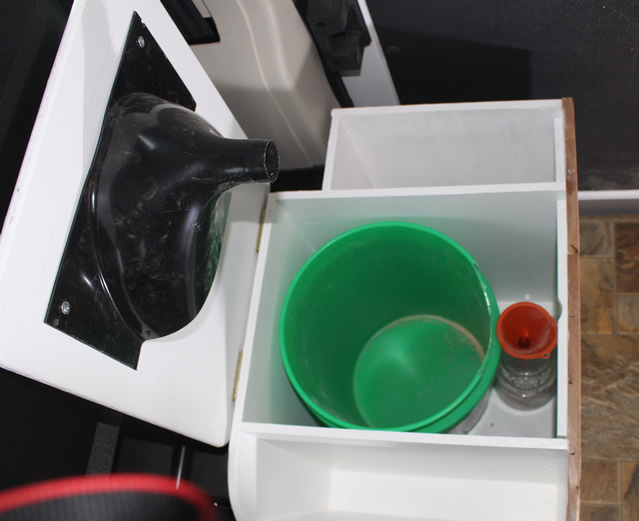
Poo bucket, pee bottle and urine diverter as they sit in the box. |
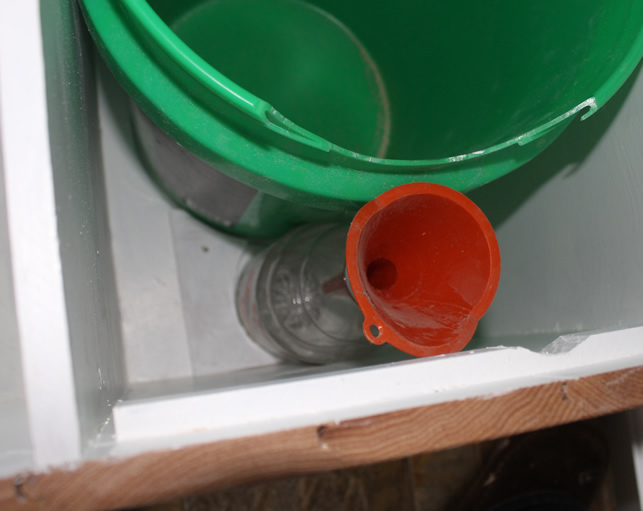
Closeup. The piece trimmed out of the lip of the green bucket is to allow the urine diverter and lid to close on the bucket.
|
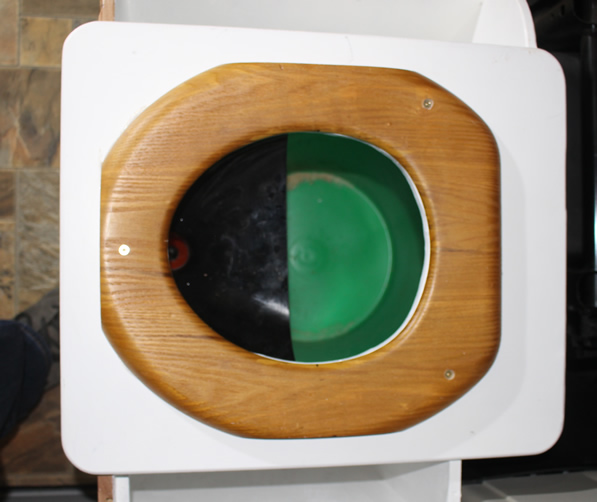
Shows relationship between urine diverter and toilet seat. The diverter extends about half way back in opening, and the front edge of diverter lines up with front edge of toilet seat opening (at least for this toilet seat).
|
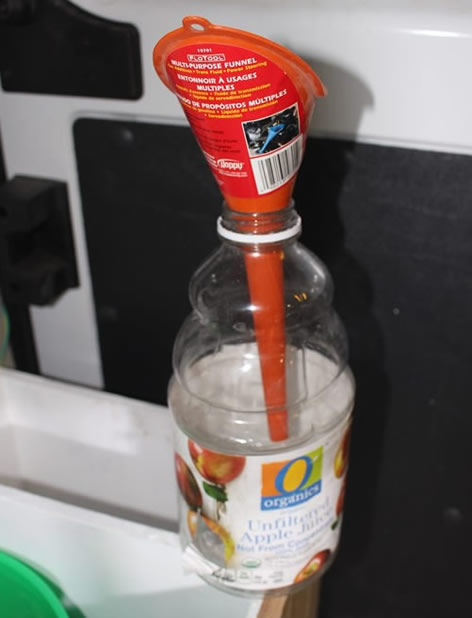
Pee bottle and funnel.
|
The little funnel channels the urine from the urine diverter into the pee bottle. I was going to use a piece of tubing, but ran across the funnel lying around, and it seems to do the job. The vertical stack up of pee bottle, funnel, and urine diverter is near perfect.
Vent Fan
Based on the references, I wanted to be sure to include continuous low flow volume ventilation of the toilet box with the vent flow exhausted to the outside. This helps to keep an aerobic composting process going and helps to avoid the more smelly anaerobic process -- it also carries away any potential odors.
The fan for the venting should be low volume, low power, and low noise as it runs all the time. I had a few 12 volt fans on hand and tried them out to pick the quietest one. The selected fan is about 2 inches on a side, and uses 75 ma, or about 0.9 watt -- this is about 1.8 amp-hours a day out of the 200 amp-hour house battery.
The jury is still out on whether the fan is quiet enough -- if not will have to buy a quieter one.
The fan is on its own fuse, and since the wires going to it are small gauge, I'll use a small fuse.
Also included an on/off switch near the fan so that if the toilet was not in use for a long period the fan could be turned off.
The vent fan is siliconed to the top of a 2 inch PVC coupling, which it fits nicely. I did not want to drill a 2+ inch hole through the floor, so I used a reducing bushing to cut the size down to 3/4 inch PVC (which fits through a hole slightly over 1 inch in diameter). I ran the 3/4 inch PVC through the floor and siliconed it all in place. I'm not sure if reducing the diameter down to 3/4 inch will reduce the flow too much, but it still seems pretty good -- will make the hole larger if need be.

The hole in the lower right is for the 3/4 inch PVC pipe exhaust vent -- it extends down through the van floor. The vent fan is siliconed to the top of the 2 inch PVC coupling. |
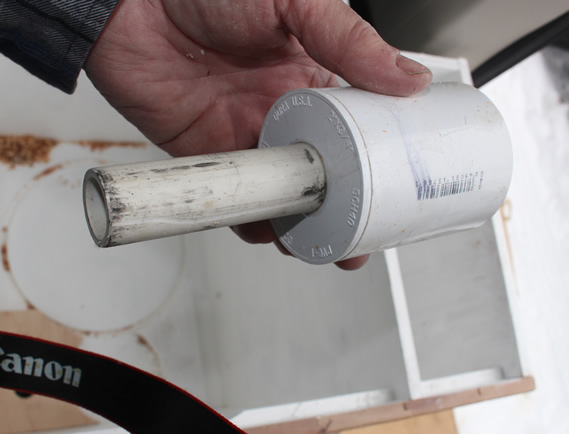
2 inch PVC coupling with 2 by 3/4 inch reducer and the short piece of 3/4 inch PVC pipe that extends down through the floor. |
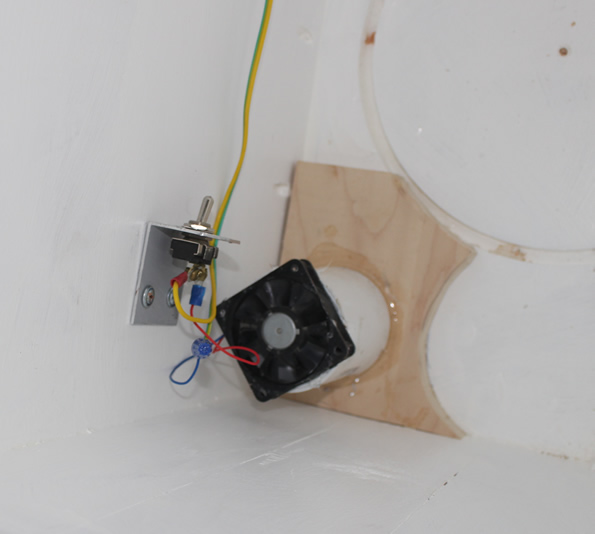
Exhaust fan siliconed to the top of the 2 inch PVC exhaust vent. A toggle switch allows the fan to be turned off, but normally it runs all the time.
|
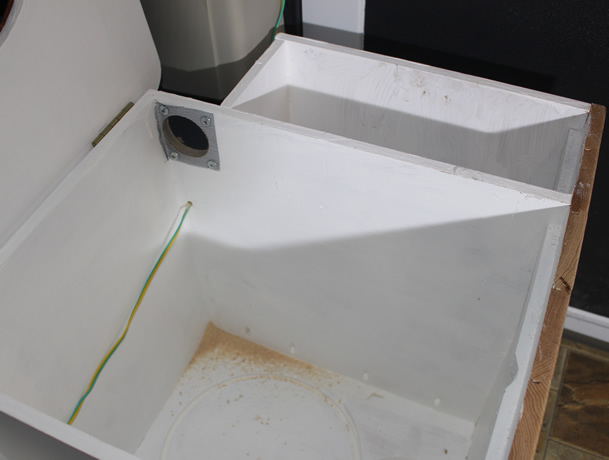
The screened air intake opening is on the opposite corner of the toilet box from the exhaust fan.
|
Still in Doubt
We have not used the toilet yet -- plan to soon.
Even though there were some good examples out there to model the design after, I'm still in doubt about a few things:
- Whether it will be necessary to mix up the poo bucket to keep enough air in it to maintain aerobic composting.
- Whether the ventilation air flow will be sufficient and whether the air flow pattern through the toilet compartment is correct.
- How often it will have to be emptied.
Cost, Weight and Time
This took a fair bit of time as I built a prototype first to get the geometry right, and then
| Item |
Cost ($) |
Weight (lb) |
| Urine diverter |
$55 |
1 lb? |
| Plywood and Hickory |
on hand |
31lb? |
| 5 gallon bucket |
free |
2 lb? |
| Toilet Seat (only part used) |
$15 |
2 lb? |
| Cushion cover and filling |
$12 |
1 lb? |
| Total |
$82 |
37 lb (weighed) |
The urine diverter was ridiculously expensive for a simple piece of molded plastic, but I could not find anything cheaper.
The 37 lbs is the actual weight of the finished toilet.
Comments
Comments and Suggestions...
Go back to the main camper van conversion page...
Gary
January 7, 2015
