Search
The Renewable Energy site for Do-It-Yourselfers
Solar Air
Heating Collector Testing -- Which DIY Solar Collectors Perform the Best?
|
DIY solar air heating collectors for
space heating can offer the best bang for the buck of any solar project I know
of. They are simple and cheap to build and can have payback periods that
are as short as one season. They offer a particularly attractive option to the
Do-It-Yourselfer -- commercial solar air heating collectors with prices pushing
$2000 can literally be built as DIY projects for $200!
The biggest question facing
someone wanting to build one of these collectors is to decide which of
the many collector designs out there to build. Its fairly easy to
look at the designs and evaluate construction difficulty and cost, but
the big missing factor is the efficiency of each design.
The aim of the test program described
here is to test the heating performance of the common DIY collector designs in a
consistent and accurate way in order to provide good performance
comparisons. Its surprising that after
all the years that solar air heating collectors have been around, there is
little material available that provides objective comparisons of the various DIY
collector
designs, but that appears to be the case. There are also some relatively new designs for which there is
essentially no performance data available.
|
|
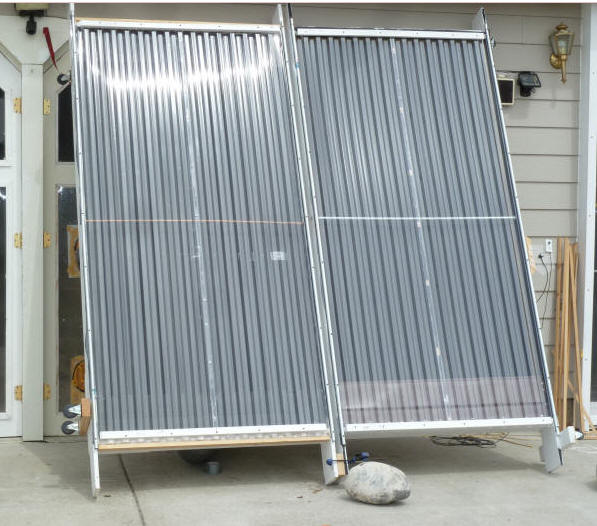
The method used was to build 4 by 8
ft prototypes of several different designs and test them side by side.
Side by side testing of collectors eliminates a lot of the difficulties in doing
good comparison tests of collectors -- if the two collector designs being
compared are sitting right next to each other and aimed in the same direction,
then the performance of the two can be compared in a pretty straight forward way
-- you don't have to worry of variations in sun intensity, ambient temperature,
wind, ... because both collectors are seeing the same conditions.
In each of the side by side tests, a new collector design was tested next to the
same baseline design collector that is the same each time. So, all collector designs were compared to the
same baseline design (except as noted below).
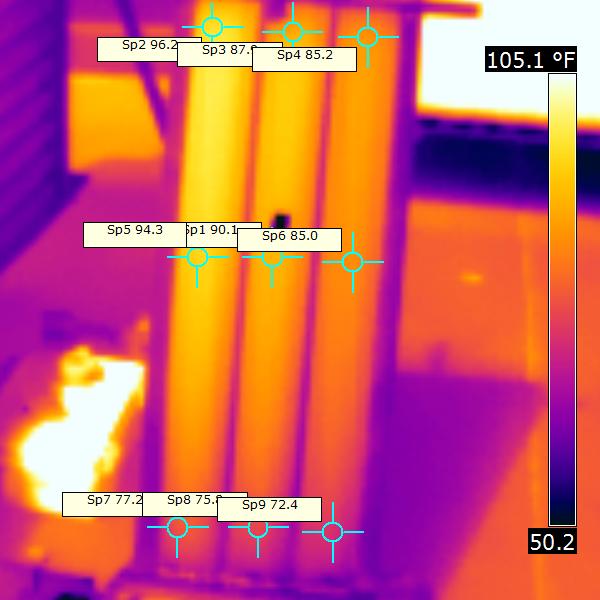
Heat
output from a collector is directly proportional to the product of the
(temperature rise through the collector) times the (flow rate through the
collector). If two collectors are running side by side, and the airflow
through the two collectors is adjusted to be the same, then the collector with
the larger temperature rise from inlet to outlet is the more efficient
collector, and the relative efficiency of the two collectors is in the ratio of
their temperature rises.
My partner in crime for this
testing was Scott. We ran similar tests on similar collector designs and
got similar results.
This is the link
to Scott's website with the details on his testing... Scott is also
the founder of the
Yahoo
Simply Solar discussion group, and some of this air collector testing has
been discussed there.
Scott has put together a very good
video that
explains the basics of solar air collector design and testing... If
you are a little fuzzy on what makes a solar air heating collector design good,
this is a great video to watch -- all the Physics without the boredom.
I am a bit hesitant about putting
this first winters material up because of some variations and inconsistencies in
the way I did the testing (see below for details). But, there is a lot of
good information, and I've decided to make it all available despite a few warts -- just be sure to read all the cautions. The
fact that Scott and I were able to independently come to the same ranking of the
collectors makes me more confident of the conclusions. Hopefully next seasons testing
will bring even more clarity to the DIY solar air heating collector picture.
The links just below provide the
details on each of the collectors and the tests done on them.
The tentative conclusions
for this season of testing are listed further down this page.
Backpass Collector
(the initial reference collector)
Backpass Collector Construction...
Backpass Collector Test Dec 4, 2010...
Backpass Collector Test Dec 5, 6, and 7, 2010...
Empty Box Collector
Empty Box Collector
Construction and Performance Test Dec 17, 2010...
Aluminum Soffit Collector
Aluminum Soffit Collector
Construction...
Soffit Collector Test
1/3/1011...
Screen Absorber Collector
(the final reference collector)
Screen Absorber Collector
Construction...
Screen
Absorber Collector Testing...
Downspout Collector
Downspout Collector Construction...
Downspout Collector
Heat Transfer Around Periphery Test...
Downspout Collector Flow Distribution Test...
Downspout
Collector Performance 110511...
Pop Can Collector (new July 2013)
Pop Can Collector Construction...
Pop Can Collector Performance...
Reference Material
Measuring Collector Airflow...
Measuring Collector Airflow with Pitot
Tube...
Reference
Areas, Volumes, etc. used in the tests...
Tentative Results for Winter
of 2010 -
2011 Tests:
This is a tentative ranking of the collectors from best
overall down based on the testing that was done.
Screen Collector:
I ranked this the best because it has a great combination
of high performance, low cost, and is a very easy build.
This collector also has a low pressure drop which means a smaller (maybe quieter and
cheaper) fan can be used to drive it.
The screen collector surprised both Scott and I -- we initially included
it because it is easy to build, and the thinking was that even it is not up to
the performance of some of the others it might be a winner in low cost and easy
build.
As it turns out, none of the other collectors did better
in performance.
Performance rating: base -- this was the best
performer and is the base for performance drops shown below for the other
collectors.
Aluminum Soffit Collector:
In the performance area, this collector was basically
tied with the screen collector, and there may be further optimizations that
could be done to improve its performance from what was tested.
Its a relatively simple build, but harder and more
expensive than the screen collector.
The pressure drop through this collector is low (which is
good).
Performance rating: About equal to the base screen
collector
Downspout Collector:
While this collector did not perform as well as the
screen collector, I would hold off on judging performance until a more optimized
one can be tested.
On the negative side, its the most expensive of the
collectors listed here to build, and its not clear (to me) exactly what needs to
be done to the design to get a more even flow distribution.
The pressure drop through the collector is low (which is
good).
The downspout collector appears to be well suited to long
narrow collectors that might be difficult to do with a screen or soffit
collector?
Performance rating: In my test, 40 to 50% off the
screen collector, but my downspout collector was not optimized, and can improve.
Backpass Collector:
This is the old standby design that has been popular for
many years.
The version that we tested turned out to have performance that was not as good
as the screen collector.
The backpass collector had the highest pressure drop of
any of the tested collectors (which is bad).
There are a lot of variations possible on this design,
and its certainly possible that other versions would do better.
Performance rating: About 10 to 20% off the screen
collector. Optimization of the baffles would improve the backpass
collector.
Empty Box Collector:
This one certainly is the winner on ease of build and
cost -- its literally an empty black box with air blown through it.
The performance was poor.
Testing it sort of answers the question I get a lot
saying "Why not just build and empty black box and blow air through it? "
The answer is that you can do this, and it works, but you
are giving up a lot of performance compared to other designs.
It may be possible to start with an empty box design, and
figure out a way to add good baffling that would get a more even distribution of air
over the full absorber, and make this design much more competitive. On the
other hand, you could start with an empty box and add a couple layers of screen
:)
Performance rating: About 50% to 60% off the screen
collector -- that is, adding two layers of window screen roughly doubles the
heat output!
These results agree with Scott's tests with the
exception of the downspout collector, which Scott did not have a chance to do a
side by side test on. I think that it is significant that we were able
repeat each others results with completely independent test setups.
Things to bear in mind in interpreting the performance
results:
-
None of these collector designs has been optimized
for best performance. They can all likely benefit from design
refinements -- some likely more than others.
-
Coming up with a good method to measure airflow
accurately in order to insure that the two collectors being tested side by
side were getting the same airflow proved to be very difficult.
The methods used included: time to inflate a large bag of known size,
velocity measurements with a Kestrel turbine style anemometer, using the
flow generated voltage of PC fans in the collector flow, a hot wire
anemometer, and pitot tubes to measure. The methods changed from test
to test, and the fact that some of these methods have an unknown amount of
error introduces some uncertainty into the results.
-
The original plan was to identify one collector
design as the baseline, and to include this collector as one of the two
collectors in each side by side test -- this way each new design was always
being compared to the same baseline design. The original choice for
the base collector was the backpass collector. But, after testing the
screen collector and seeing how well it did with such a simple and easy to
build design, we decided to change the baseline to the screen collector --
this makes it easier for anyone who wants go join in this testing to do so.
But, this again introduced a bit of uncertainty in the test program.
-
The weather was different for each test, so basically
each pair of collectors was tested on a somewhat different part of its
efficiency curve. This was one of the main reasons for always
including the baseline collector in each test. I did attempt to
do each test on a clear day with outside temperatures that are typical of
real winter conditions (the downspout collector test was the one exception
with a fairly high 49F ambient temperature).
One final note on the testing is that as a sort of check
on the whole process, I built a 2nd screen collector that is the same as the
first one. I tested the two screen collectors against each other in a side
by side test. I used the same setup, blowers, flow measurement techniques
as are described above for all the other tests. So, this is a check on the
whole side by side method of testing and on the instrumentation. The
difference in heat output between the two was 3%. Of course, if both
collectors were completely identical and the instrumentation, flow rate setup,
... were exactly the same for both the heat output difference would have been
0%. I guess that one message here is don't be looking at differences of 2
or 3% as significant -- these kinds of differences arise from small differences
and construction and measuring techniques.
I'm probably going to do more testing next winter with an
eye toward repeating some of these tests with a better airflow measuring setup,
and then (hopefully) get into some changes to improve the design on some of
them.
I'd very much like to hear from anyone who has ideas on
what was done this last winter and what might be done next winter. Any
feedback on whether any of this was helpful in deciding what kind of air
collector to build and/or deciding to build one at all.
Gary...
Gary December 11, 2010, January
3, 2011, May 14, 2011