
Search
The Renewable Energy site for Do-It-Yourselfers
Using the Homemade Blower Door
|
This page covers using the DIY blower door made from a
furnace blower.
It goes through the process of installing the blower "door" in a
window and setting it up. How to search for leaks. And, how
to take pressure measurements that will allow you to calculate
infiltration rates and heat loss due to infiltration.
Back to the main page on the DIY Blower
Door... |
|
Using the Blower Door
Please don't do anything with your new blower door fan until you read through
the safety note and read through this
section and read through some of the references ... This is not just the pro forma make the
lawyers happy boilerplate -- there really are safety hazards if you use the
blower incorrectly.
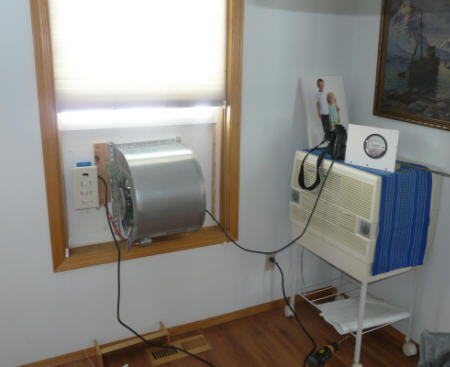
Install the blower in the window:
Find a good window with enough working room around it and with a clear space
outside the window so the fan flow will not be restricted. Be mindful of
things that might get pulled into the fan when its running. Make sure
there is a power outlet nearby. Remove any window screens before
installing.
Blower door installed in the window frame.
Note how the tube from the pressure gage goes out through a hole in the blower
mounting door -- this
tube must extend several feet so that it is not effected by the blower and is in
a sheltered area.
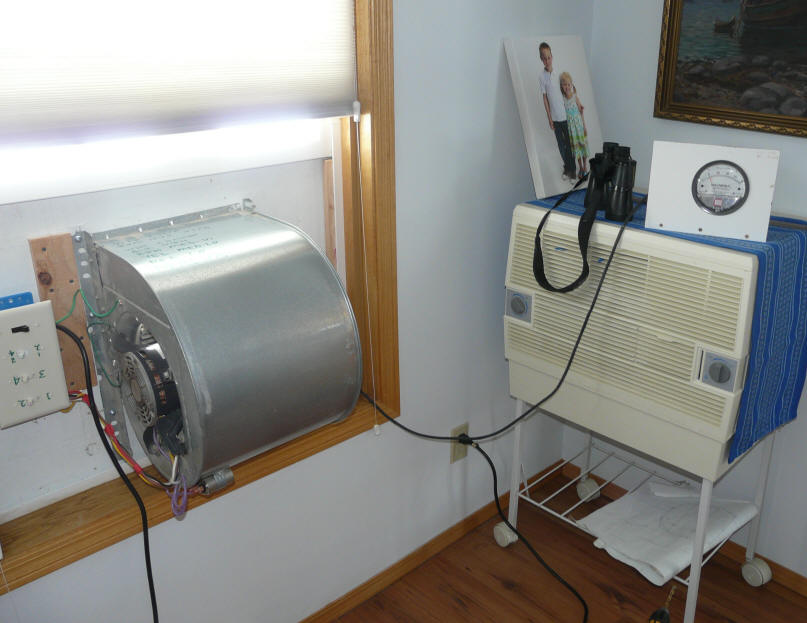
Seal the furnace blower into the window so that there are
no air leaks around the edges of the plywood mount board. I use wood
spacers to force the mounting board against one face of the window frame as
shown in the picture below. Use something like masking tape to seal any
remaining leaks -- this may be easier to do from outside.
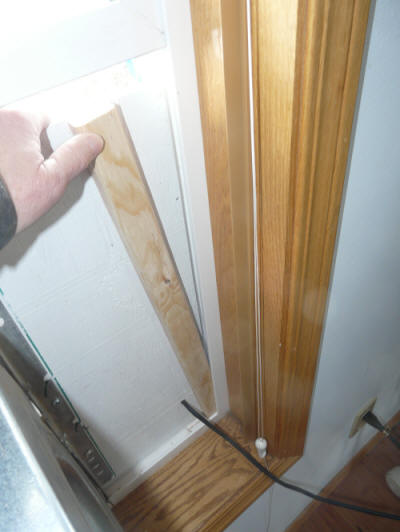
The wood spacer or shim being put in place to lock the mounting
board against one face of the window frame.
The tube going outside from the manometer is also visible.
Be very careful not to let anything be drawn into the fan -- be particularly
careful of curtains.
Since the furnace blower is not variable speed and has only 4 fixed speeds,
its not likely that any of these speeds will give the standard 50 Pa of
depressurization. But, noting the pressure drop for at least two of the
speeds, its possible to interpolate a fairly accurate flow rate for 50 Pa.
Before you turn it on:
- Make sure nothing is going to get pulled into the blower when its
running -- curtains, nearby loose stuff, cats, pictures of the grandkids,
...
- Turn off all combustion appliances in the house -- gas water heater,
furnace, fireplaces, ... If these appliances are running when the
blower door is on, the blower is likely to back draft the exhaust vents and
pull combustion products into the house. For the furnace, the
thermostat can just be turned down to a very low temperature.
- Make sure any fireplace or wood stove fires are dead out, and remove the
ashes or cover them with taped down paper so that if the blower pulls a lot
of air down the flue it won't blow ashes all over.
- Close the dampers in fireplaces and close the doors on gas fireplaces.
- Make sure that kitchen and bathroom exhaust fans are off and that the
clothes dryer is off.
- Close all the exterior doors and windows. Close fireplace dampers.
Close the doors or other openings to areas of the house that you don't heat.
Pet doors can be big leaks, and you may want to leave them initially open to
see how big, but you will probably want to close them off for most of the
testing.
- If its a windy day, and you want to get accurate pressure drop readings,
you may want to wait for a more calm day.
In general, any path for air to follow from inside the home to outside that
is not a normal infiltration path should be closed.
Running The Blower:
Once you have double checked all the cautions above, you can turn the blower
on. I'd start with low speed, and once its running, go around the house
and make sure nothing is amiss. Then you can step it up to a higher speed.
Then take another tour around the house to make sure nothing is amiss.
Finding Leaks
I've not really seriously gotten started on using the blower door to find
leaks in my house yet, so this section is mostly reports from others. I'll
add my own experiences later.
Before you start looking for leaks, note the pressure differences you get on
all fan speeds so that you have a record of what the house started at.
Also make a note of any parts of the house you have closed off or sealed up pet
doors -- that is, note anything in the house configuration that would effect the
pressure differences so that you can recreate this configuration when you retest
after sealing leaks.
To find leaks, set the blower door to a speed that gives a good
depressurization -- this will make the leaks more obvious. Some references
recommend a depressurization of about 30 Pa, but this is not at all crtical.

Pressure gage during the test indicating about 0.15 inches
of water or about 38 Pa.
These pressures, by the way, are not going to pop your ears or anything like
that -- they are pretty modest.
With the blower running, start looking for leaks.
Most people report that using the back of the hand is about as good a way to
find leaks as any. You can wet the back of the hand with a wet cloth to
make it more sensitive.
There are also devices like smoke pencils or chemical smoke puffers that
generate a little smoke that will indicate airflow leaks. With the the
blower door depressurizing the house, an area that is leaking will stream the
smoke quickly away showing where the leak is. This video from
Minneapolis Blower Door shows some smoke testing for leaks.
Where To Look For Leaks
Inside the main living area, the usual places to check are:
- around windows,
- around doors
- along the floor/wall junction
- cabinets (like sink cabinets)
- electrical outlets
- around heater duct outlets
- fireplaces
- attic hatches
- whole house fan openings
- can lights
- pet doors (see below)
- any kind of dropped ceiling area
- Kitchen cabinet soffits
For the reasons listed just below under "High and Low", I would also check
things like outlets and baseboard for interior walls. These interior walls
may have openings through the top plate and into the attic (eg for wire or
plumbing), and the stack effect will tend to pull in air from the room, up
through the interior wall and up into the attic. The blower will result in
the reverse flow -- that is, into the room.
One thing we found some time back was that our dog door was a major leaker.
We replaced it with this dog door, which seals
much better... In starting our blower door tests, I simulated our old
pet door by pushing the flap open on our new door, and then just letting it
settle back to where the blower flow kept it part way open -- this change alone
dropped the manometer pressure by 25%!

As you find and fix leaks, go back and check the pressure gage and see if you
can see any difference. Either way, you will probably want to keep a
record of what leaks you fixed and how much they effected the pressure gage
reading.
High and Low
For most homes (they say) the leaks listed above, while they may be
significant, are not likely to be the largest leaks in most homes. The biggest
leaks will more likely be from the living space up into the attic and from the
outside into the basement or crawl space (eg leaks along the rim joist just
under the flow). The reason for this is that the house is the stack effect
that the heated air in the house creates -- warm air wants to rise up to the attic, and
this pulls cold air in down low. The stack effect will result in a
slight negative pressure in the lower part of the house which tends to pull
outside air in, and a slight positive pressure up high in the house which tends
to make air flow into the attic or outside.
If you have combustion appliances that are subject to backdrafting, you
should work on the attic (high) side of this equation first, and then move to
the basement or crawl space side.
Up in the Attic
Venturing into your attic can uncover a lot of evil leaks. Here are
some of them:
- The attic access hatch or pull down stairs can be a major leaker, so be
sure to test with with your hand or smoke. There are some commercial
and DIY approaches to sealing up
the hatch better...
- Once you get up in the attic, find the top plate of one of your interior
partitions and pull the insulation away so you can examine it along its
length. If you see wires or pipes coming up into the attic through the
walls top plate and the holes have not been sealed up, then your should
figure on sealing up these wire and pipe penetrations using something like
Great Stuff foam in a can. You should do this for all wiring and
plumbing penetrations from the living space up to the attic.
- Look for any places where the insulation is stained dark by air from the
living space flowing up through it. When you see this kind of
staining, look for the air source causing the staining and seal it.
- Find the places where any kitchen or bathroom exhaust fans are installed
and make sure the housings are sealed to the ceiling and any case holes
plugged.
- Can lights can also be a major leak path. If you have cans that
are approved for insulation contact, then pull the insulation away, seal
around the can, and pile the insulation back up on them. If your cans
are not approved for insulation contact, you can either replace them with
ones that are, or another approach is to buy one of the LED inserts for can
lights that converts the can to an LED fixture -- them tape up the holes in
the can with alum tape and seal the ceiling penetration with Great Stuff.
- Look around carefully for any dropped ceiling areas or discontinuities
in the framing that may have not been insulated or sealed properly.
Look at the places where there are discontinuities like dormers, porches
joining the house, etc. These can be very major leakers if not done
properly.
- Check chimney and flue penetrations. If they are not sealed, then
seal them with an appropriate high temperature material made for that
purpose.
- While you are up in the attic, check any heating or cooling ducts that
go through the attic. All of the joints and seams should be sealed
with duct mastic or tape that is approved for ducts (regular "duct" tape is
not approved and will have a very short life). Uninsulated ducts
should be insulated. Some of the studies show that on average homes
30% of the heated air never gets to the heat registers because it is lost
out of poorly sealed ducting -- 30%!
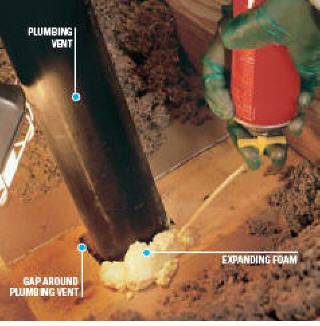
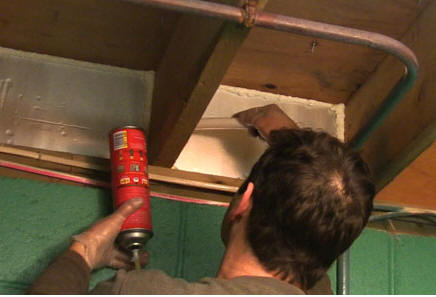
Sealing a pluming vent with foam in a can.
Clearly, this is all stuff you want to do before adding more insulation to
the attic as the new insulation will just make it more work to do the sealing.
One thing to note is that if the ceiling on the living space is not well
sealed from the attic, that a powerful attic exhaust fan can make these leaks
much worse by depressurizing the attic and will likely do more harm than good.
There are some good references on
measures to take in the attic here...
Basement and Crawl Space
Some of the things to look for in sealing the basement or crawl spaces:
- The rim or band joist around the periphery of the foundation is a
notorious source of air leaks. There are lots of places for
cracks: the sill plate to foundation, the sill plate to rim joist, the rim
joist to floor, and joints in the rim joist all make for cracks --
especially as the lumber dries out and shrinks. Some links below for
rim joist sealing.
- Plumbing, electrical and duct penetrations of the basement ceiling into
the first floor should be sealed with Great Stuff or the like.
- Any holes left open by the framers in the basement ceiling should be
sealed.
- Basement windows are usually not installed with much care and and may
have large infiltration leaks.
- As in the attic, heating or cooling ducts should be sealed with duct
mastic. If the basement is not a
conditioned space, then the ducts should be insulated.
- If you have a conventional ventilated crawl space, I would consider
converting it to a conditioned crawl space, which will reduce crawl space
heat loss and infiltration.
Sealing the rim joist.
Some links for basement, crawl space, rim joist sealing:
http://howtohomeinsulation.com/index.html
http://www.finehomebuilding.com/PDF/Free/021189072.pdf
http://oikos.com/library/sealing_rim_joists/index.html
If your efforts using the blower door are successful, bear in mind that some
combustion devices may have more trouble with developing a good draft to run
properly. If in doubt, an HVAC technician can run a check on your
combustion appliances to make sure they are not back drafting combustion
products back into the house. Gas appliances with blower forced draft or
sealed combustion should not be a problem.
Using a Fog Machine and Blower Door to Find Leaks
A theatrical smoke or fog machine located in the house
along with a blower door turned around to pressurize the house can be used to
find air leaks. In this case, the fog machine is started, blower door
turned on, and the leak spotters go outside and look for the smoke escaping the
house. The effect is apparently quite dramatic.
This
GreenBuildingAdvisor story gives some more detail...
Again, I will add to this section as I progress through
my leak exploration process.
Back to the main page on the DIY Blower
Door...
Gary February 22, 2013