Design Notes -- Low Thermal Mass Sunspaces
for Space Heating & Many Other Purposes
Introduction
There are some good existing guides on building regular sunspaces, but low thermal mass sunspaces are
not well covered. This set of notes covers some of the unique
advantages and characteristics of low thermal mass sunspaces as well as
providing some advice for designing and building a good one.
If you have a low thermal mass sunspace I'd love to hear about your
experiences with it --
email me, or use the Comments section.
What is a Low Thermal Mass Sunspace?
and, what can it do for me?
The amount of thermal mass included in sunspaces for heat storage depends on
what the heat produced by the sunspace is to be used for. If the heat is
used to keep the sunspace itself warm on a 24 hour basis, and to reduce the drop
in temperature at night, then a relatively large amount of thermal mass should
be included. This helps to keep the sunspace from overheating during the
daytime, and it keeps the temperature of the sunspace from dropping as much at
night. This approach is typically used when the sunspace is used for
growing plants that must be kept from freezing at night, or when the sunspace
area needs to be maintained at comfortable temperatures into the evening.
These sunspaces typically provide little heat to the attached house.
The other end of of the spectrum is the low thermal mass sunspace that this
guide is about. In this case, the amount of thermal mass in the sunspace
is kept as low as possible, and all of the excess heat is exported to the
attached house for space heating. The sunspace will be comfortable during
the daytime, but after sunset, its temperature will drop rapidly, and before too
long it will be close to the outside ambient temperature. The advantage of
this approach is that it produces quite a lot of heat for space heating the
house, while still providing extra useful space during the day for a variety of
activities like: play area, lounging area in the sun, laundry drying, workshop,
firewood storage and drying, food drying, ...
Low thermal mass sunspaces are (surprise) sunspaces that keep the amount of
thermal mass in the sunspace itself as minimal as possible. In a
nutshell, the advantage of the low mass design is that the sunspace heats up quickly when the
sun gets on it, and nearly all of the heat that the sunspace produces can go to
the attached house for space heating as opposed to being stored in the sun space
mass. The advantage compared to regular sunspaces is that they
provide considerably more space heating for the house. If well designed,
they are just as effective in house heating as similar size, high quality,
active solar collectors.
Other advantages (mostly shared with regular sunspaces) are:
They are true multipurpose family spaces that can be used for lounging
in the sun (even when its 10F outside), reading the newspaper, kids (or
adults) play area, workshop, ...
They provide a good year round area for drying laundry, which can add
substantially (1200 KWH a year) to the energy savings.
A place to store and dry firewood.
They can be aesthetically very pleasing and add value to the house.
While I personally think that conventional solar collectors look great on
any house, not everyone has come around to that viewpoint. Sunspaces
can be a solution that everyone (including your HOA) agrees looks great.
I don't know of any other solar project that is so cost effective from an
energy saving point of view, and that also provides a whole raft of other
benefits.
In a nutshell, here are the main design features of an LTM sunspace
are:
Large glazed area that is optimized for winter sun collection.
Low thermal mass in the sunspace (including floors)
Insulation for all non-glazed surfaces.
Finishes that absorb sun well for all surfaces.
A high capacity and quiet system to transfer heat from the sunspace to
the house.
Since low thermal mass sunspaces are intended for space heating in the
winter, the glazing should be optimized for winter conditions.
The sunspace guides and also the guides for greenhouses that are intended for
growing right through the winter give recommendations for glazing that are good
for low thermal mass sunspaces. In a nutshell, the glazing should face
south and use a high tilt angle (60 degrees up to vertical). Surfaces that
don't get a lot of winter sun should be insulated instead of glazed.
Double glazing will reduce heat loss from the sunspace to the outdoors, and
improve its heat output and efficiency. This is particularly true for cold
climates.
Insulation and Infiltration
For maximum space heating potential, all of the surfaces that are not glazed
and that face an outdoor area should be insulated. This prevents the heat
you collect from being lost out the sunspace walls, ceiling and floors.
This includes not only walls and ceiling, but also the floor. Since the
sun will likely shine directly on the floor, it will heat up, and, if not
insulated a lot of this heat will be lost through the floor.
As a guideline, I would say that only a small fraction of the heat collected
through the glazing should be lost out the other sunspace surfaces.
Like any collector, It is inevitable that a significant amount of heat will be
lost out the collector glazing, but, other than using double glazing, there is
not much to be done about that. But, losses out other surfaces can easily
be cut to low levels using insulation, and this should be done.
As a rough example, suppose you are building a sunspace that has 200 sqft of
good winter glazing, and has 350 sqft of non-glazed wall, ceiling and floor that
face the outdoors. Lets look at a sunny winter day with an outside
temperature of 20F, and an average inside temperature of 80F.
Your 200 sqft of good winter glazing will be gaining
about 36,000 BTU per hour
of heat.
If your 350 sqft of outside facing surfaces has no
insulation and is constructed with a single layer of (say) plywood siding, the
the effective R value is about 1. The heat loss for these conditions
through these uninsulated surfaces will be about (350 sqft)(80F - 20F) / R1 =
21000 BTU/hr. This is more than half of your solar gain -- clearly
this is unacceptable for an efficient sunspace.
Insulating all of the 350 sqft of surfaces to R20 would
reduce the heat loss to about 1000 BTU per hour -- only about 3% of the
collected solar heat. This seems quite acceptable.
Its probably worth noting that floors can be more difficult to insulate and
also may not have as much heat loss, so a somewhat lesser R value may be fine.
Vertical insulation around the periphery of the sunspace that extends at least a
couple feet downward might also be an option, but I would always include some
insulation in the floor itself, so that the mass right under the floor is not
cycled each day.
Note that east and west facing walls do have some solar gain -- particularly
in the spring and fall. If such walls are double glazed, they may do
about as well as insulating them.
For the same reasons that insulation is important, infiltration is also
important. The space should be built carefully with attention to not
leaving infiltration paths. This is more a question of taking some extra
time during the construction and does not add much cost.
Low Thermal Mass -- The key to high
efficiency
If you want to maximize the heat that the sunspace can transfer to the house,
its important to keep the thermal mass in the sunspace as low as possible.
If the sunspace has a lot of thermal mass, then much of the solar heat will go
into warming that mass up, and that heat will mostly be lost to the outdoors
after the sun sets.
Taking the same example we used above in the Insulation section, here are a
couple examples of how much thermal mass may cost in terms of solar heat that
does not get delivered to the house:
- 1000 lbs of wood mass warmed from 20F to 80F absorbs
30,000 BTU of solar heat that could otherwise go to the house.
- 4 inches of dirt over 150 sqft of floor warmed from 30F
to an average of 70F would absorb about 50,000 BTU of solar heat.
These are rough estimates, but it is clear that if your sunspace has a lot of
thermal mass that a significant fraction of your daily solar heat will be used
to heat this mass each sunny day, and that this heat will not get to your house.
Of course, if you want the sunspace to remain warm for a longer period of time
after the sun goes down, you may be willing to add thermal mass to accomplish
this and take a hit on heat to the house.
Low thermal mass floors seem like a particular challenge in that they have to
be tough enough to walk on, but you don't want them to be massive. Since
floors are often exposed to direct sun for an extended period each day, keeping
their mass low is important. Carpeting
over a light underlayment with insulation under seems like one approach that
might work. A wood floor with rigid insulation right under the wood might
be another option -- for our example sunspace with 150 sqft of floor area, a
half inch thick would floor would absorb about 5000 BTU -- a fairly small
fraction of the total daily heat gain. Got any other ideas?
If the sunspace has a deployable netting or shade cloth as suggested in the
Sunspace Livability section, then this will absorb
some of the solar radiation before it gets to the floor, and make a low mass
floor less critical.
The Potential Improvements section discusses some
ideas for storing heat in the sunspace that can be used for house heating after
sunset.
Heated Air Distribution -- Getting the hot air
where you want it - quietly
Low mass sunspaces produce a lot of heat and this heat has to be efficiently
transferred to the home living space. Since no one wants to listen to loud
fans, noise is a major design consideration.
In a nutshell, the fan and duct system that distributes heated air to the
house wants to:
Have sufficient flow capacity to transfer heat from sunspace to living
area under good sun conditions.
Be quiet in operation.
Have some adjustability in flow rate to handle the wide range of sun
conditions that occur.
Be rated to operate in heated air.
Duct systems want to be generously sized for quiet operation and low
load on the fan.
Include dampers that prevent the infiltration of cold air at night or on
cloudy days.
Each of these areas is covered below in more detail.
Fan Flow Rating:
Based on the tests on
our LTM sunspace, I would recommend about 3 cfm of fan capacity for each square
foot of glazing to handle the heat produced on a good sunny winter day.
This refers to the actual cfm delivered, not to the fan free air rating, which
will be higher than what the fan can deliver under load. If you can get the fan
curve for the fan you plan to use, then, as a rough indication I would use the cfm rating for 0.1 inches of water pressure drop. The 0.1 inches of water
pressure drop allows for the resistance of a carefully designed duct system of
moderate length.
For our example sunspace with 200 sqft of glazing the
recommended fan capacity would be about (200 sqft)(3 cfm/sqft) = 600 cfm.
Under sunny winter day conditions, the sunspace can
deliver about 33,000 BTU per hour. So, the fan must be able to move that
much heat.
If the air at the peak of the sunspace is 110F and the
return air from the house is 60F, and the fan is moving the recommended 600 cfm,
then the heat moved is:
Heat Transferred = (Flow)(air density)(Temperature
rise)(specific heat)
= (600 cf/min)(60 min/hr)(0.075 lb/cf)(110F - 60F)(0.24 BTU/lb-F) = 32,000 BTU
per hour
So, the 600 cfm fan is well matched to the example sunspaces heat output.
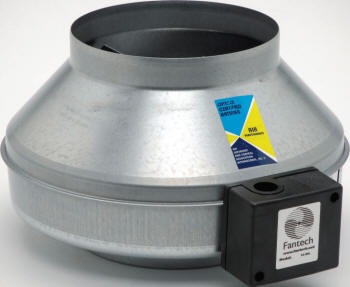
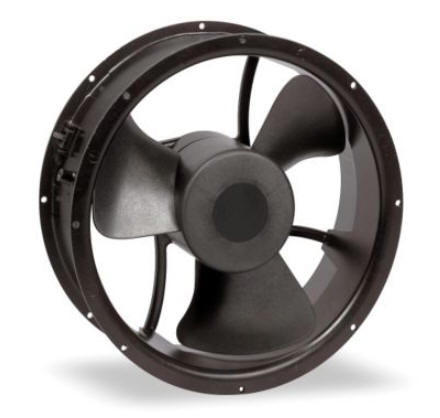
Looking at fans that might fit this, and assuming that
the duct system pressure drop is around 0.1 inches of water, a
Fantech FG fan in the 10 inch size delivers 597 cfm with a 0.1 inch pressure
drop. Or, two of the 6 inch or 8 inch fans, which would offer more
flexible control
(see below) might be a better choice. This is just an example to
illustrate fan selection, I'm not particularly recommending this model of fan --
the data on this particular model of fan says nothing about noise levels, so
this would be something to investigate.
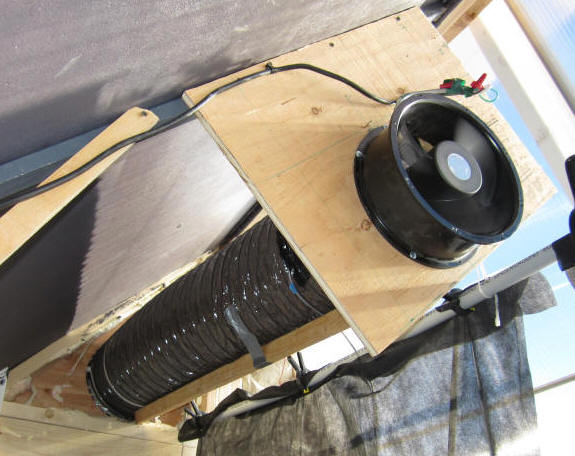
Our test sunspace used two of these
Dayton 10 inch fans. These fans were able to deliver about 325
cfm each with an about 10 ft duct system. The noise level was louder than
I would like with the fans right in the sunspace, but would probably be
acceptable if the fans could be moved outside of the sun and living space and
mounted carefully.
Just as a side note, these two fans use 27 watts each, and when the sunspace is
cooking, it delivers about 33,000 BTU per hour, which is equivalent to 10,000
watts. So, the Coefficient of Performance (COP) is about 185!
Ducting System:
If the area you want to deliver heat to is located on the other side of the
wall that the sunspace is on, then a through wall fan (or two) could be used to
transfer the heat. The fact that the fan would be hearable from both
spaces puts a premium on low noise level. Some form of variable speed
would also be desirable to cut down the volume of air when sun conditions are
not optimal. And, a closeable damper to keep cold air from entering the
living space at night
If the air must be delivered to a space that is a ways away from the sunroom,
then a ducting system will be required. There are
ducting sizing
calculators that can help in choosing the duct diameter. The duct
pressure losses (including bends etc.) should be kept low by using a relatively
larger diameter duct -- this keeps duct noise down and allows the use of a fan
that is quieter and uses less power. I think that keeping the total duct
losses under 0.1 inches of water is a good target if possible.
Fan Flow Rate Flexibility:
Since the amount of heat that the sunspace can deliver depends strongly on the
how good a sun day it is, and on the time of day, it is a good idea to provide a
fan/duct system that can vary its delivery rate. This might be done using
more than one fan and duct, so that under low to moderate sun conditions, only
one fan is used, and in full sun, both fans are used. Or, a variable speed
fan would also be a good solution.
Fan Temperature Rating:
If the fan is blowing the hot air from the peak area of the sunspace into the
living space, then the fan should be rated for the kind of temperatures it will
see in service -- probably up to around 120F. If the fan is in the return
air flow to the sunspace, then the temperatures will be low.
In some sunspaces, natural ventilation in the form of high and low vents in
the wall joining the house and the sunspace is used. The heated sunspace
air flows through the high vent and into the living space, while cool living
space air flows back into the sunspace via the low vent. I do not believe
that this kind of ventilation is sufficient for a low thermal mass sunspace --
they produces to much heat to move in this way. But, natural ventilation can
be a supplement to fan forced ventilation as in
Mike's sunspace.
If such openings are used, they must be closeable at night to prevent heat
loss.
Venting -- Prevent Overheating in the warmer
seasons
Low thermal mass sunspaces will need a good system to vent heat to the
outdoors when the heat is not desired. The vent system will be
needed during the seasons when you don't want the heat to go to the house, and
also for mild winter days when little house heat is needed, but the sunspace is
generating a lot of heat.
I think it fair to say that most people underestimate the mount of vent area
that is needed -- so go big on the vents.
I'll try to add some more specific recommendations here, but as a start,
looking at the venting recommendations for greenhouses with the same
glazed area would be a good place to start. This is one reference that
covers
venting requirements for an all season greenhouse... scaling these by
glazed area might be a good starting point.
Performance -- Can be excellent
Low thermal mass sunspaces are amazing producers of heat -- this section puts
some numbers to that claim.
Heat Output and Efficiency:
Low thermal mass sunspaces if designed to the guidelines listed above are very
efficient heat making machines. Our test sunspace indicates that they are
just as efficient as high quality commercial active solar collectors having the
same glazed area. This is quite an accomplishment given that you get all
the other multi purpose advantages that sunspaces offer in addition to very
efficient space heating.
As a rough guide, under full sun conditions, LTM sunspaces will deliver about
160 to 180 BTU per hour per sqft of glazed area depending on season.
In less sunny conditions (600 watt/sm), the delivery rates falls to 80 to 100
BTU per hour per sqft of glazing -- still a very useful amount of heat.
This section on the heat output testing we did on our prototype LTM sunspace
gives a great deal more
information on performance. In particular the
day 1 test has a lot on
sunny day performance.
We also tested our sunspace before certain of the design guidelines listed
above were met to get an idea what the sacrifice in heat output would be.
This is covered on this page on heat
output for a non-optimized
sunspace. In a nutshell, the heat output for the non-optimized
sunspace was less than half of the optimized sunspace under similar conditions.
I think that this large drop in heat output for deviating from the guidelines
for low thermal mass sunspaces is something that is not sufficiently covered in
most of the literature on building sunspaces.
Overheating:
Depending on the size of the LTM sunspace and the size of your house and how
thermally efficient your house is, there may be times when the sunspace can
produce enough heat to overheat your house. In these cases, the sunspace
heat can just be shut off, or the excess heat vented. But, for a lot of us, our
large heat leaky homes will take all the heat the sunspace can deliver on a cold
winter day.
During the day, as the sunspace warms the house, the house thermal mass is
also warmed, and this allows the sunspace heat to last a ways into the evening.
This will be more effective if the house temperature is allowed to rise somewhat
above the normal temperature you set.
The Potential Improvements section provides some thoughts on adding low loss thermal
storage to LTM sunspaces for cases where the sunspace routinely produces more
heat than can be used.
In any case, the consequences of having more glazing and heat production than
the house can routinely use is not as much of a problem as it would be on an
over glazed passive heated house in that the sunspace is separate from the house,
and excess heat output can just be shut off.
Sunspace Livability
Low thermal mass sunspaces can be quite comfortable during the day when the
sun is on them. The heat distribution system is continually removing heat
from the sunspace, so the temperatures in the sunspace remain comfortable.
During the middle of the day on a bright sunny day, and particularly if there
is reflective snow in front of the sunspace, the glare can be strong. To
control that, some form of shade cloth screen that lets a fraction of the sun
through and that is can be deployed across all or part of the glazing will cut
down on the glare. This is to some degree a matter of personal taste --
some people like the very bright conditions, and some prefer some
screening. Having a screen that can be easily moved into a position where
it provides glare protection, or out of the way for less sunny days makes the
sunspace comfortable under a wider range of conditions.
These are some of the example low thermal mass sunspaces from our website
section on LTM Sunspaces. They show the very large range of
designs and builds that are possible. Low thermlal mass sunspaces can
range from a sunspace built in an afternoon with a roll of poly film up through
very practical and cost effective sunspaces that can be built for a few hundred
to a few thousand dollars worth of materials, up to high end sunspaces with very
high level finishes that may cost hundreds of dollars per sqft.
The example list below gives a brief description of each LTM sunspace -- for
more details on each, follow the links.
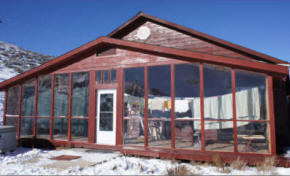
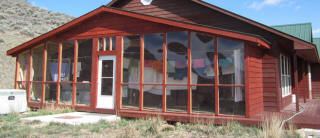
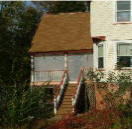
This
is Mike's low thermal mass sunspace in Colorado. It is used for a
variety of purposes including heating the house, drying clothes, kids
play room, drying food, and
reading the paper. In addition to all those uses, Mike is currently working on a way to integrate
solar water heating into the sunspace.
An exceptional job of blending the added sunspace with the existing house.
The variety of purposes that sunspaces can be put is what makes them exceptional
-- drying clothes alone saves about 1200 KWH and 2000 lbs of CO2 a year.
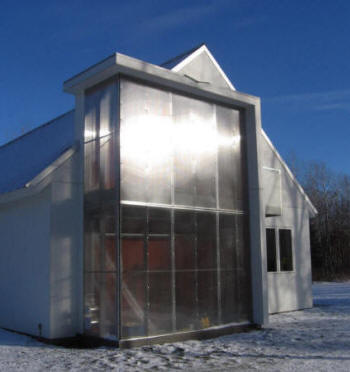
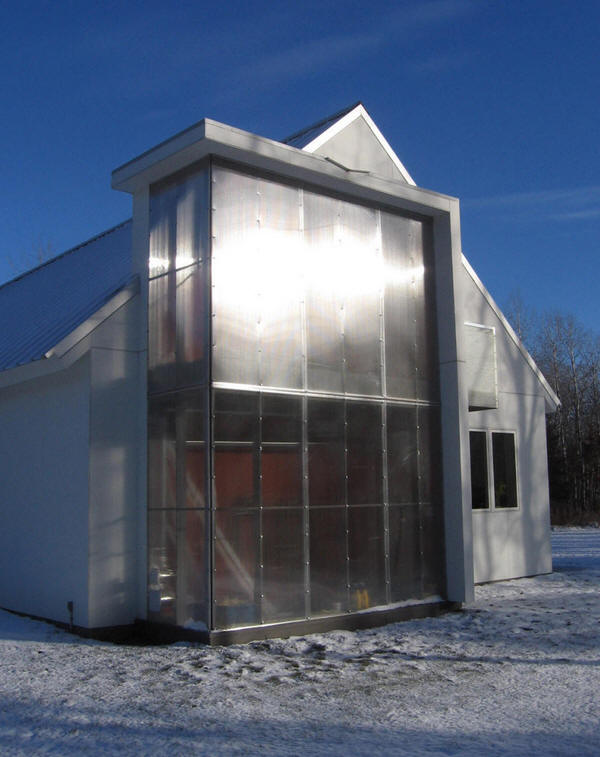
This
is Nick's new and cutting edge three story sunspace.
It includes a number of innovative features such as custom made DIY double
glazing, an experimental mesh system to improve collection efficiency, and a
unique heat distribution system.
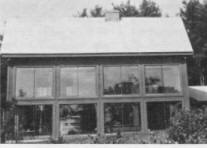
The Cliff house
designed by Norman Saunders uses a large, 2 story, low mass sunspace across
the front of the house that provides 100% of the heating demand for the
house all year.
The sunspace is coupled with heat storage systems in the attic and crawl
space that allow the home to achieve 100% solar heating.
A good article by Laren Corie on how to build and experiment with
inexpensive sunspaces. The example used in the article cost a grand
total of $22, and went together in a couple hours!
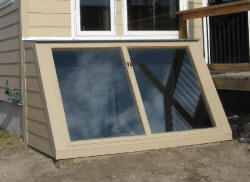
Mitch
calls this a "Hot-Box" collector, but I think it could equally be called a
mini-sunspace.
Very nicely built -- as Mitch says, its "wife approved".
Some performance estimates provided.
Note the use of the reflector to improve collection -- reflectors are
particularly effective in that they increase collection area without
increasing heat loss.
I would pass on the idea of adding rocks for heat storage for the reasons
discussed above -- unless you have a way of insulating the glazing at night.
Potential Improvements
While the sunspace discussed above as it is does a very efficient job of producing heat,
there are some things that might improve it.
Collector Efficiency:
What causes a sunspace to be less than 100% efficient? Two main
reasons:
Part of the solar radiation is absorbed by the
glazing itself, and never gets into the sunspace. For good single
glazing about 90% gets through, and for good double glazing a bit over 80%.
So, you lose 10 to 20% off the top to glazing absorbtion.
Heat loss out the glazing from the warm sunspace
interior accounts for most of the rest of the reason we don't see 100% efficient
collectors. This loss is partly conduction through the glazing from the
warm air next to the glazing, and partly radiation at thermal wavelengths from the
absorber toward the glazing.
Some things that might help:
Reducing the temperature of the air near the glazing to reduce
conduction heat loss through the glazing -- see Deep Mesh below as one
example.
Reducing the temperature of the absorbing surfaces, so that less heat is
radiated out the glazing. Efficient transfer of heat from the absorber
surface to the air is probably the main factor in reducing absorber
temperature. Good airflow on the absorber, lots of absorber surface
area, flow through absorbers (like screen), ... might all contribute to
lower absorber temperatures.
Selective surfaces that are often used in commercial active collectors that
have low emissivity in the heat radiation wavelengths might also help.
There are some glazing materials (like Teflon) that have higher light
transmittance and might be used for the inner layer of glazing on double
glazed sunspaces.
One thing the sunspace already has going for it is that air velocities next
to the glazing are quite low -- this reduces the efficiency of heat transfer
from the air to the glazing, and that is good.
Deep Mesh: Nick Pine's sunspacehas a fabric mesh that is fairly close
to the glazing. He introduces the supply air (probably around 65F) between
the mesh and the glazing. The mesh has enough air resistance to spread the
supply air over the full surface of the mesh. So, the sun heats the mesh,
and the uniform airflow through the mesh takes that heat away. The desired
end result is that the air next to the glazing and the mesh absorber will both
run relatively cool, and that this will reduce heat loss out the glazing, which
is what efficiency is all about. Hopefully as Nick gets further along with
his sunspace we will get a reading on how well this works.
Storage:
If the sunspace is large enough to routinely produce more heat than the home can use
during a sunny day, It would be desirable to be able to store some heat in the
sunspace for home heating use after sunset. While its easy to add mass to
the sunspace to store heat, the problem is that with the normal sunspace design
a lot of this heat will be lost out the sunspace glazing before it can be used
by the house.
Some possibilities would be
Movable insulation on the sunspace glazing. This would
reduce heat loss from the sunspace and would make the sunspace more
comfortable as well as allow storing house heat in the sunspace without as
much loss.
There are some sunspace and greenhouse insulation curtain designs out there
-- they tend to be somewhat difficult due to the large glazed area, but not
impossible.
Some of the commercial shades for home windows that have side tracks provide
R values up toward 4 (US).
It might be possible to provide movable insulation over sunspace thermal
mass. These insulation panels would be closed around the thermal mass
to reduce heat loss after the collection period. For example, one
might have water barrels along the north wall for heat storage with an
insulating curtain or panels that deploy after sunset to insulate the mass
from the sunspace. Forced air circulation around the barrels would
transfer heat to the house. Or, a water to air heat exchanger (eg a
radiator) could be used to transfer the stored heat to the house.
Another possibility would be to just have
a massive north wall that heats in the sun during the day, and has an
insulating panel or curtain over it at night. This would be like a Trombe wall,
and would transfer its heat to the house later in the day. The book
Movable Insulation, Langdon is a good source of ideas for (surprise)
movable insulation schemes.
Of course, if the sunspace is modest in size and the home is large and heat
leaky, then the thermal mass of the home will store some heat during the day
without the house overheating, and it will give that heat back after sunset.
Air Pickup:
An air system that picks up heat efficiently from the absorbing surfaces
would help to keep the absorbing surfaces cooler, and would reduce heat loss out
the glazing. Sunspaces provide a lot of room to work with, so maybe there
is a way to direct airflow so that it picks up heat from the absorber more
efficiently?
Absorber Design:
An absorber that absorbs the heat from the sun efficiently and transfers it
to the air efficiently will run cooler and lose less heat out the glazing.
For example
tests
of flow through screen absorbers in DIY solar collectors have
proven them to be a good deal more efficient than (for example) a bare black box.
Contrast to an Active Collector:
When used for space heating, the sunspace is being used as an alternative to a
conventional solar air heating collector to provide space heating.
Its interesting to think about some of the contrasts.
The flow velocities are much lower in the sunspace -- in most
places I can't measure them with a good air velocity meter and you really
can't feel them, but in a conventional collector, air velocities are fairly
high -- up toward 100 fpm and more.
In a conventional collector, there is usually a significant air
velocity along the glazing, where as in this sunspace its too small to
measure.
The surfaces that absorb the solar radiation are spaced further
from the glazing, are larger, and often run cooler.
The flow pattern in a conventional collector can (it seems) be
controlled with channels, baffles, screens. What would one do in a sunspace
to control and direct the flow to the desired areas?
The sunspace has more outer heat loss area and more potential leakage
area.
Do these differences offer some opportunities for greater efficiency?
Got other ideas? Use the Comments section below
or email me.
Gary January 18, 2013
Comments
Please use this comment area to make comments, ask questions, or pass on any
experiences you have had with sunspaces..


 This
is Mike's low thermal mass sunspace in Colorado. It is used for a
variety of purposes including heating the house, drying clothes, kids
play room, drying food, and
reading the paper. In addition to all those uses, Mike is currently working on a way to integrate
solar water heating into the sunspace.
This
is Mike's low thermal mass sunspace in Colorado. It is used for a
variety of purposes including heating the house, drying clothes, kids
play room, drying food, and
reading the paper. In addition to all those uses, Mike is currently working on a way to integrate
solar water heating into the sunspace.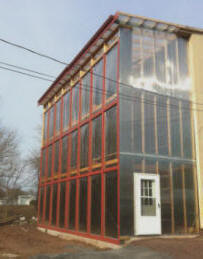 This
is Nick's new and cutting edge three story sunspace.
This
is Nick's new and cutting edge three story sunspace. 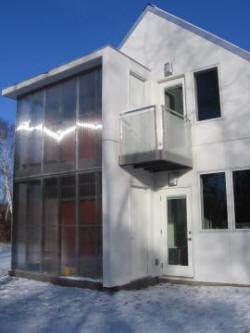
 The Cliff house
designed by Norman Saunders uses a large, 2 story, low mass sunspace across
the front of the house that provides 100% of the heating demand for the
house all year.
The Cliff house
designed by Norman Saunders uses a large, 2 story, low mass sunspace across
the front of the house that provides 100% of the heating demand for the
house all year. ESSN
Journal, Feb, 2005
ESSN
Journal, Feb, 2005
 Here
is another very low cost (actually zero cost) sunspace done by Ed.
Here
is another very low cost (actually zero cost) sunspace done by Ed.
 Mitch
calls this a "Hot-Box" collector, but I think it could equally be called a
mini-sunspace.
Mitch
calls this a "Hot-Box" collector, but I think it could equally be called a
mini-sunspace.